Well, this is a real reservoir problem: in an Iowa study of hundreds of deer sampled between April 2020 and January 2021, eighty percent tested positive for COVID-19.
Upcoming: "Functional Aesthetic" at the Le Mars Arts Center
in Exhibitions
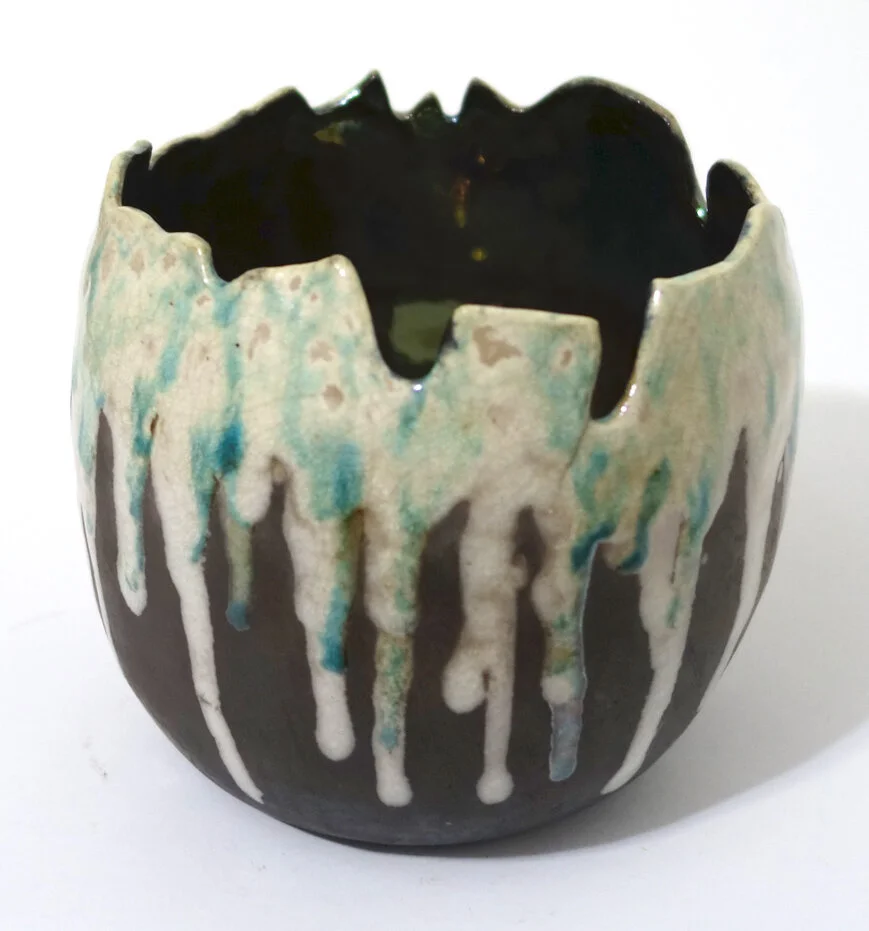
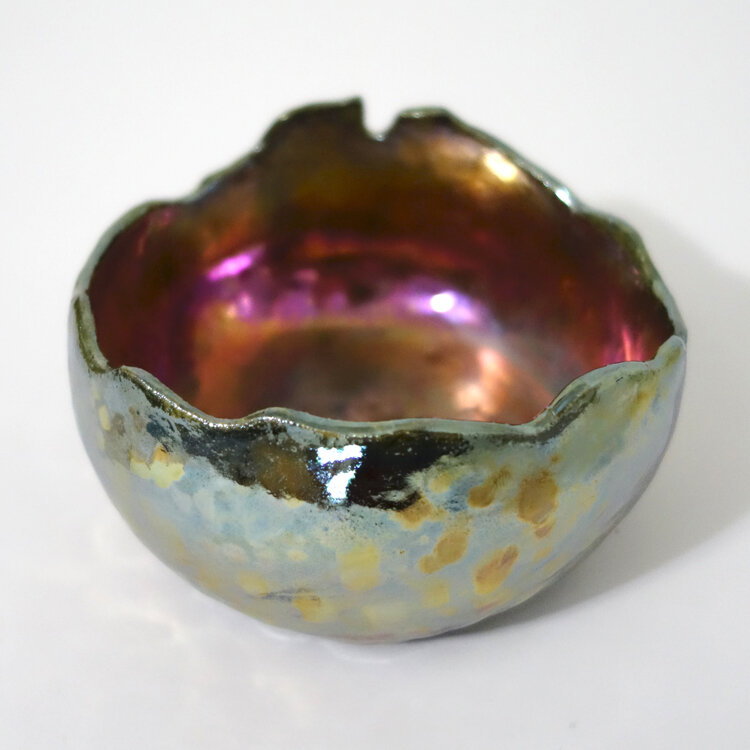
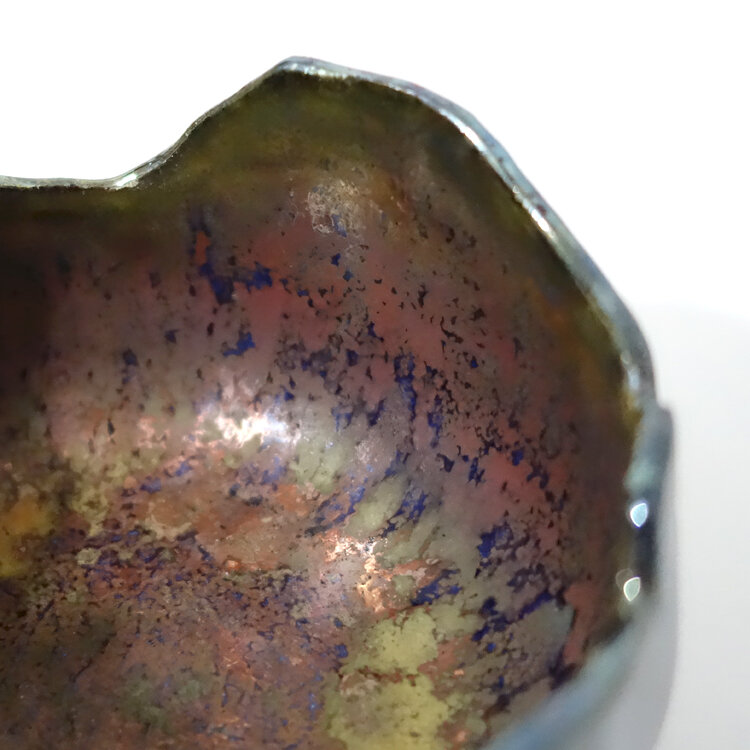
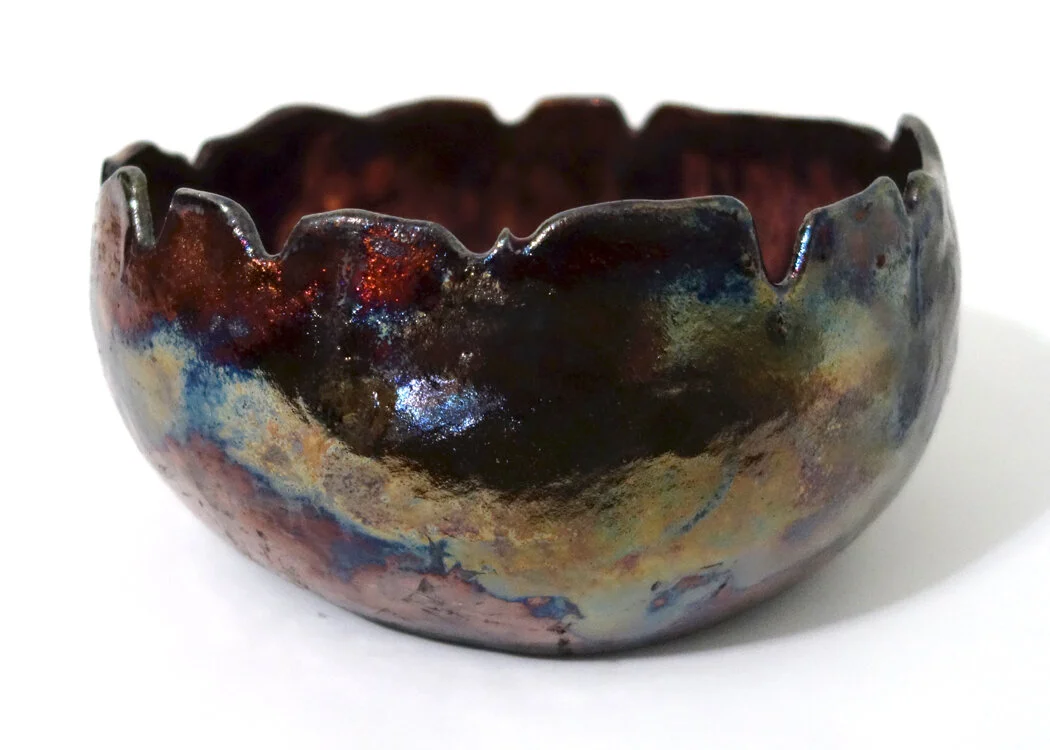
This is a milestone - I have my first ever juried ceramics exhibition which will be at the Le Mars Arts Center later this month. I only began working with the discipline of ceramics in 2020, and so this is an exciting development. I will have five handbuilt pieces from my raku firings in July and October 2021 on display in this Functional Aesthetic group show.
Functional Aesthetic will be open from November 9 - December 18th, 2021. The opening reception will be Friday, November 12th from 5-7pm.
The Le Mars Arts Center is located at 200 Central Ave SE, Le Mars, IA 51031. Contact info: 712-546-7476, lemarsarts@gmail.com, www.lemarsarts.com. Hours: Tuesday, Wednesday, and Friday 1-5pm, Thursday 1-7pm, Saturday 10am-4pm.
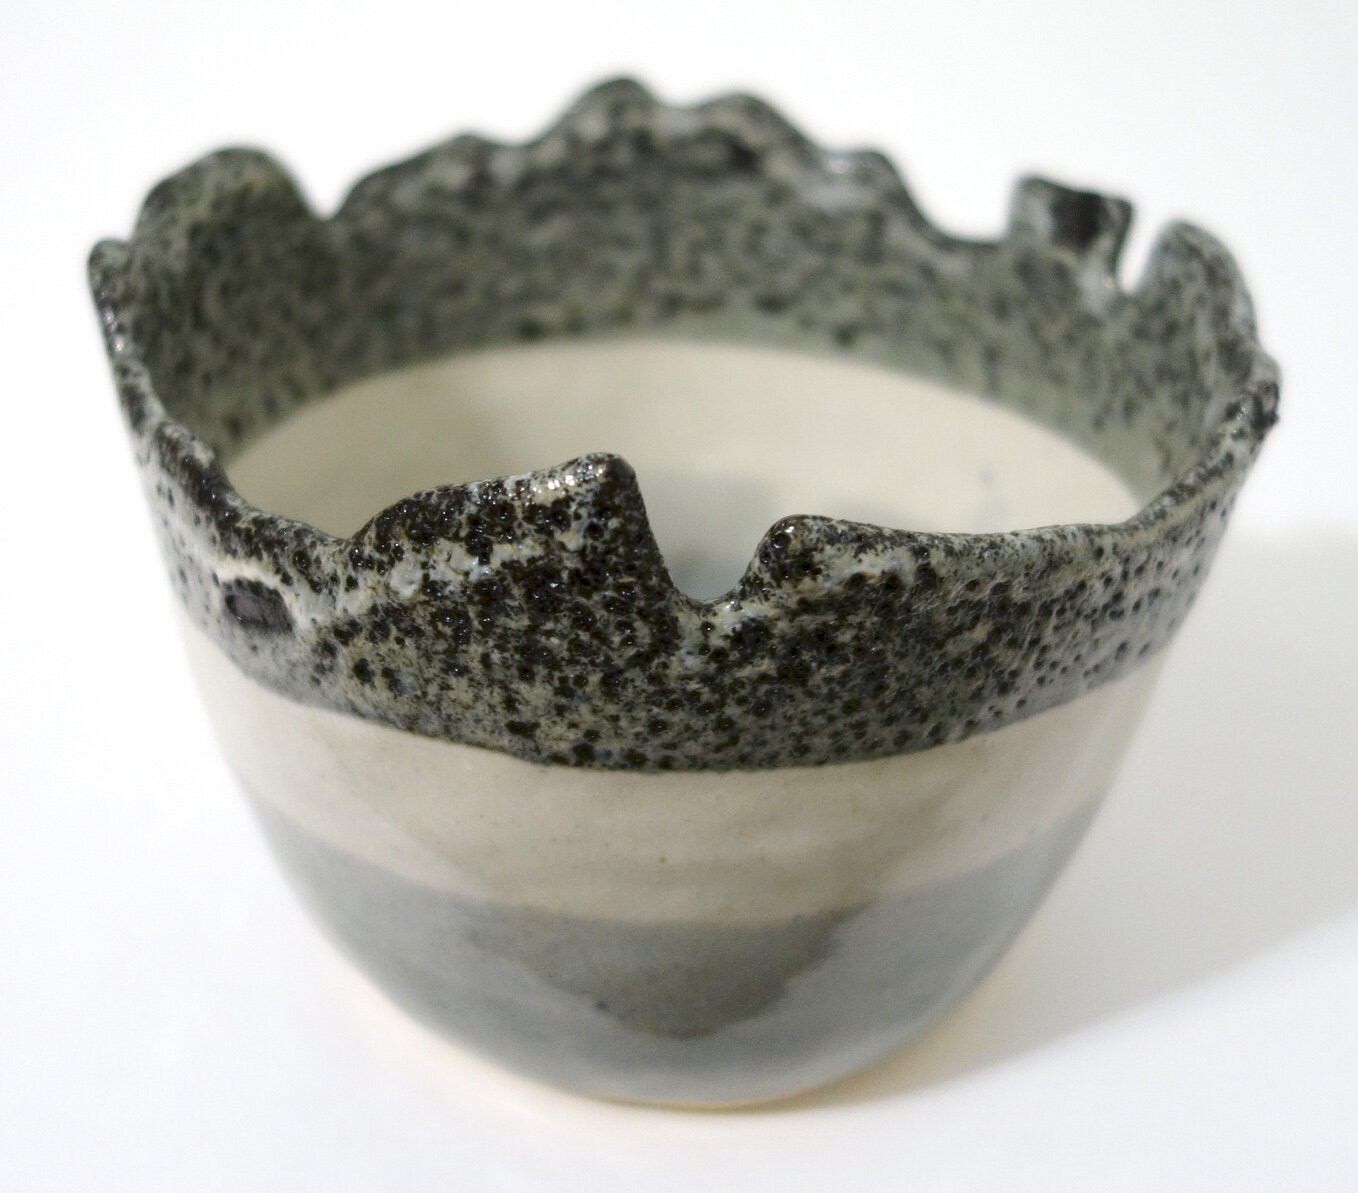
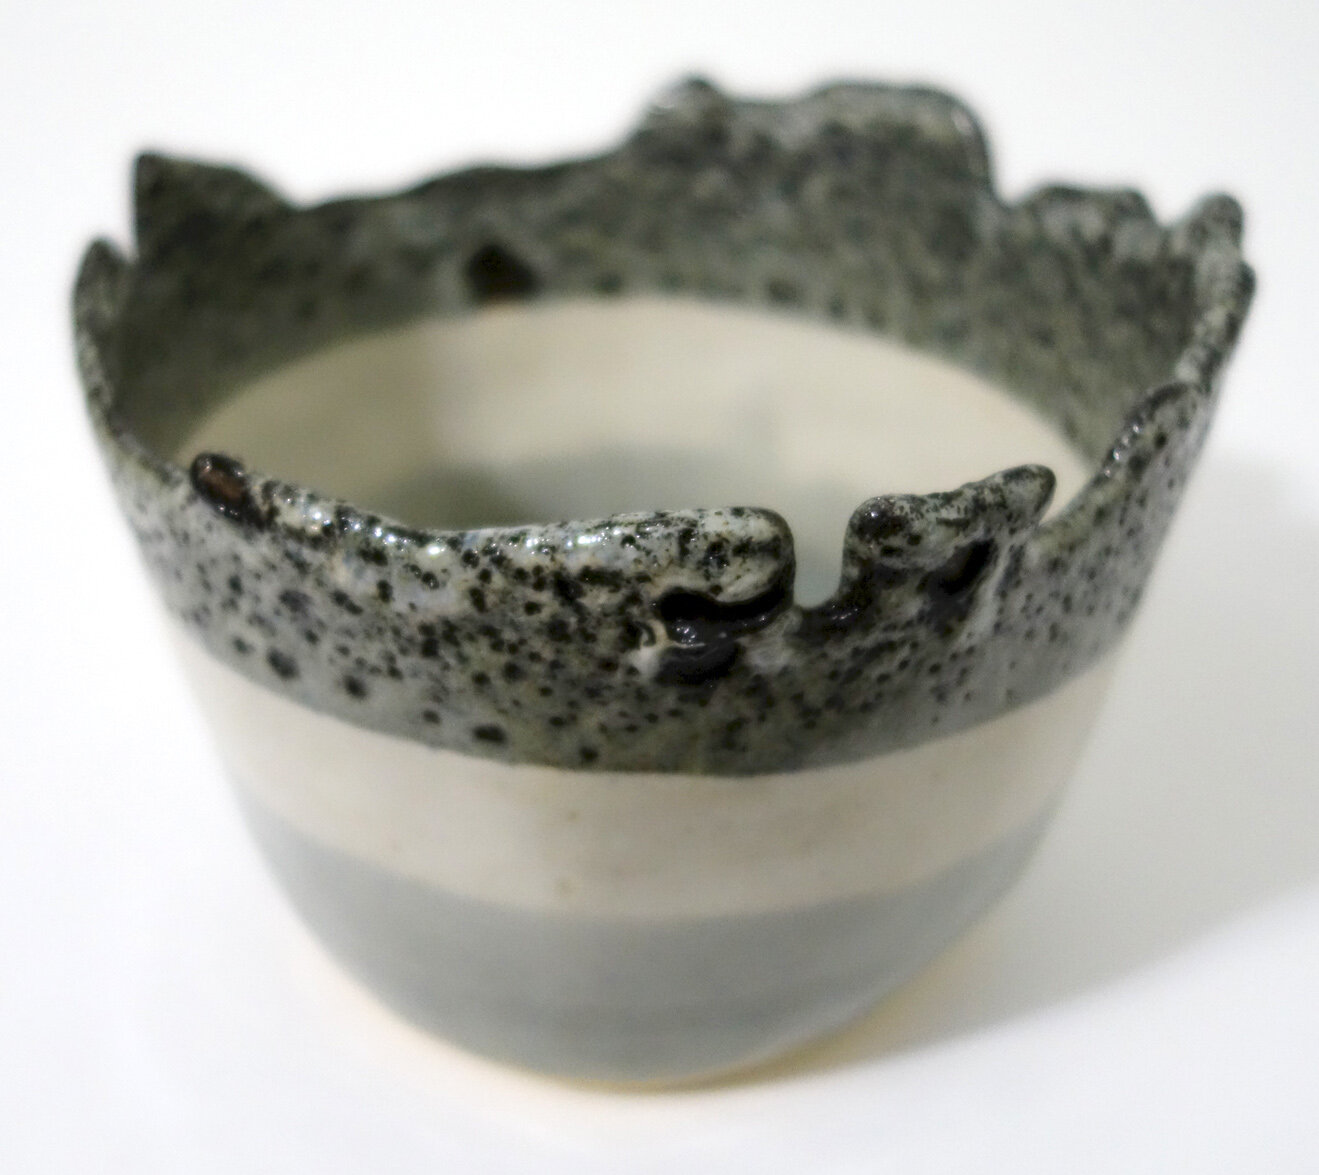
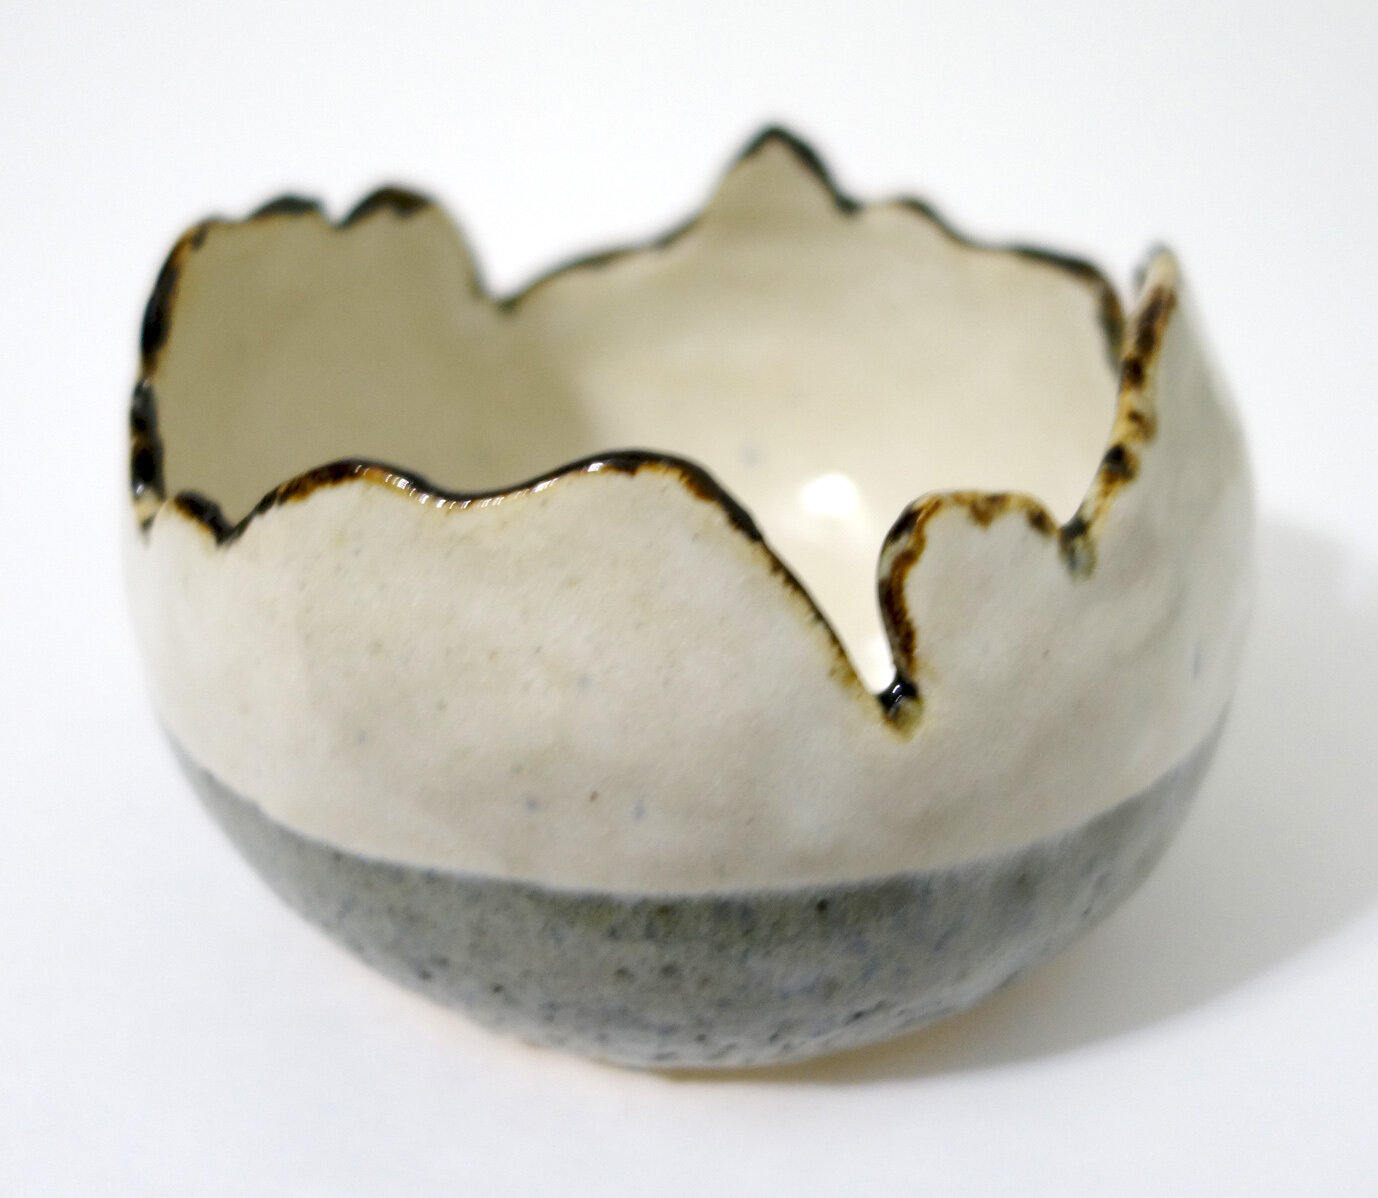
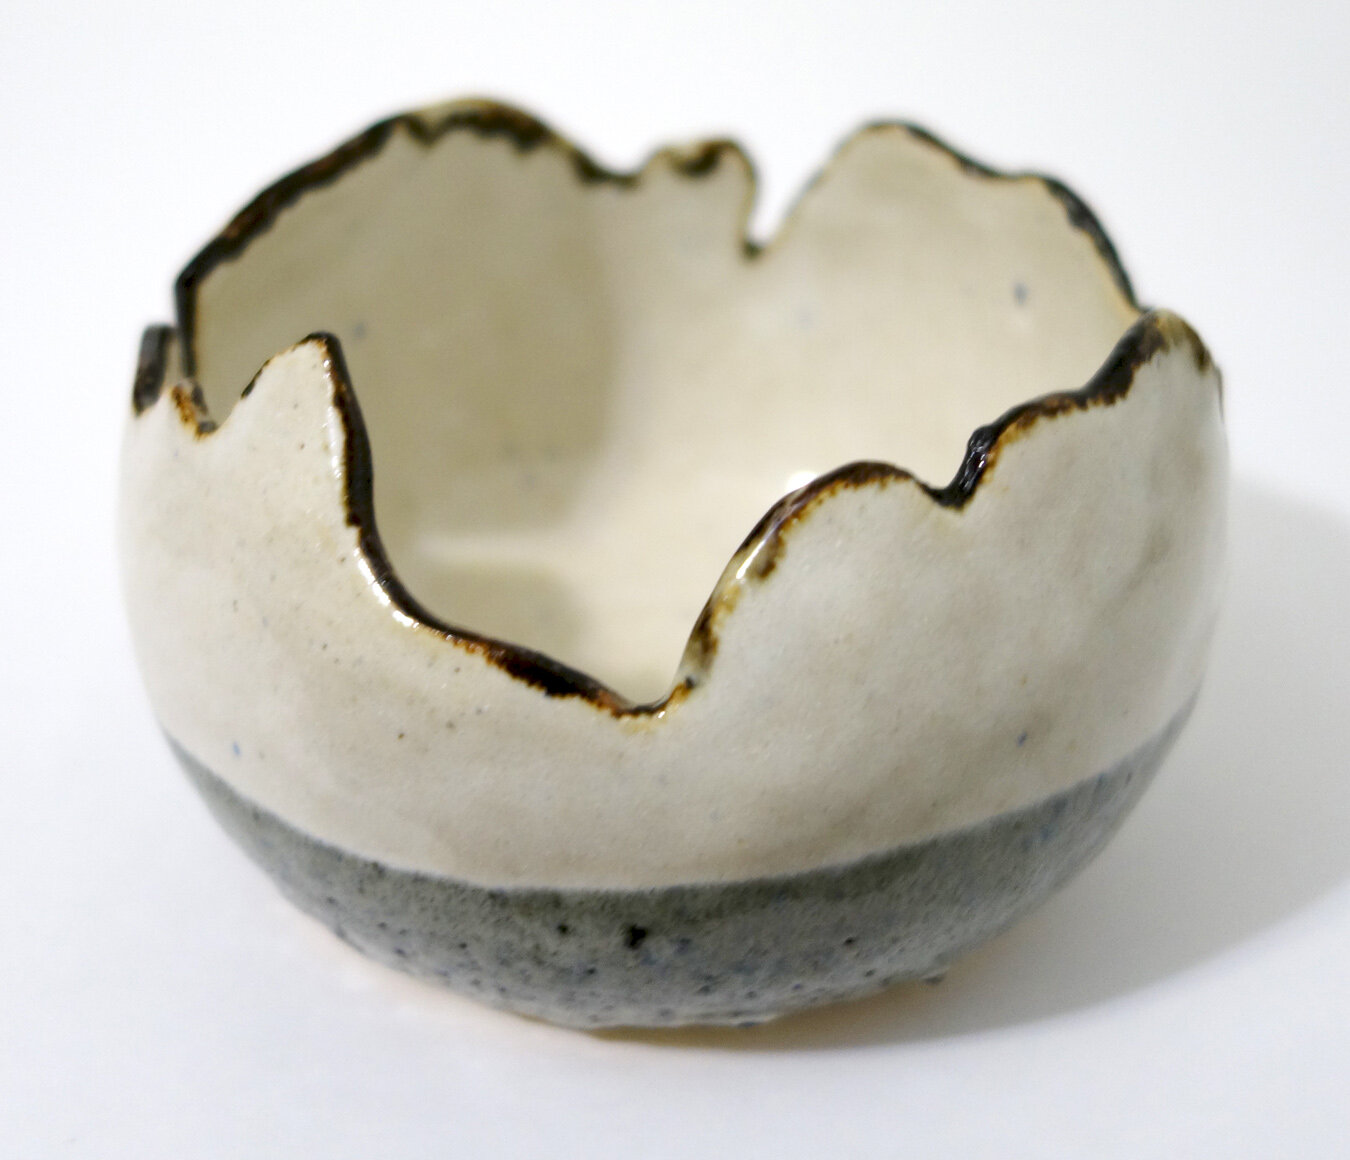
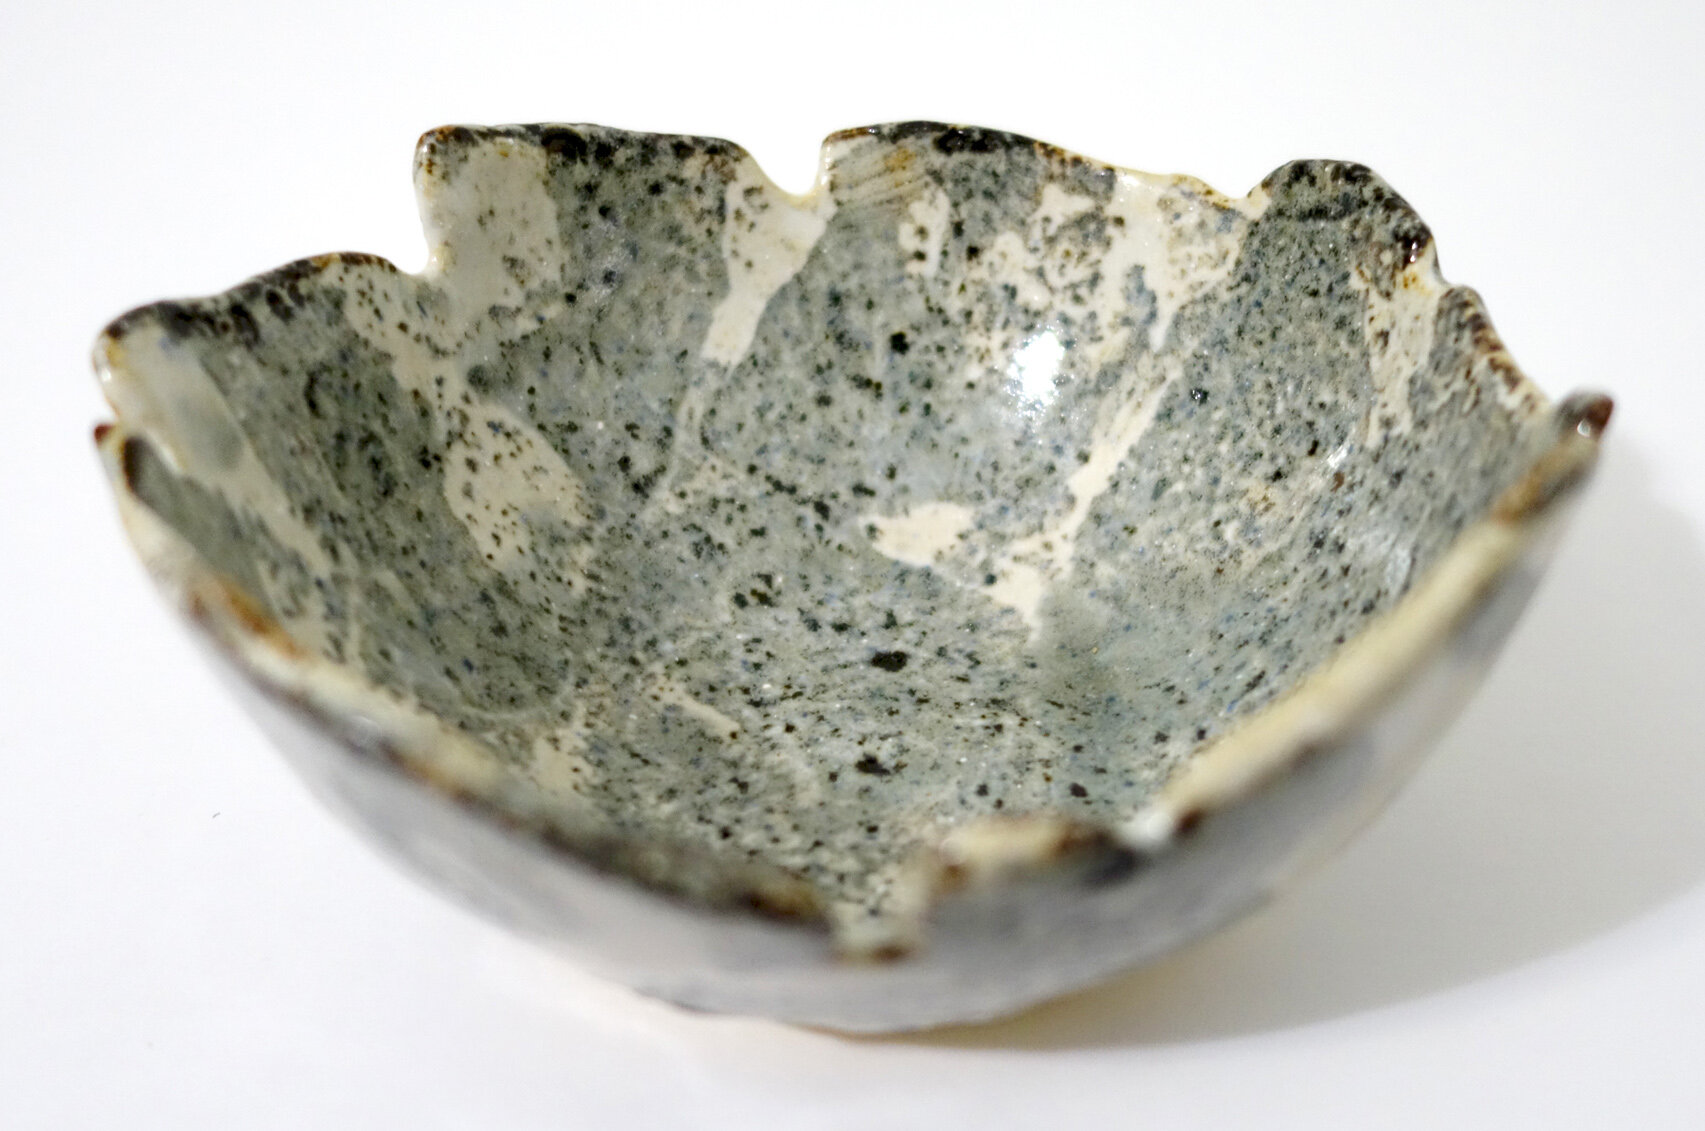
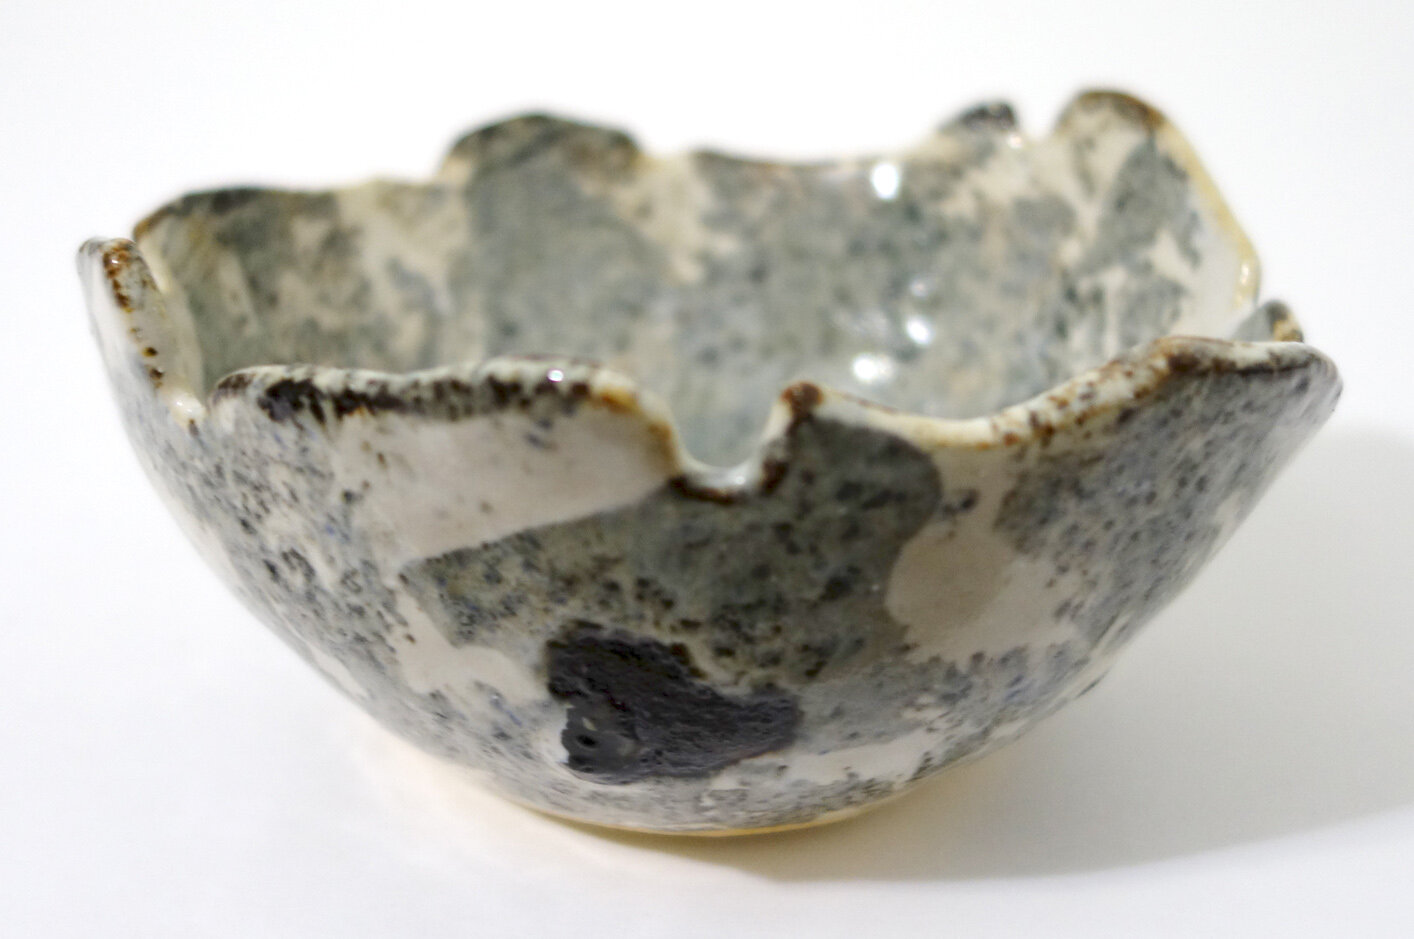
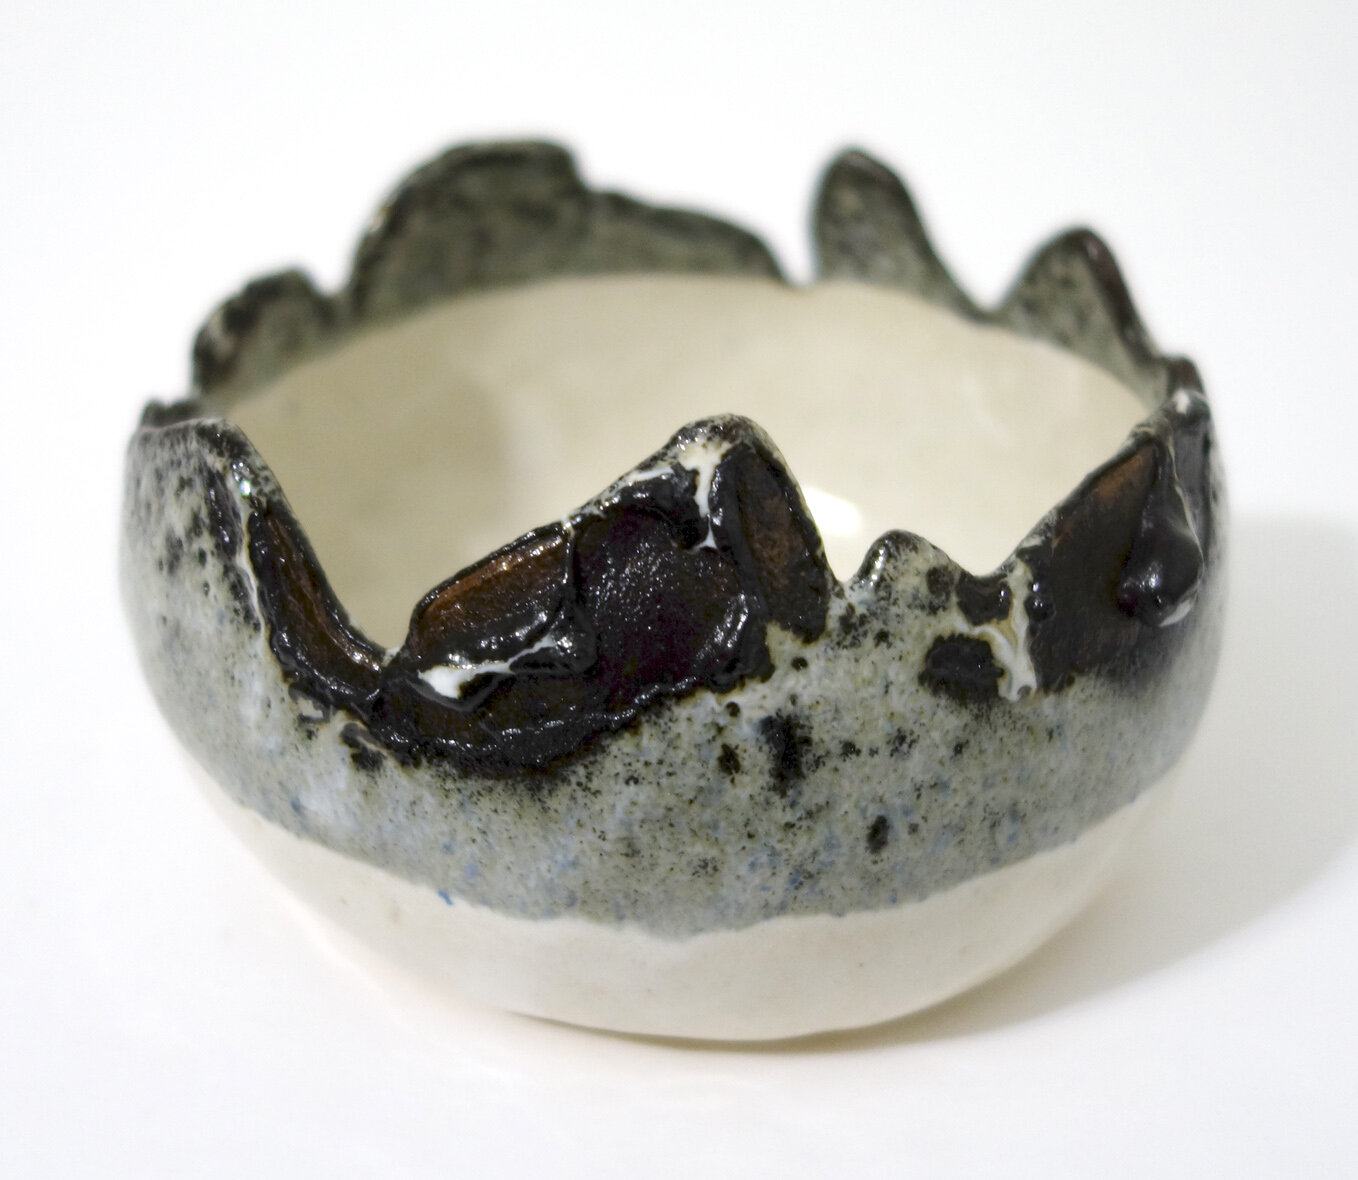
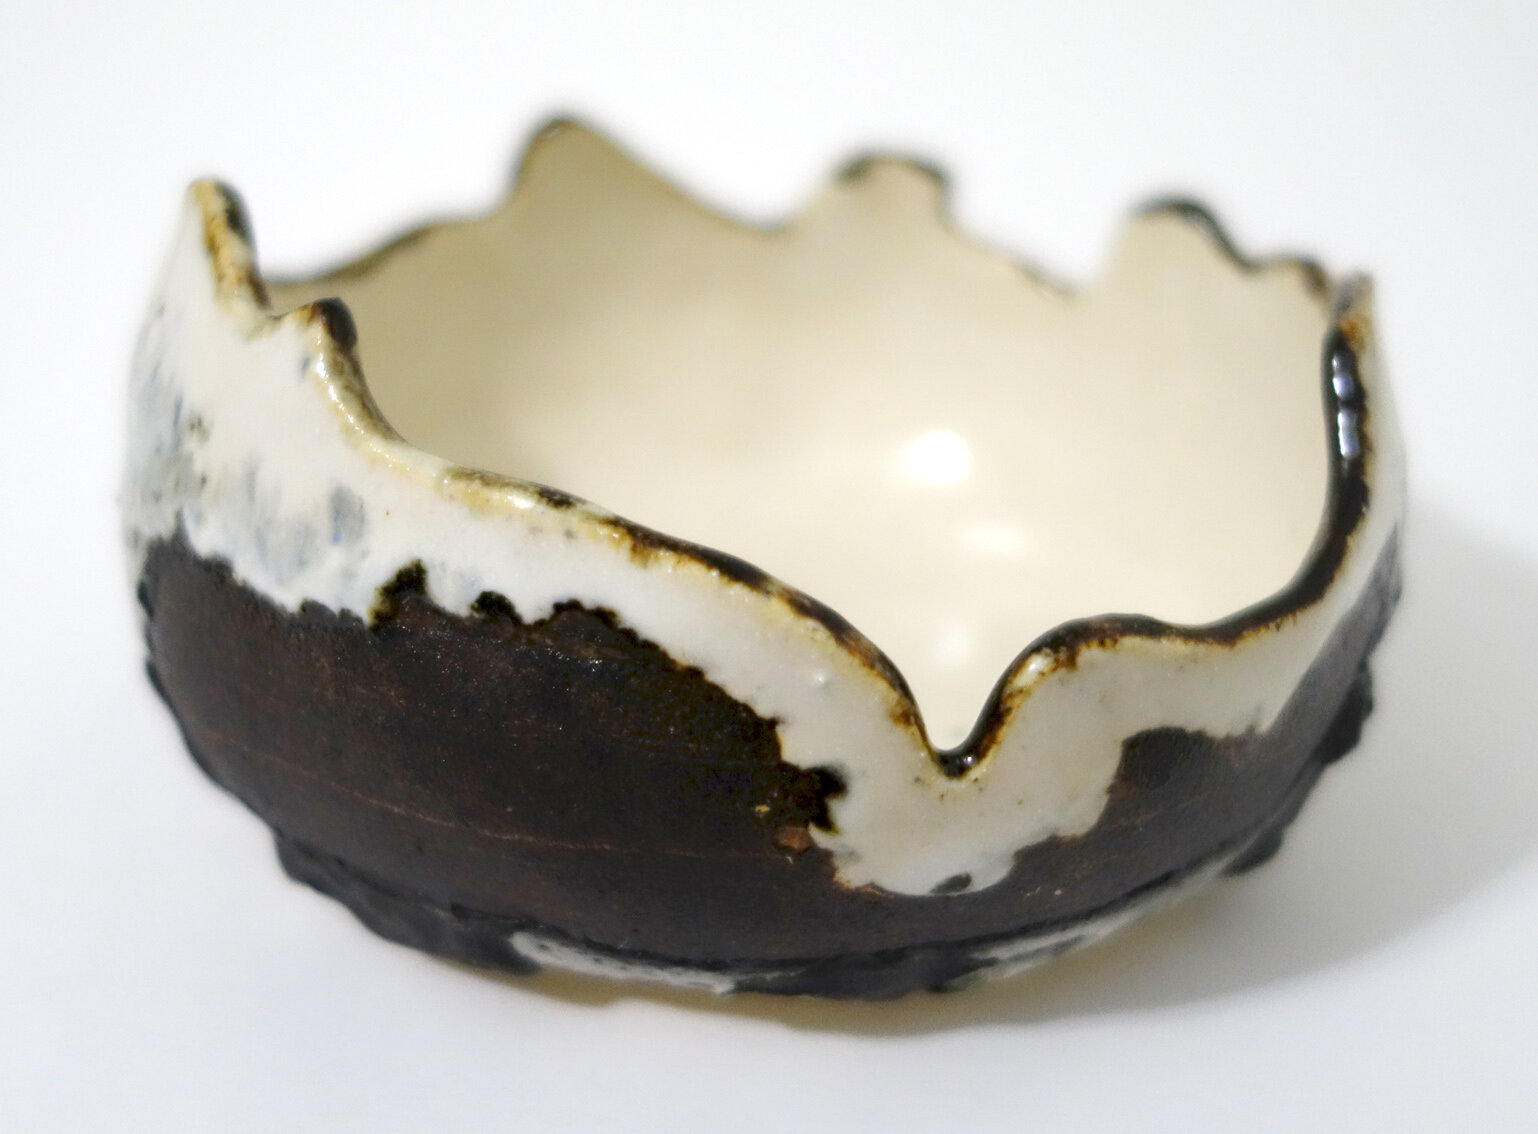
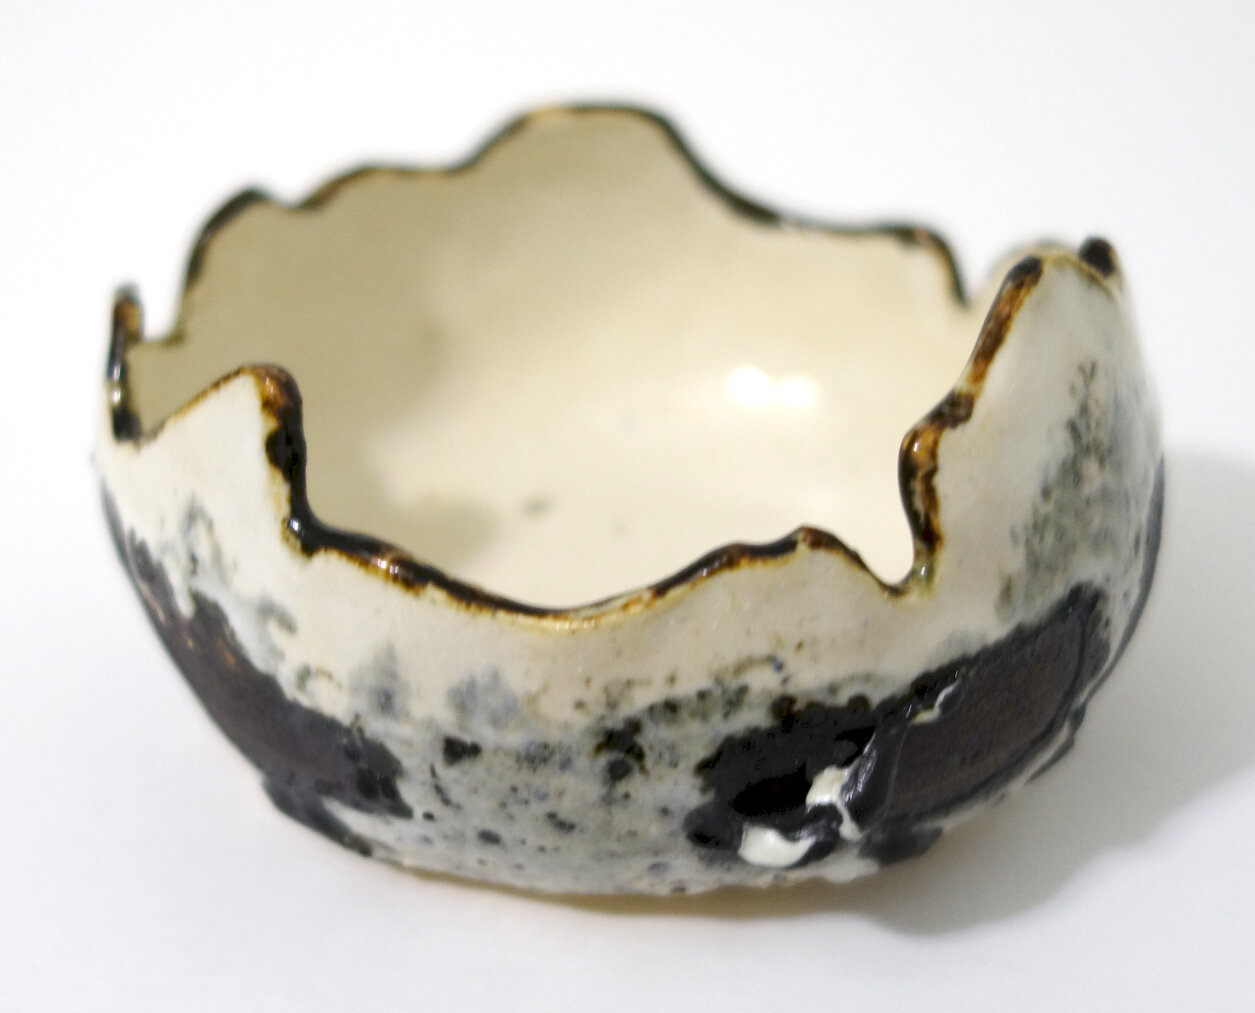
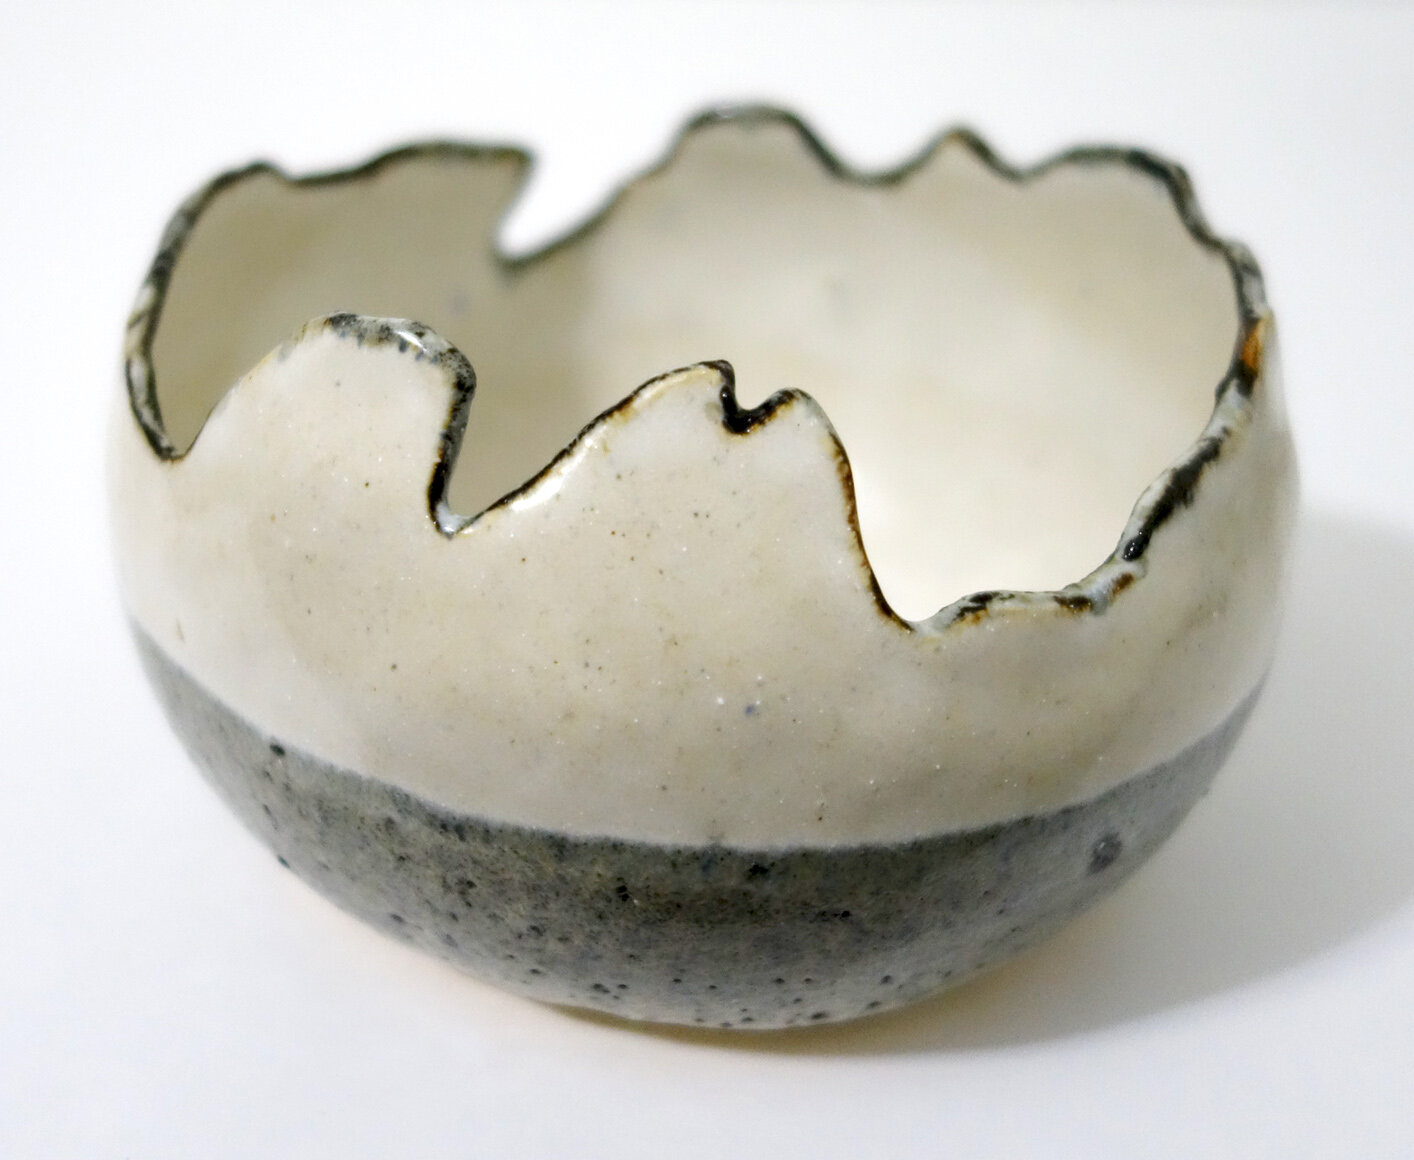
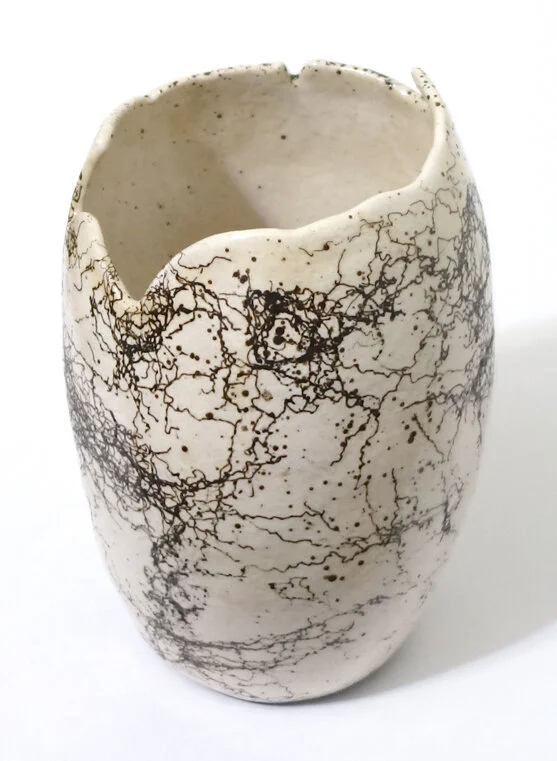
More Stoneware Ceramics!
in New Artwork
I’ve been posting about my raku productivity of late, but I have also continued to make stoneware pottery too!
I really like the combination of two glazes - standard Cone 6 recipes for a white and “smoky brown.” I particularly like the crawling that frequently results. I sometimes add in a complementing lighter grey glaze which is a discard mix of my own creation and therefore likely very difficult to reproduce once gone.
Below are eight different pieces. They include, respectively, a bowl, two images of a planter, two more of a second bowl, a third bowl, two images of a dish, a fourth bowl, two images of a fifth smaller bowl, and two images of a sixth bowl.


I Earned Tenure at Morningside University!
I am extremely happy and honored to announce that I have earned tenure at Morningside University. I came in on a shortened tenure clock due to having already earned tenure and promotion at my previous institution, so this news comes in my third year here at Morningside University as Art Department Chair and Associate Professor of Art!
In that time - even in a pandemic - I have experienced the professionalism, academic excellence, support, and warmth of the Morningside community in an abundance of ways. I look forward to continuing my work and service as I join the ranks of the tenured Morningside faculty!
Upcoming: "Haunted" at the Washington Street Arts Center
in Exhibitions
I have artwork in the upcoming group exhibition Haunted, hosted by the Vermillion Area Arts Council at the Washington Street Arts Center (located at 202 N Washington St, Vermillion, South Dakota).
This show will run from October 24-31, 2021 from 6:30-8:00pm, if you’d like to stop by and check it out! Entry fee to the exhibition will be $2 for VAAC members or $5 for non-VAAC members. Masks will be required.
Won a Faculty Conference Travel Fund for My Next Raku Workshop!
in Awards
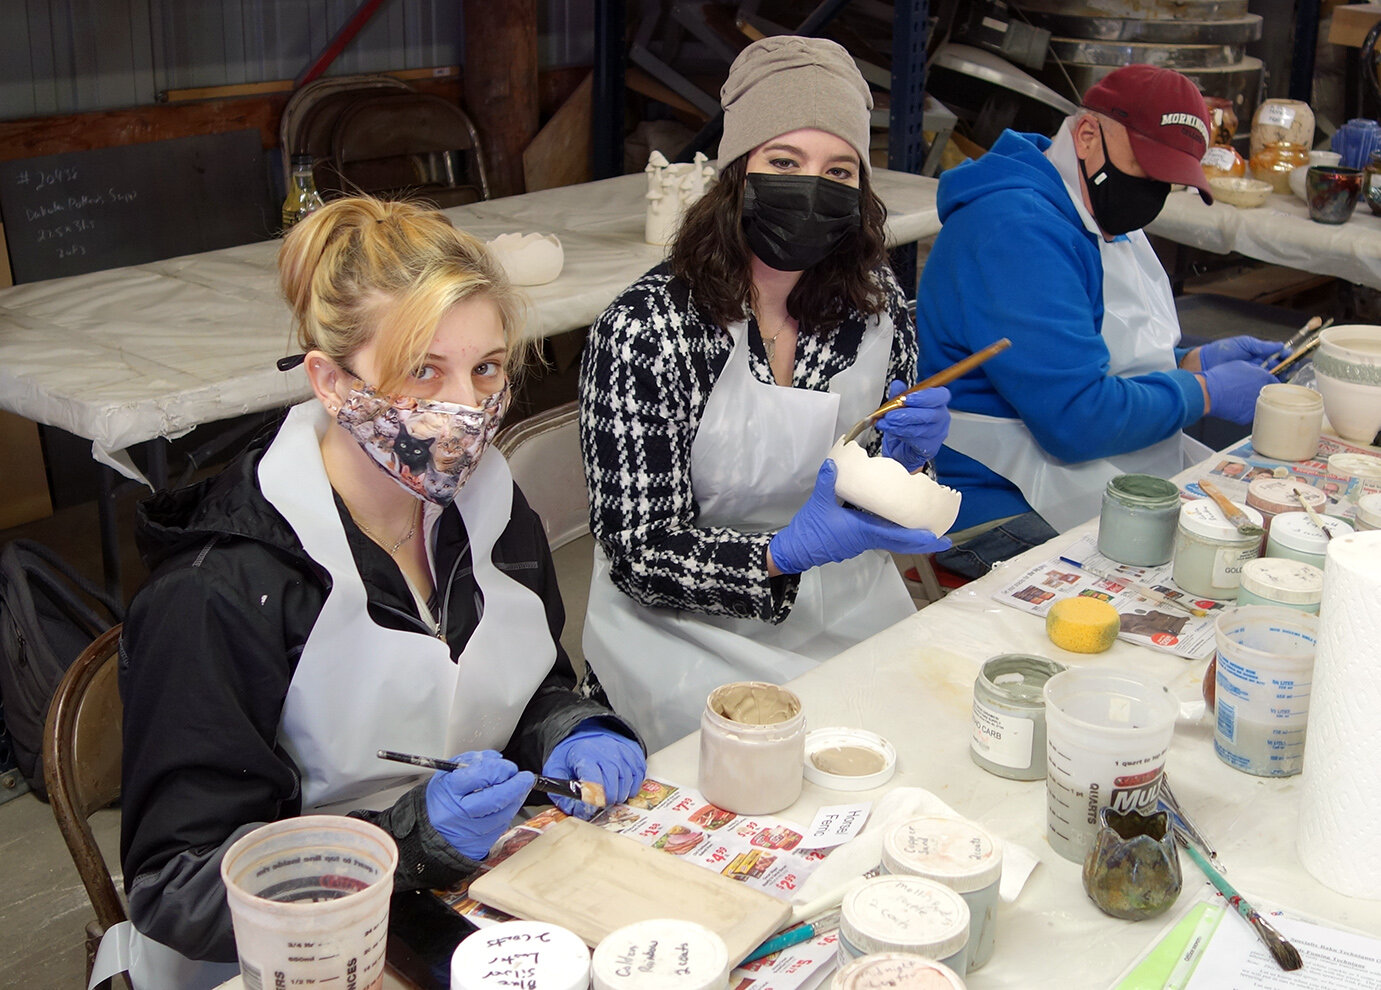
I have another raku workshop coming up on October 16th, and it should be a fun one - we’ll be bringing 6-7 Morningside artists, including alumni, faculty, and current students. I decided to apply earlier this fall to the Morningside Faculty Development Committee Conference Travel Fund to help cover my costs for this one, since doing these regularly does add up financially. My request was approved!
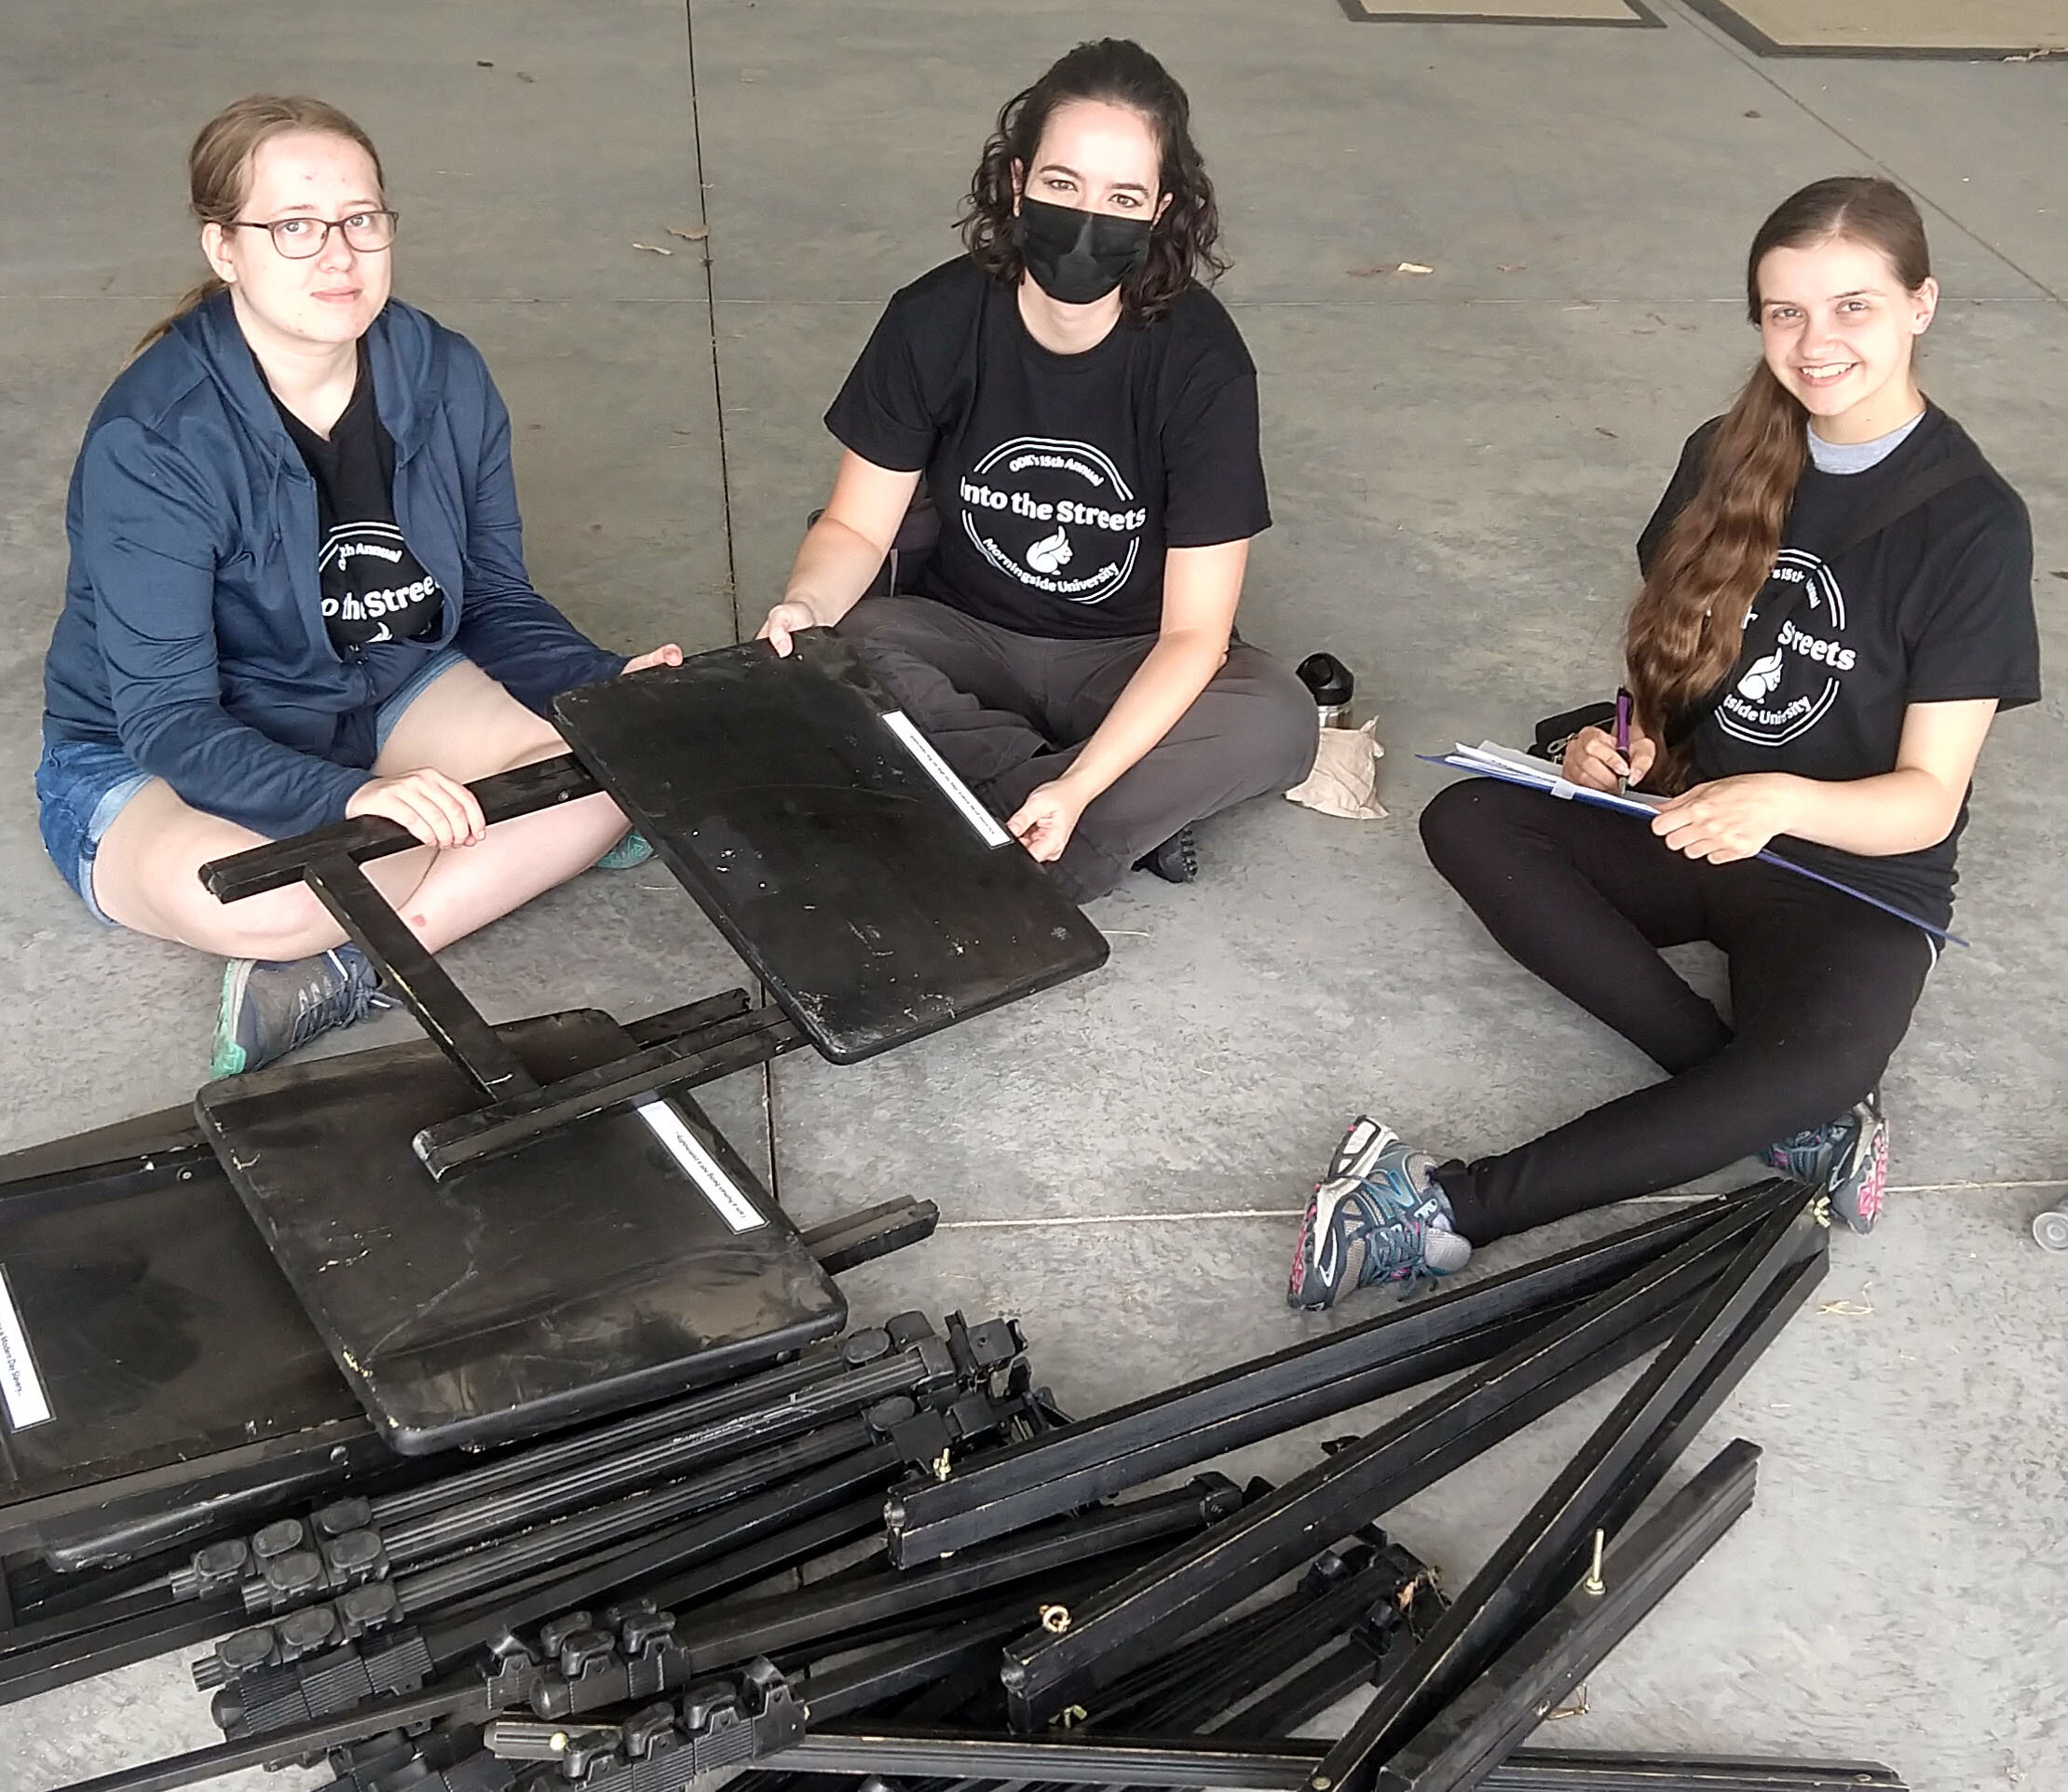
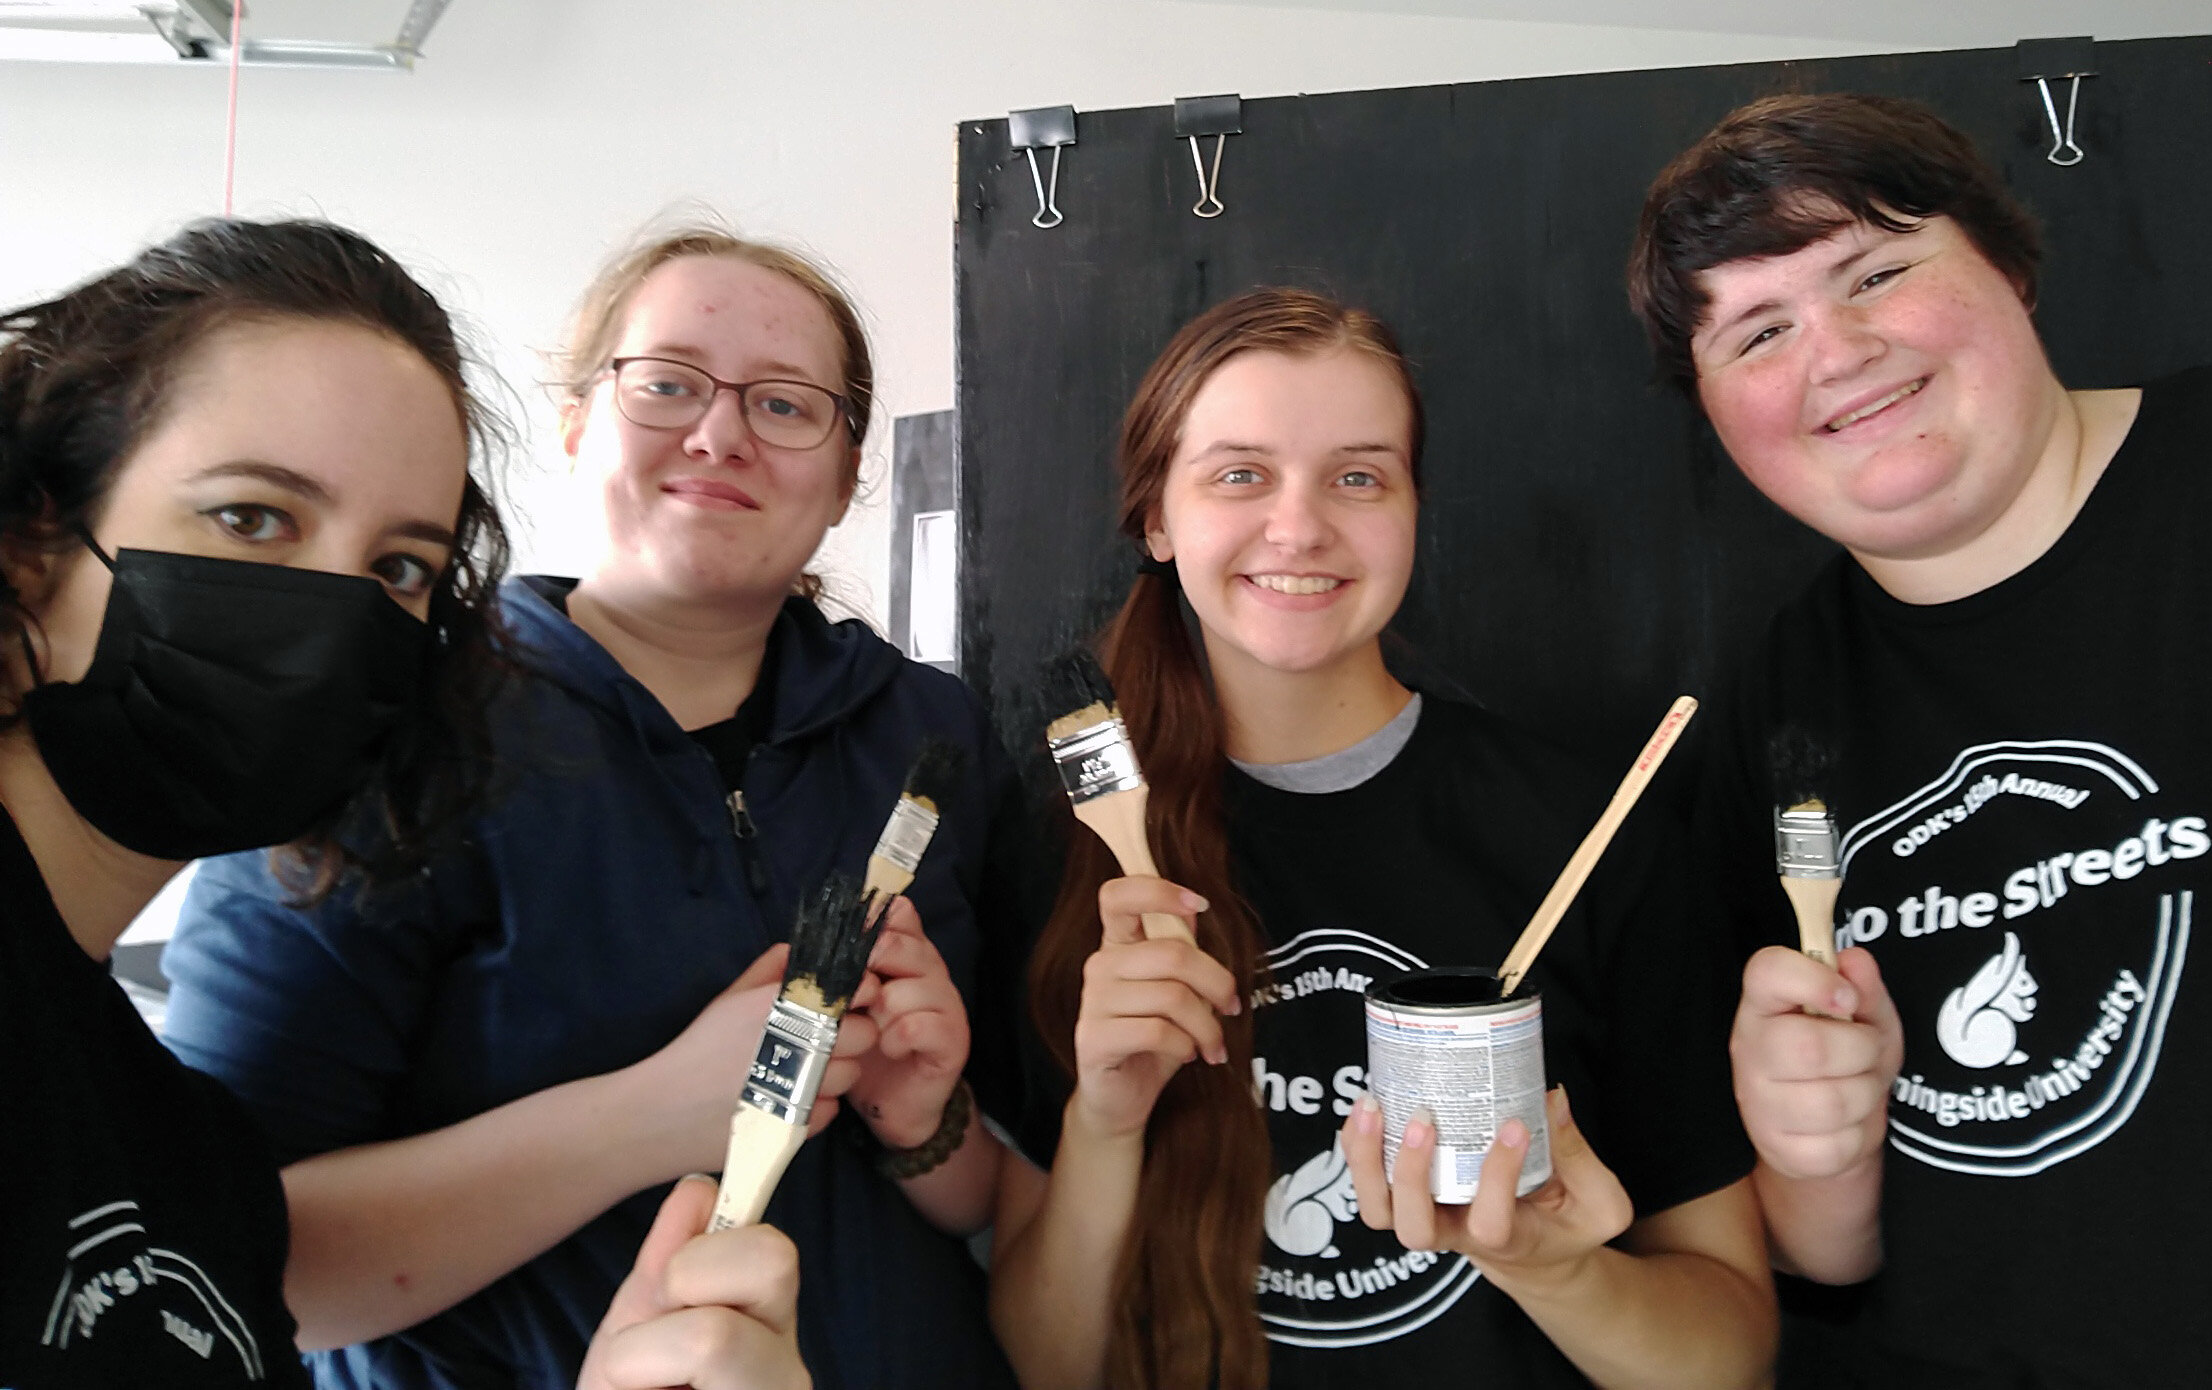
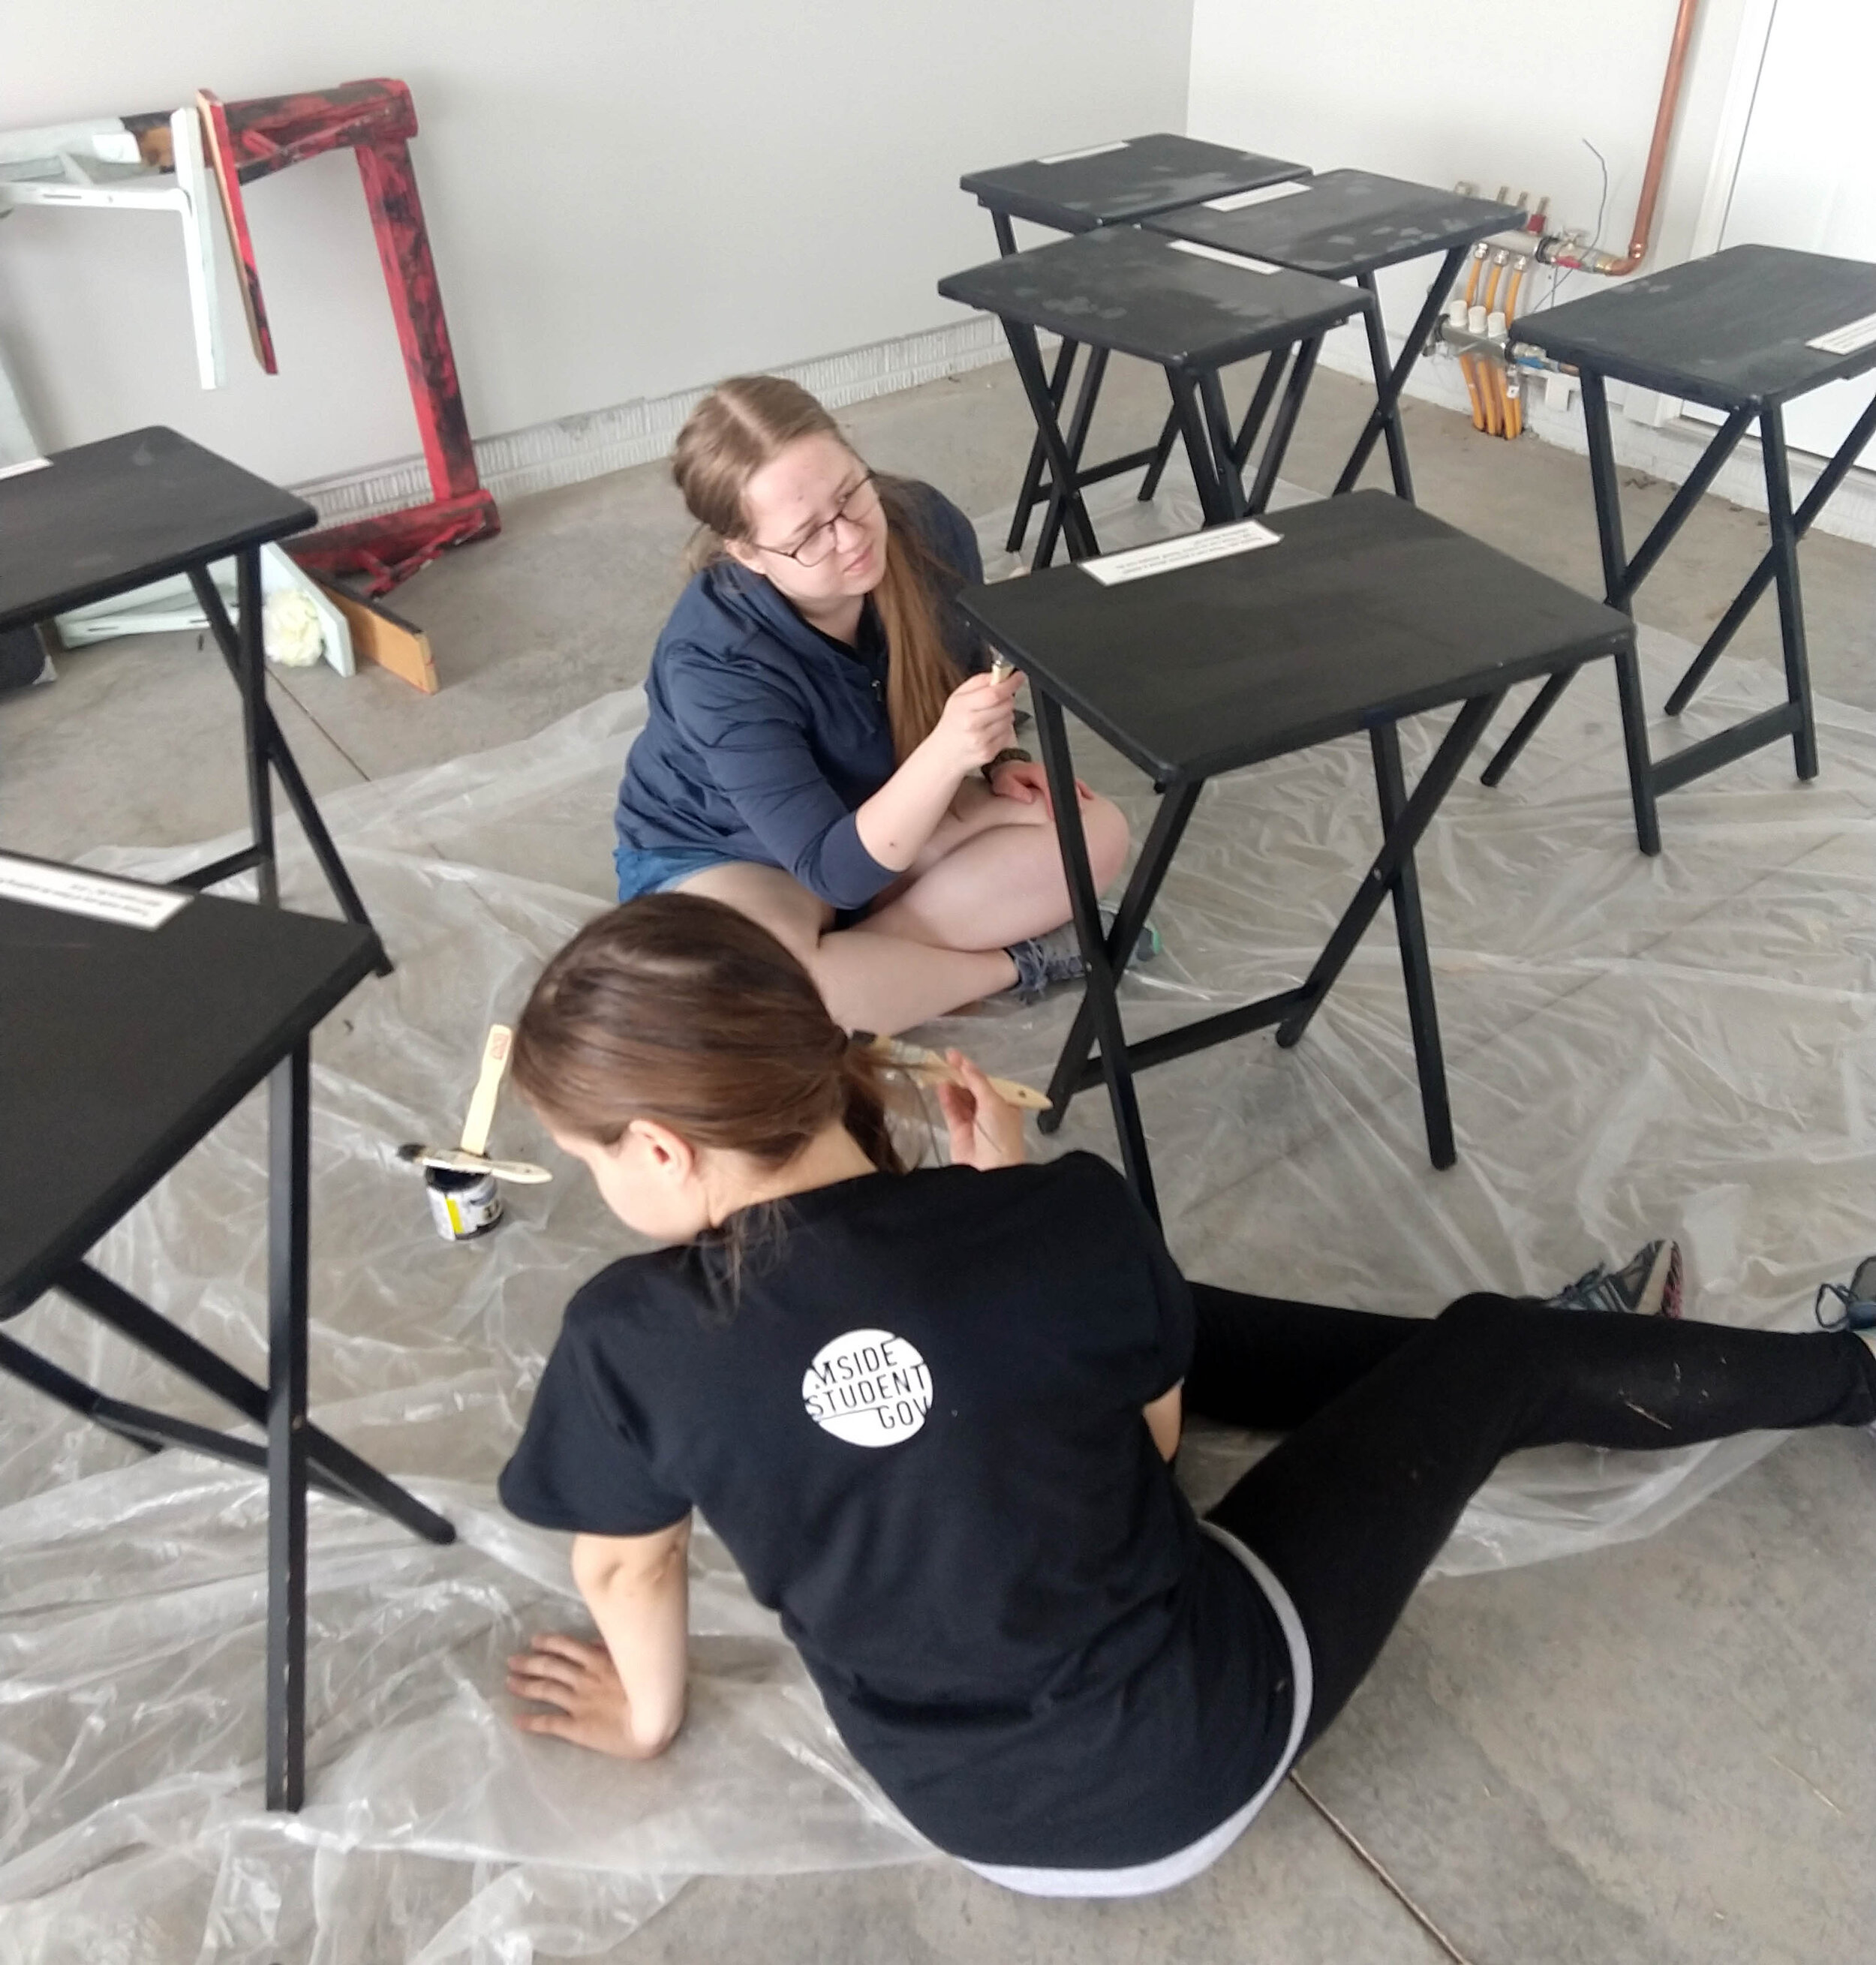
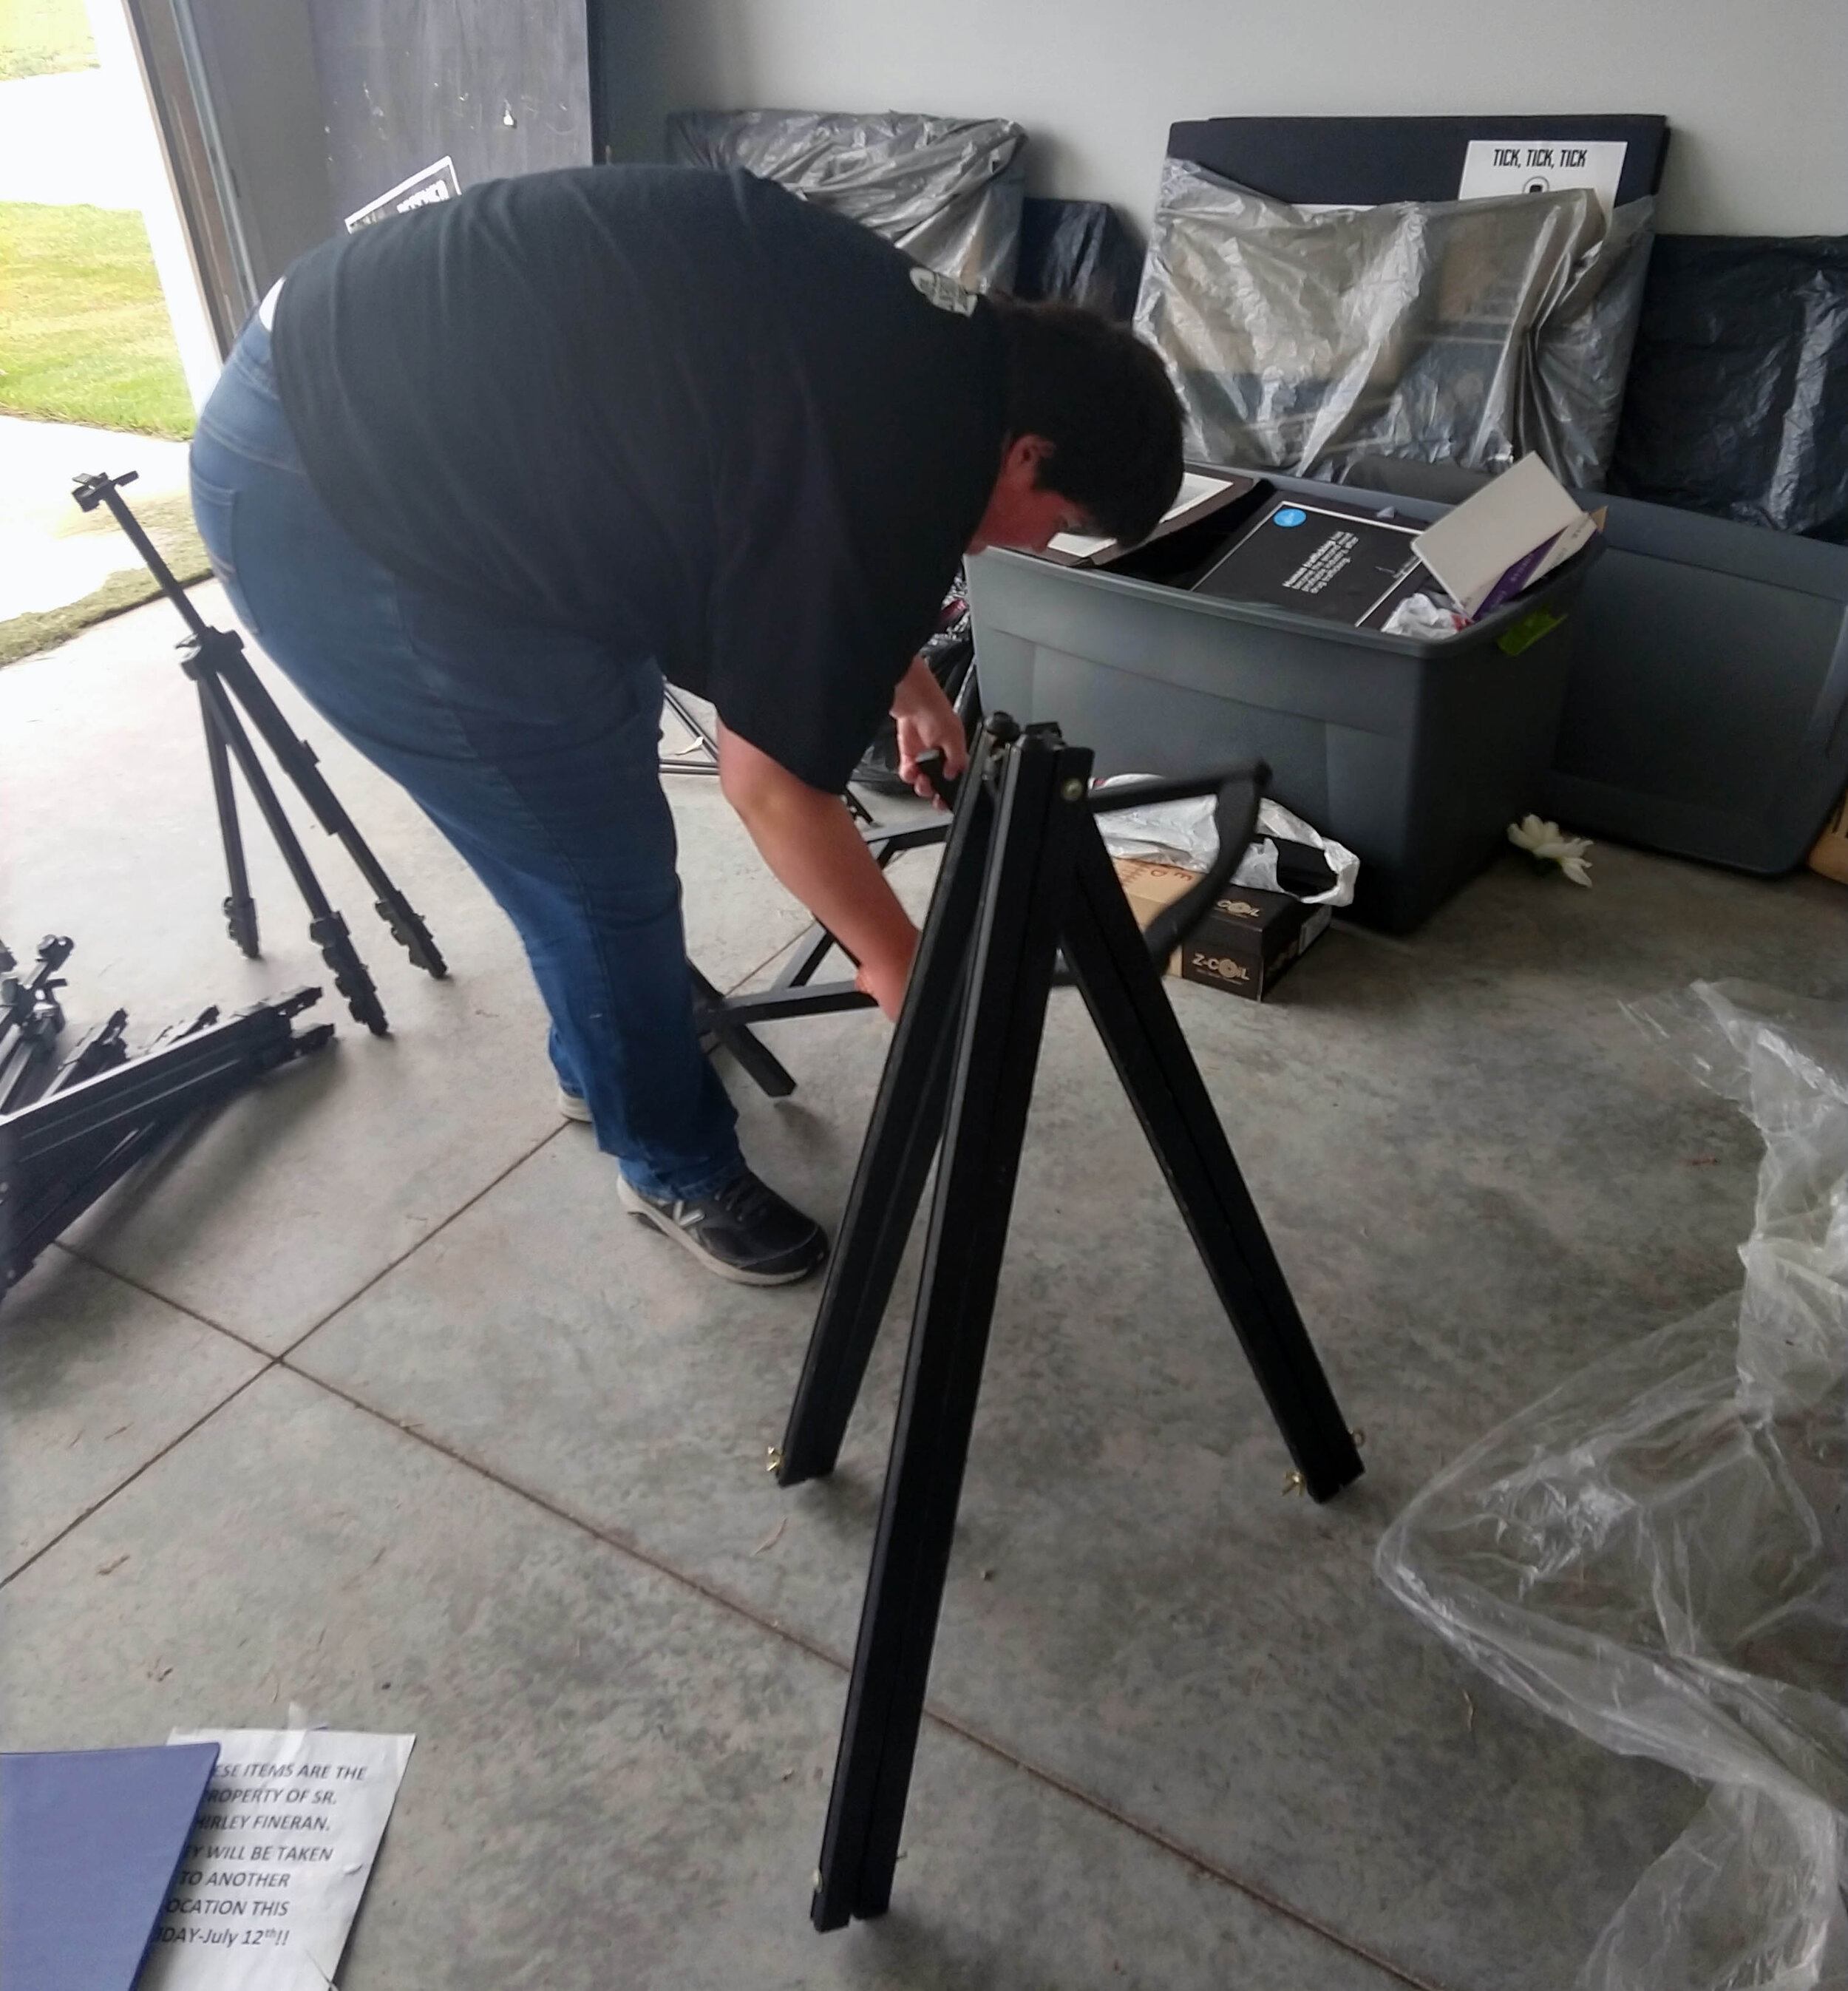
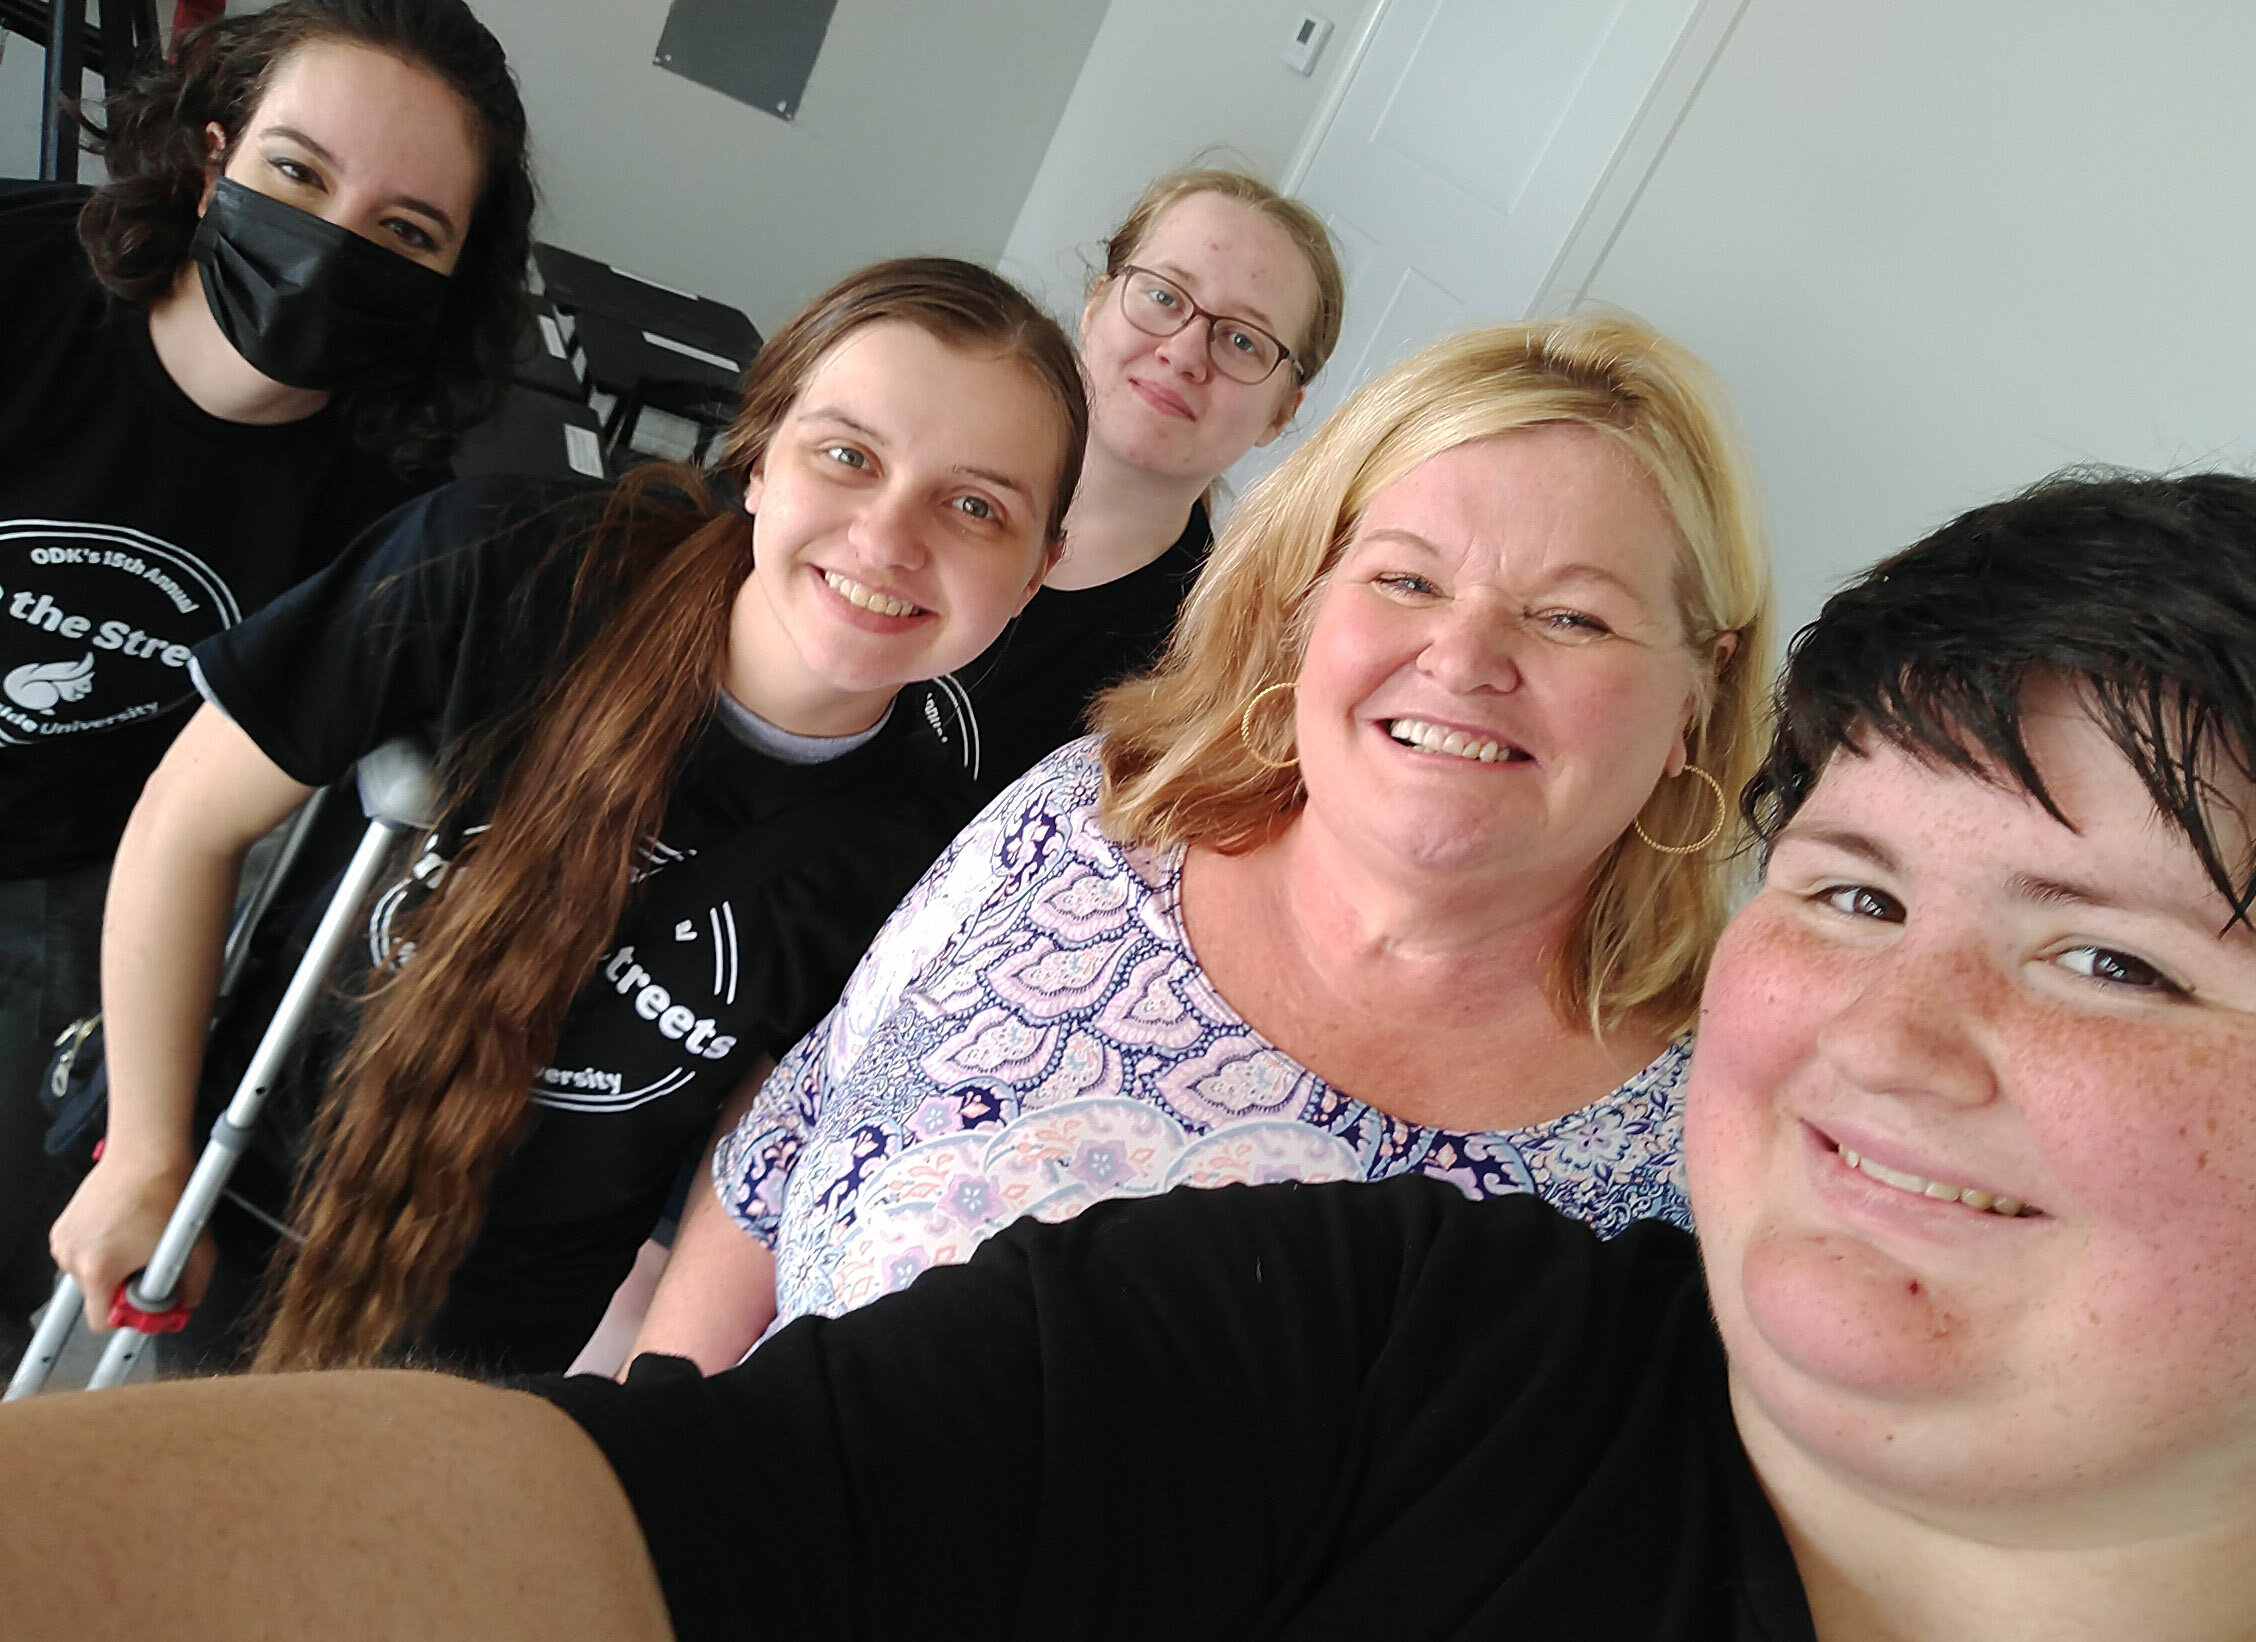
Volunteering with Art Club for Morningside's Into the Streets 2021!
Morningside’s 15th annual Into the Streets event took place today; we had over 800 Morningside students, faculty, and staff volunteer with non-profit organizations across the region! I volunteered with Art Club students, and we brainstormed display changes and restored the Lila Mae's House Break the Silence exhibit, which raises awareness about sex trafficking.
Second Raku Workshop - Crackle Edition
in New Artwork
I only did one crackle piece (and this time, I went with the natural crackle as opposed to the white) this go-round, but it is my favorite of all of the pieces from either raku workshop. In fact, in a sense I think this might be my first professional piece of ceramic artwork. Or perhaps ceramic object.
What I mean by that is that so far, my ceramic studio practice has involved experimentation and learning, but my primary design purpose has been functional. The aesthetics matter, of course, but don’t take primacy over the form. I’ve been making pottery. That’s a completely valid ceramic arena!
However, in this piece, the function took a backseat to conceptual and aesthetic goals. I’m really pleased with how it turned out!


2021 ArtSplash Festival Judge!
in Awards
This past weekend (September 4th and 5th) was the 2021 ArtSplash festival, hosted by the Sioux City Art Center. I had previously attended the 2019 ArtSplash which was held in Riverside Park; the 2020 festival was cancelled due to the pandemic. This meant a lot of people - including myself - were really excited to attend the 2021 ArtSplash, which was relocated downtown to take place in and around the Sioux City Art Center itself. I think this was a very smart change that highlights the institution and clearly links it to the festival.
I was invited to serve as one of the two 2021 ArtSplash judges, and I was honored and excited to say yes! I visited each of the approximately 50 artist booths and looked closely at the work presented as well as spoke with the artists about their processes. My co-judge and Briar Cliff University art professor Nan Wilson and I then came together, compared our notes, and visited a number of booths again before selecting four Awards of Excellence, a Best 2D, Best 3D, and Best in Show artist.
This was my first time judging an art festival, though I have judged art shows and competitions before. In my previous judging roles, I did so solely based off of the work itself, without access to the artists until after the awards ceremony. I really enjoyed getting to speak with the artists and learning more about the work and process as a part of this ArtSplash judging. Overall, I’d say the 2021 ArtSplash was a blast, and I look forward to 2022 ArtSplash!
Second Raku Workshop - Copper Glazes Edition
in Events, New Artwork
I decided to try copper glazes again, but with some wild cards thrown in - I experimented more with unglazed negative spaces, and tested out some different types of glaze.


This first piece has “Midnight Luster” glaze on the interior and a lithium carbonate glaze on the exterior. It’s quite attractive in photo, but it did suffer from a bit of pitting, meaning the glaze pooled in some spots and it bubbled and hardened in ways that are suboptimal; instead of a smooth surface, there are rougher points within.


This next piece is interesting in that I had intended it to be a more standard bowl, but in the bisque firing process its sidewall accidentally got damaged and it was involuntarily edited into the shape it has now. I sanded it down a bit and decided to move forward with it; I can imagine that the cavity might improve accessibility to whatever is stored within!


I was pretty proud of this platter as a handbuilt piece, but unfortunately though it made it through the bisque firing unscathed it was unable to handle the temperature fluctuations of the raku firing and it sustained a crack across about 2/3 of its base. It is not salable now, but I still wanted to share the piece with you!


Finally, here is the most experimental piece of the metallic batch - I used both “Emerald Copper” glaze and a thinned out crackle glaze to create the exterior dripping decoration, and used “Midnight Luster” on the interior. The bottom of the exterior is just the result of carbon trapping in unglazed raku clay.
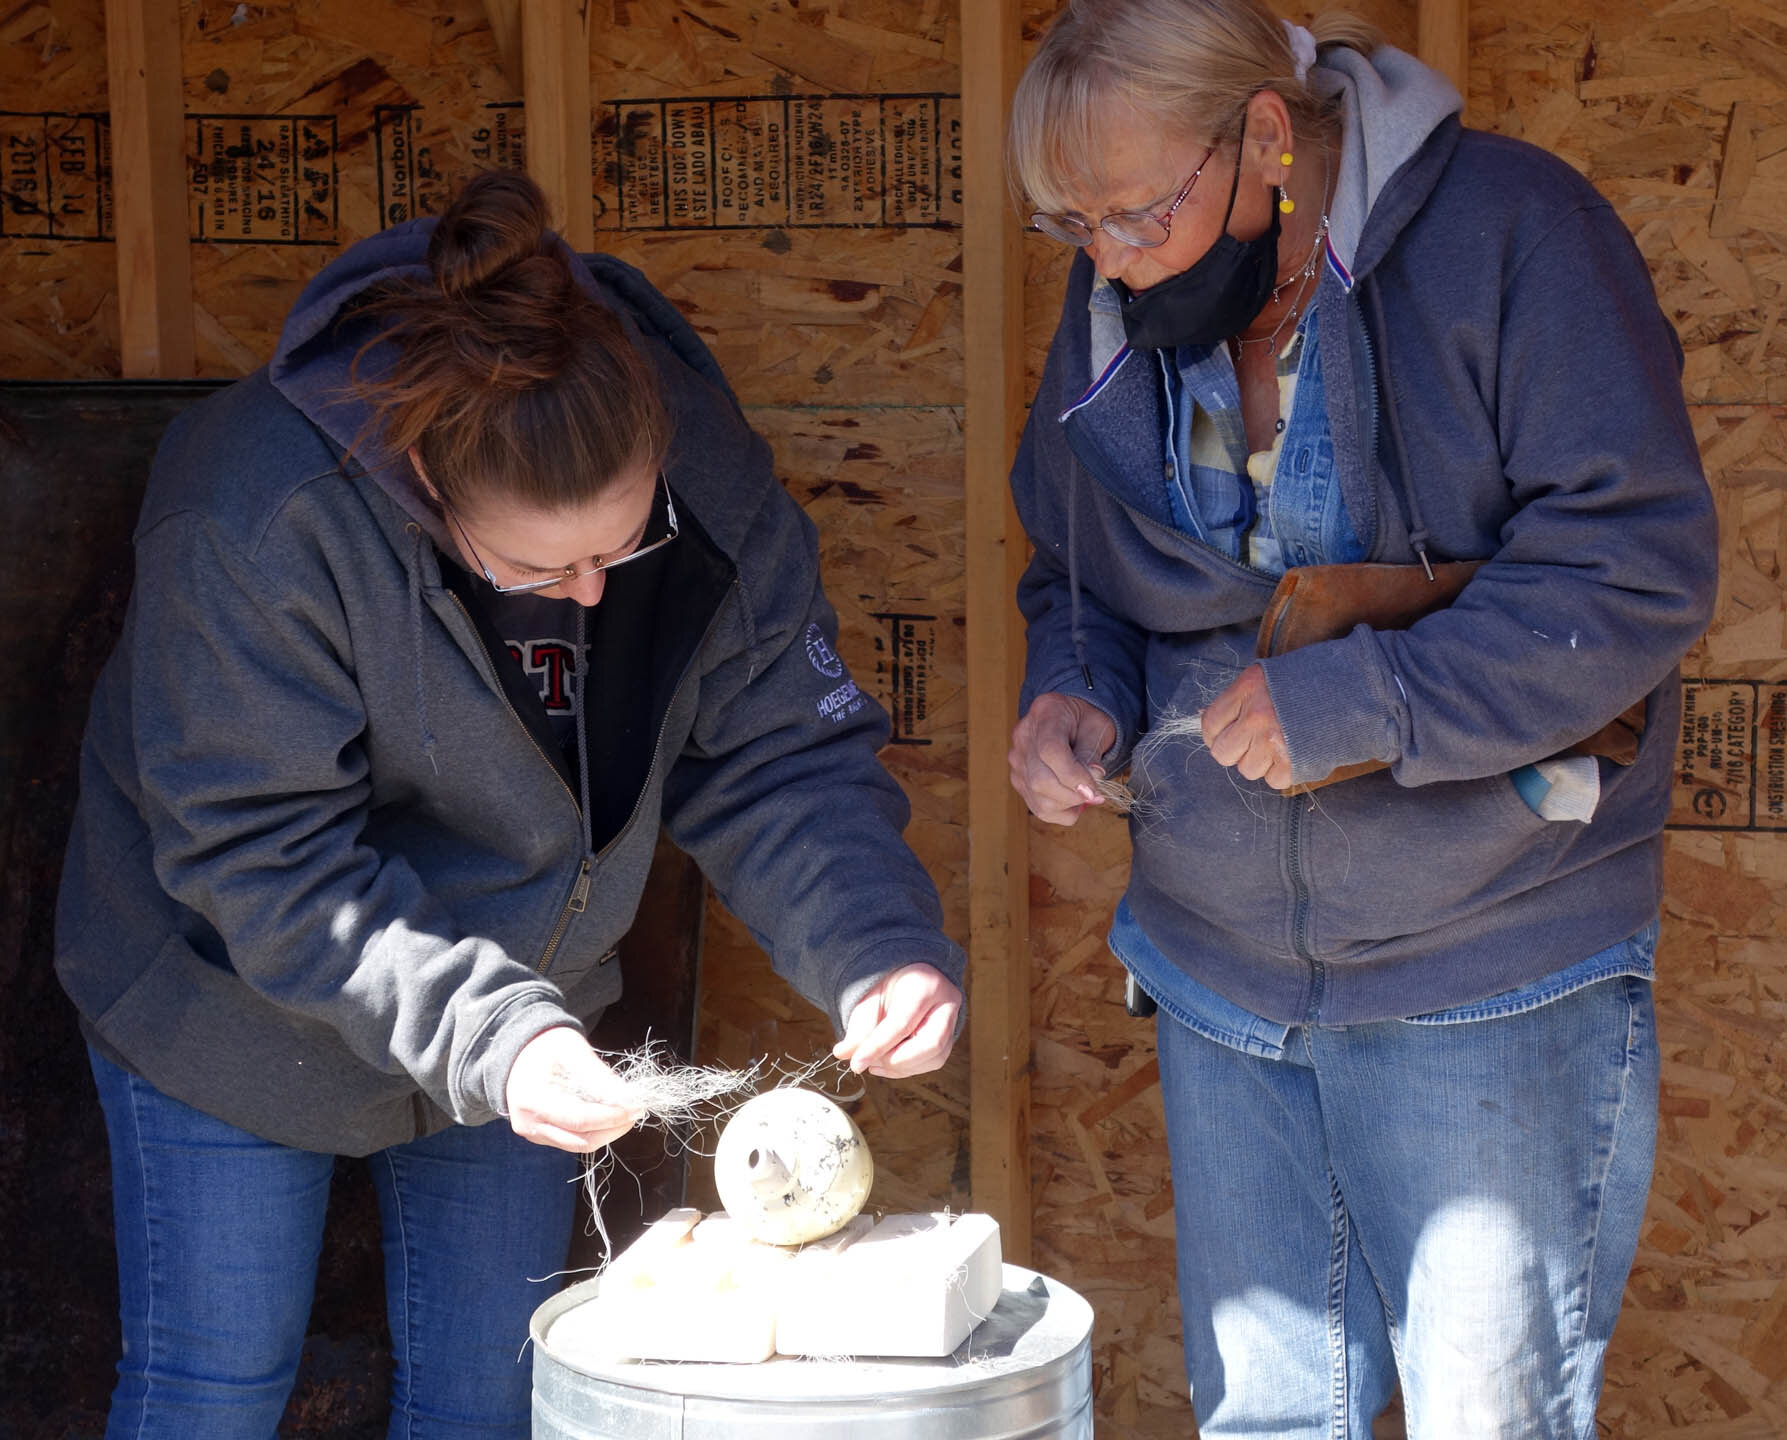
Second Raku Workshop - Horsehair Edition!
in New Artwork, Events
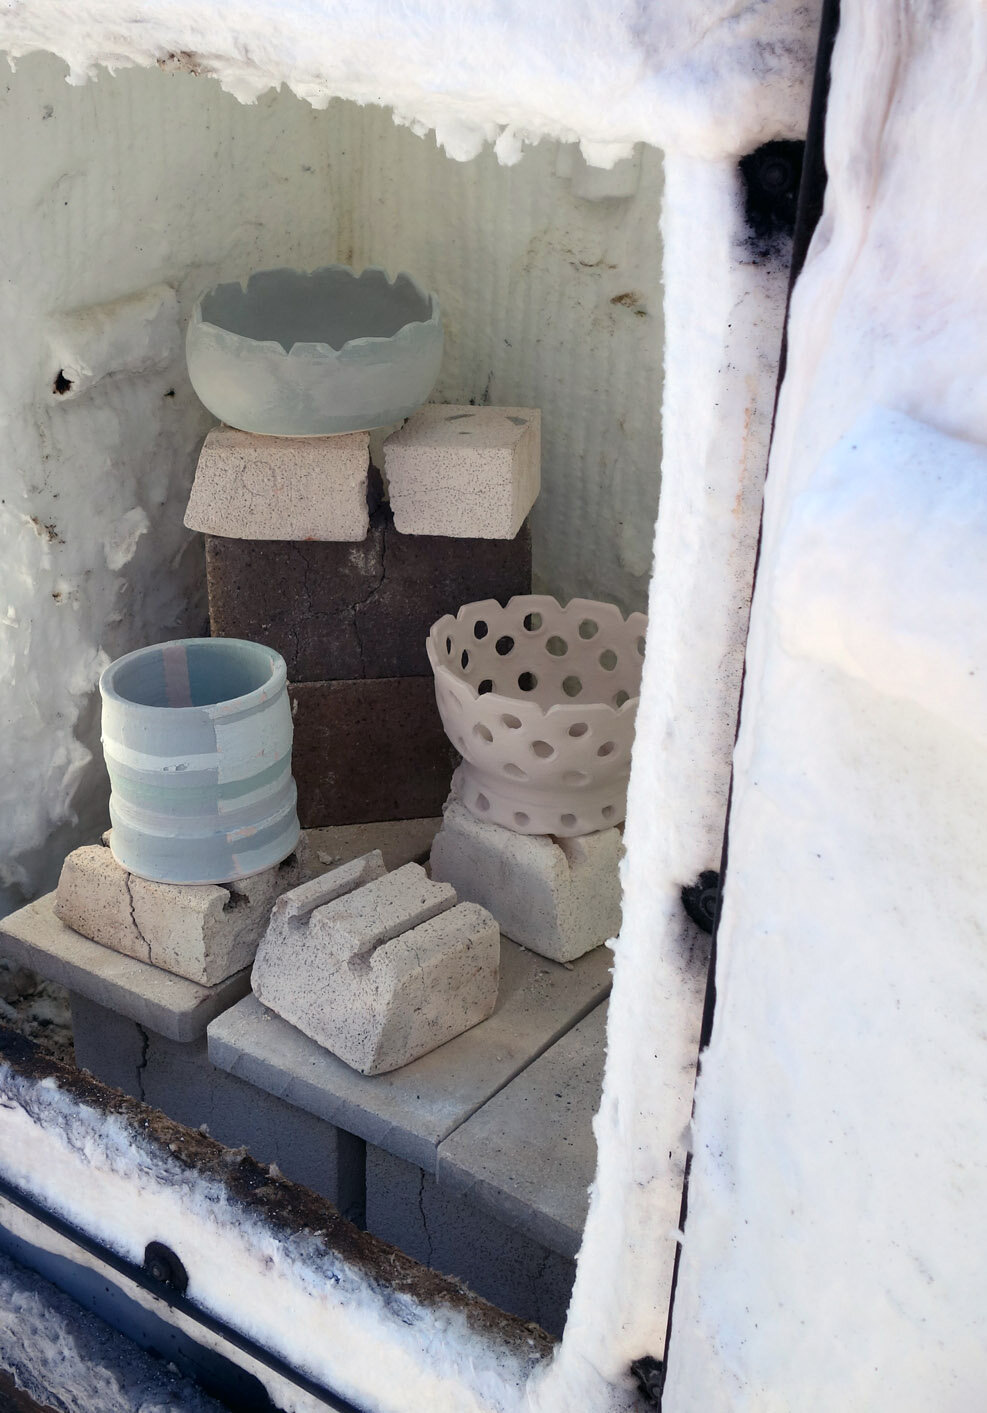
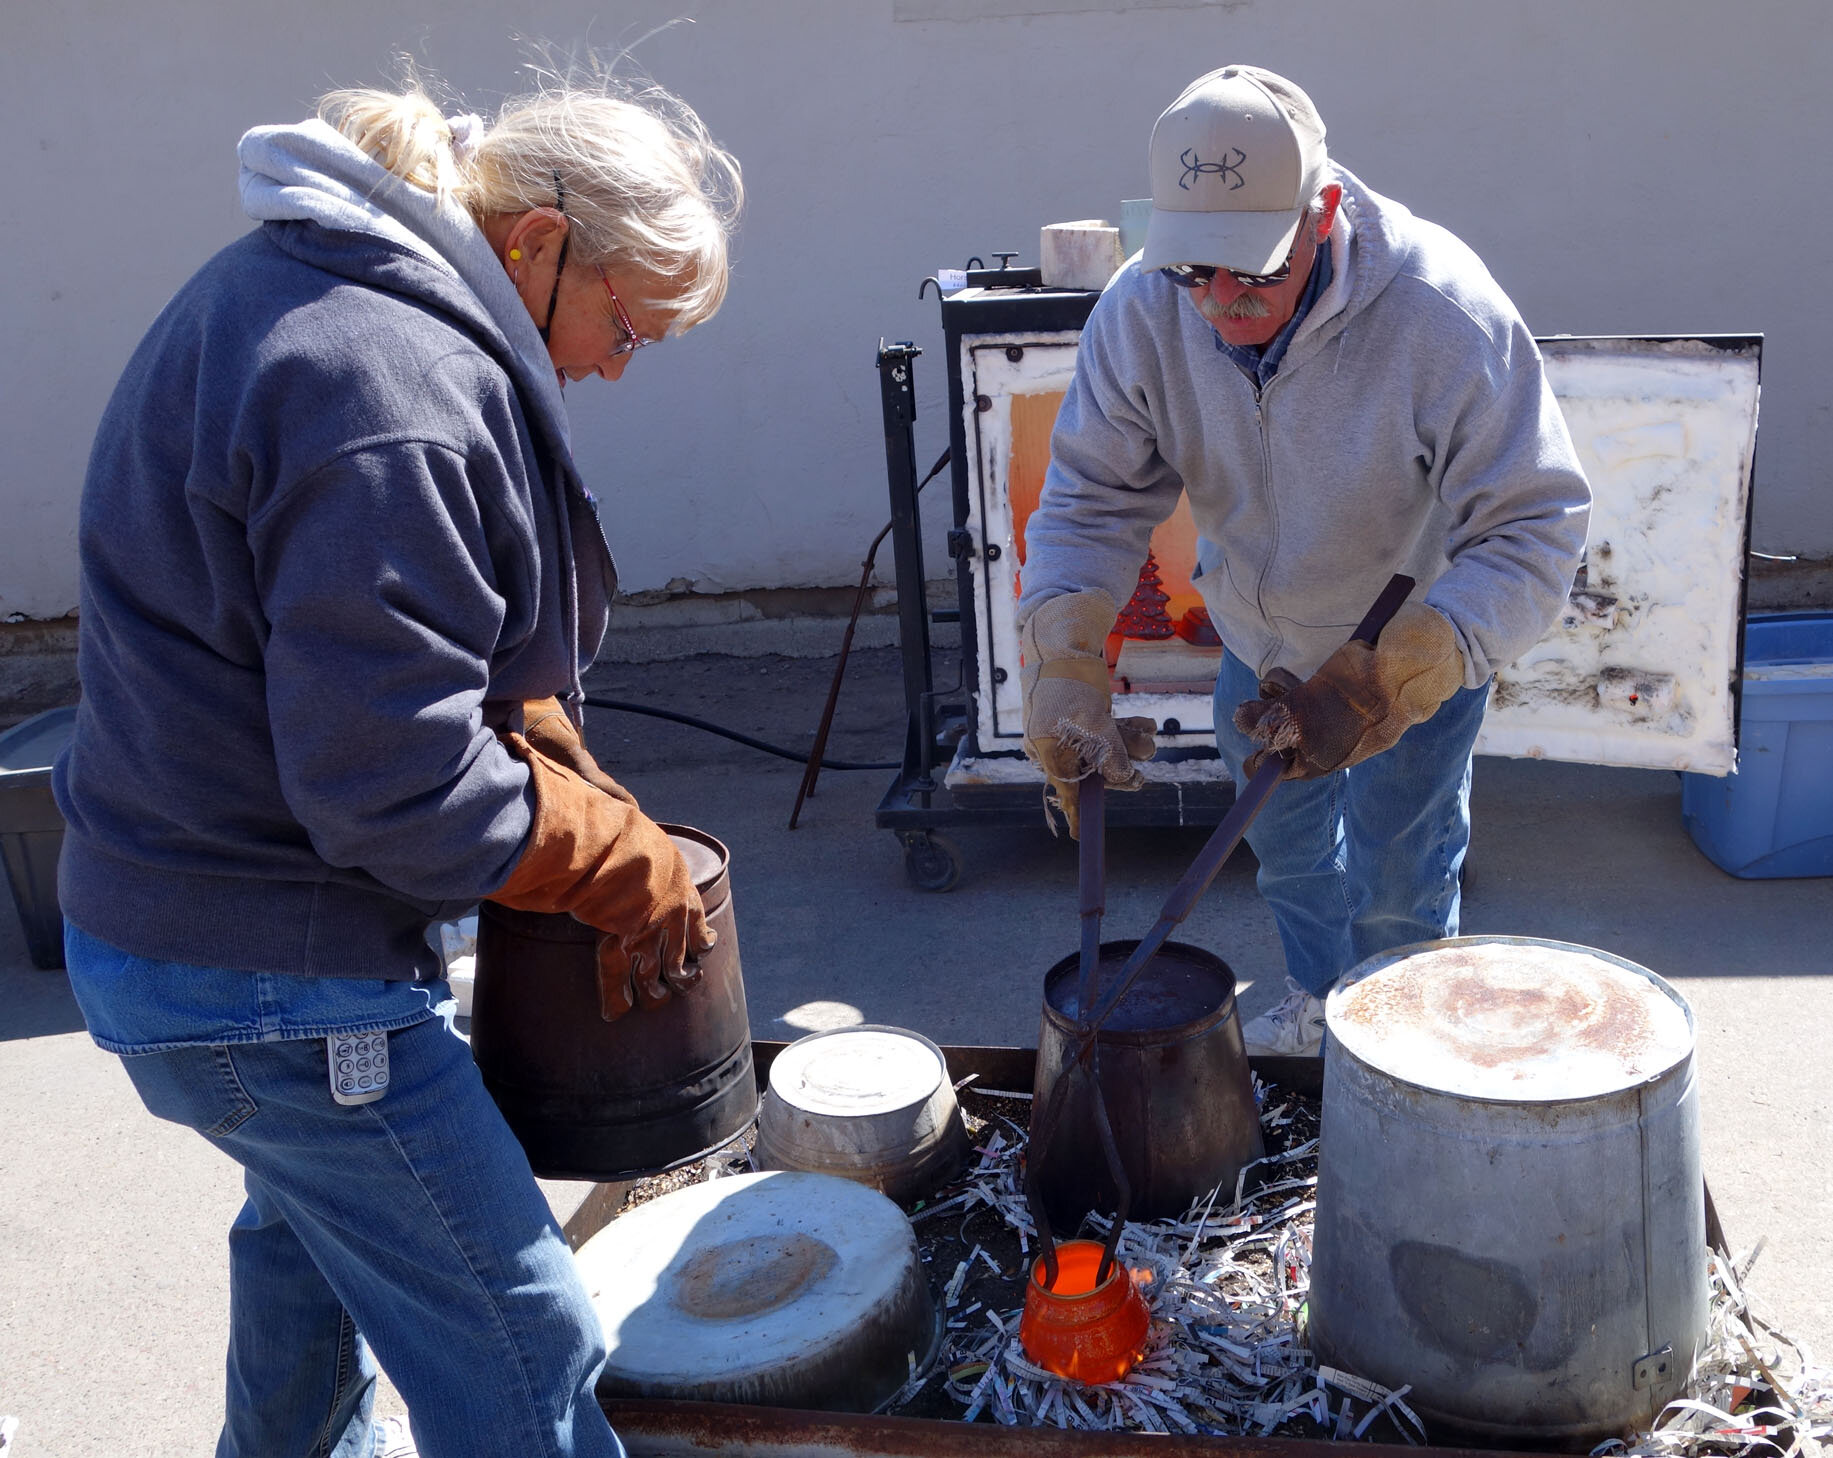
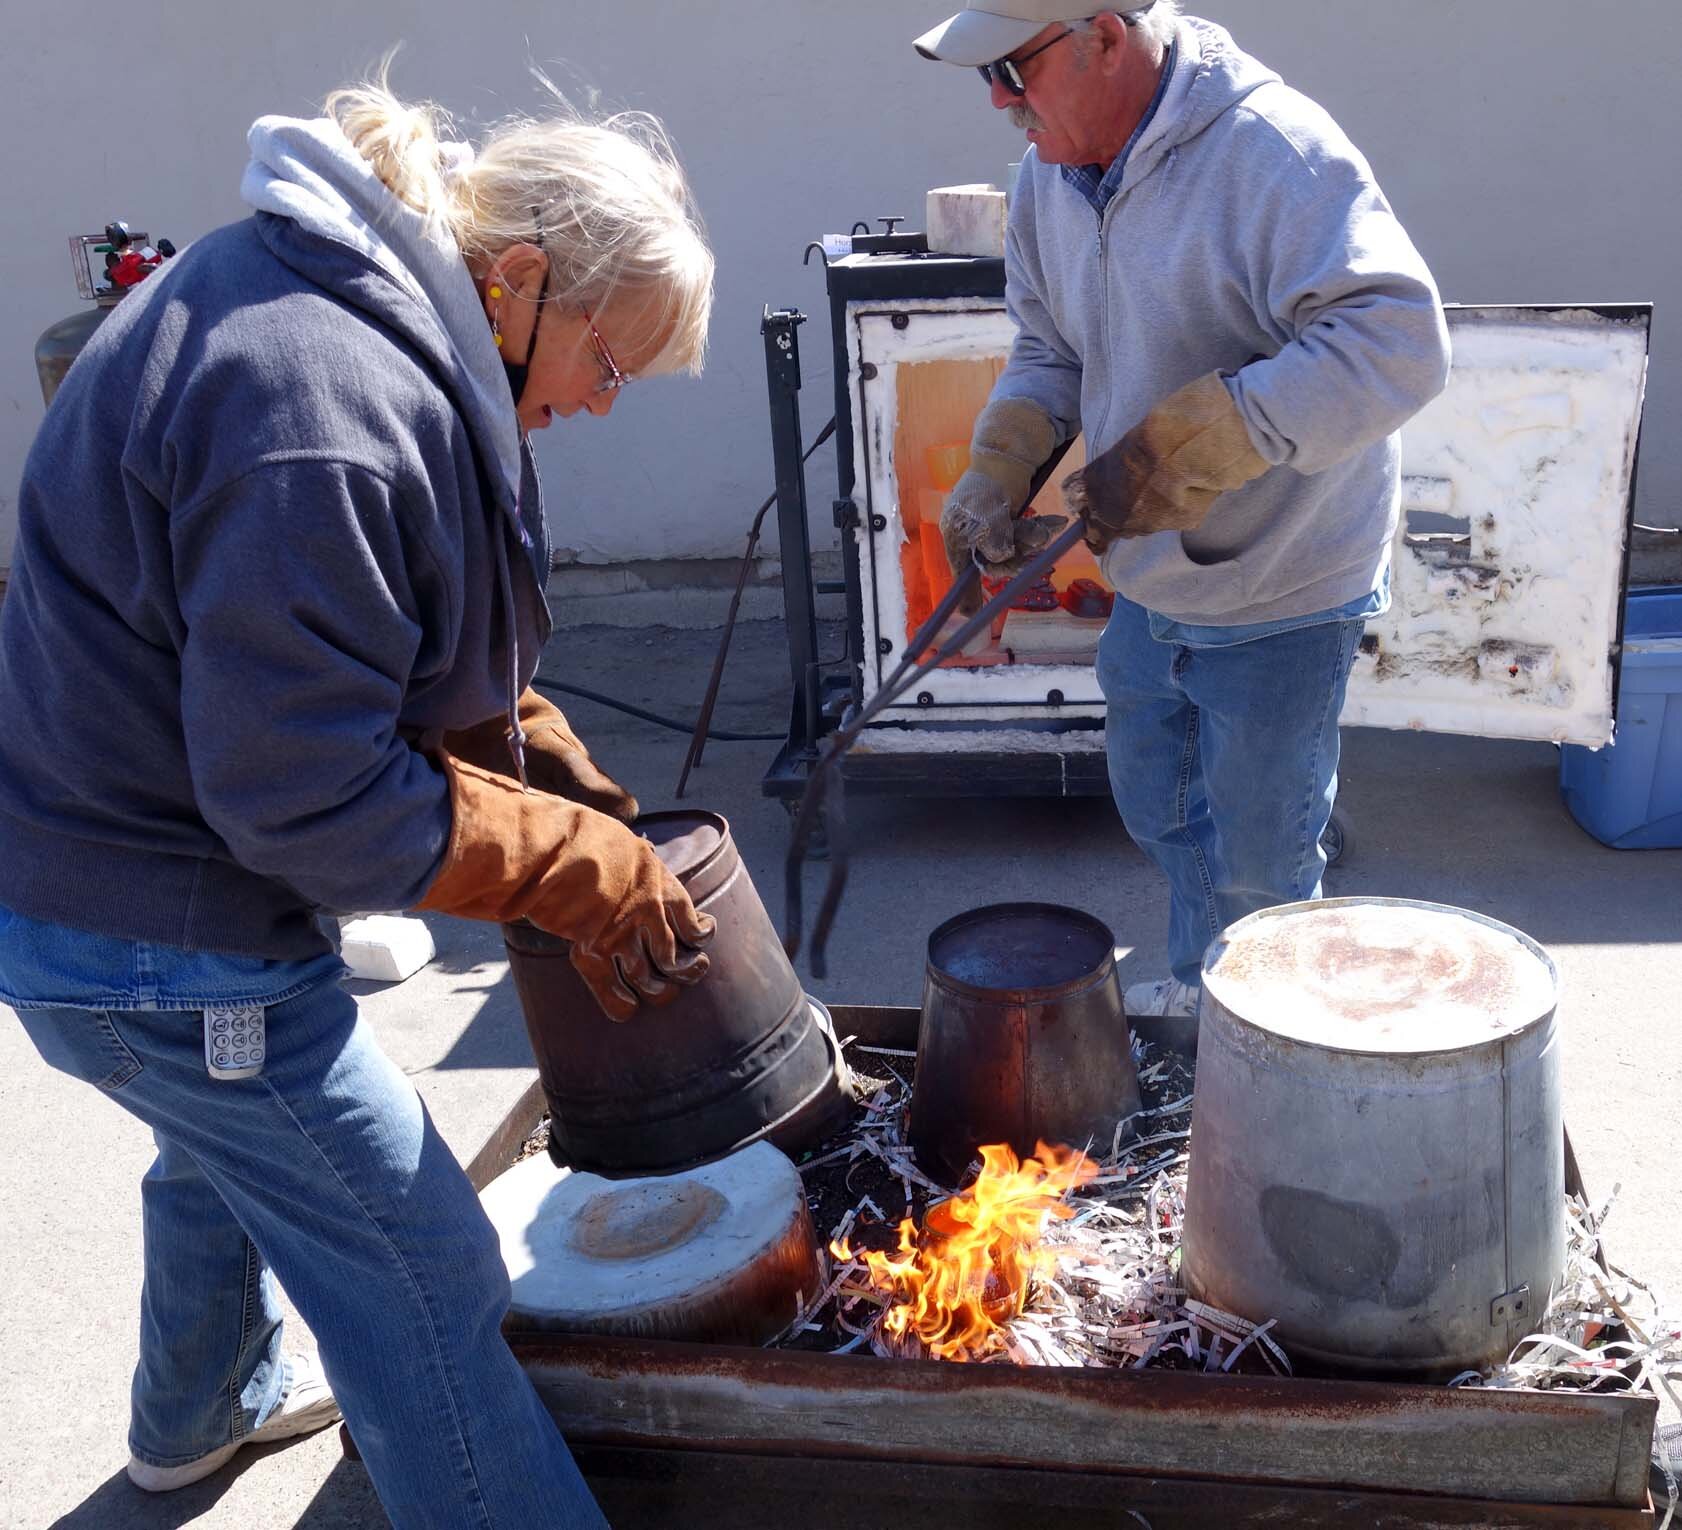
I attended a second raku workshop at Dakota Potters Supply in July! I brought eight pieces along, but this time unfortunately two of them did crack during the process as the wild temperature swings were too much for them. Thus only six pieces made it through.
At this workshop, I decided to try one of the techniques that I hadn’t yet attempted - horsehair and/or feather application! I had two twists in mind, though.
The first is that I had just had over seven inches of hair cut off in a summer chop, and my hairdresser kindly collected it for me upon my request to use in this raku process! I like the conceptual power of it being my own hair, plus human hair results in a more delicate line (though I do have pretty thick hair).
The second is that I had gathered in my ceramics research that sprinkling sugar is a possibility as well and decided to request giving that a simultaneous try. Dakota Potters had never heard of using sugar in this way, so Wanda was really curious to see the results too! She helped me add my decorations as there’s only a short window of time where the piece is at the right temperature to trap the carbonized additions.


This above bowl turned out really nicely!


This vase was even more of a showstopper, as it is the tallest piece I’ve handbuilt thus far and the height lends drama to the overall impact.
I made three “horsehair” (my hair) pieces, but the third one cracked so these two are the ones that got through without issue!
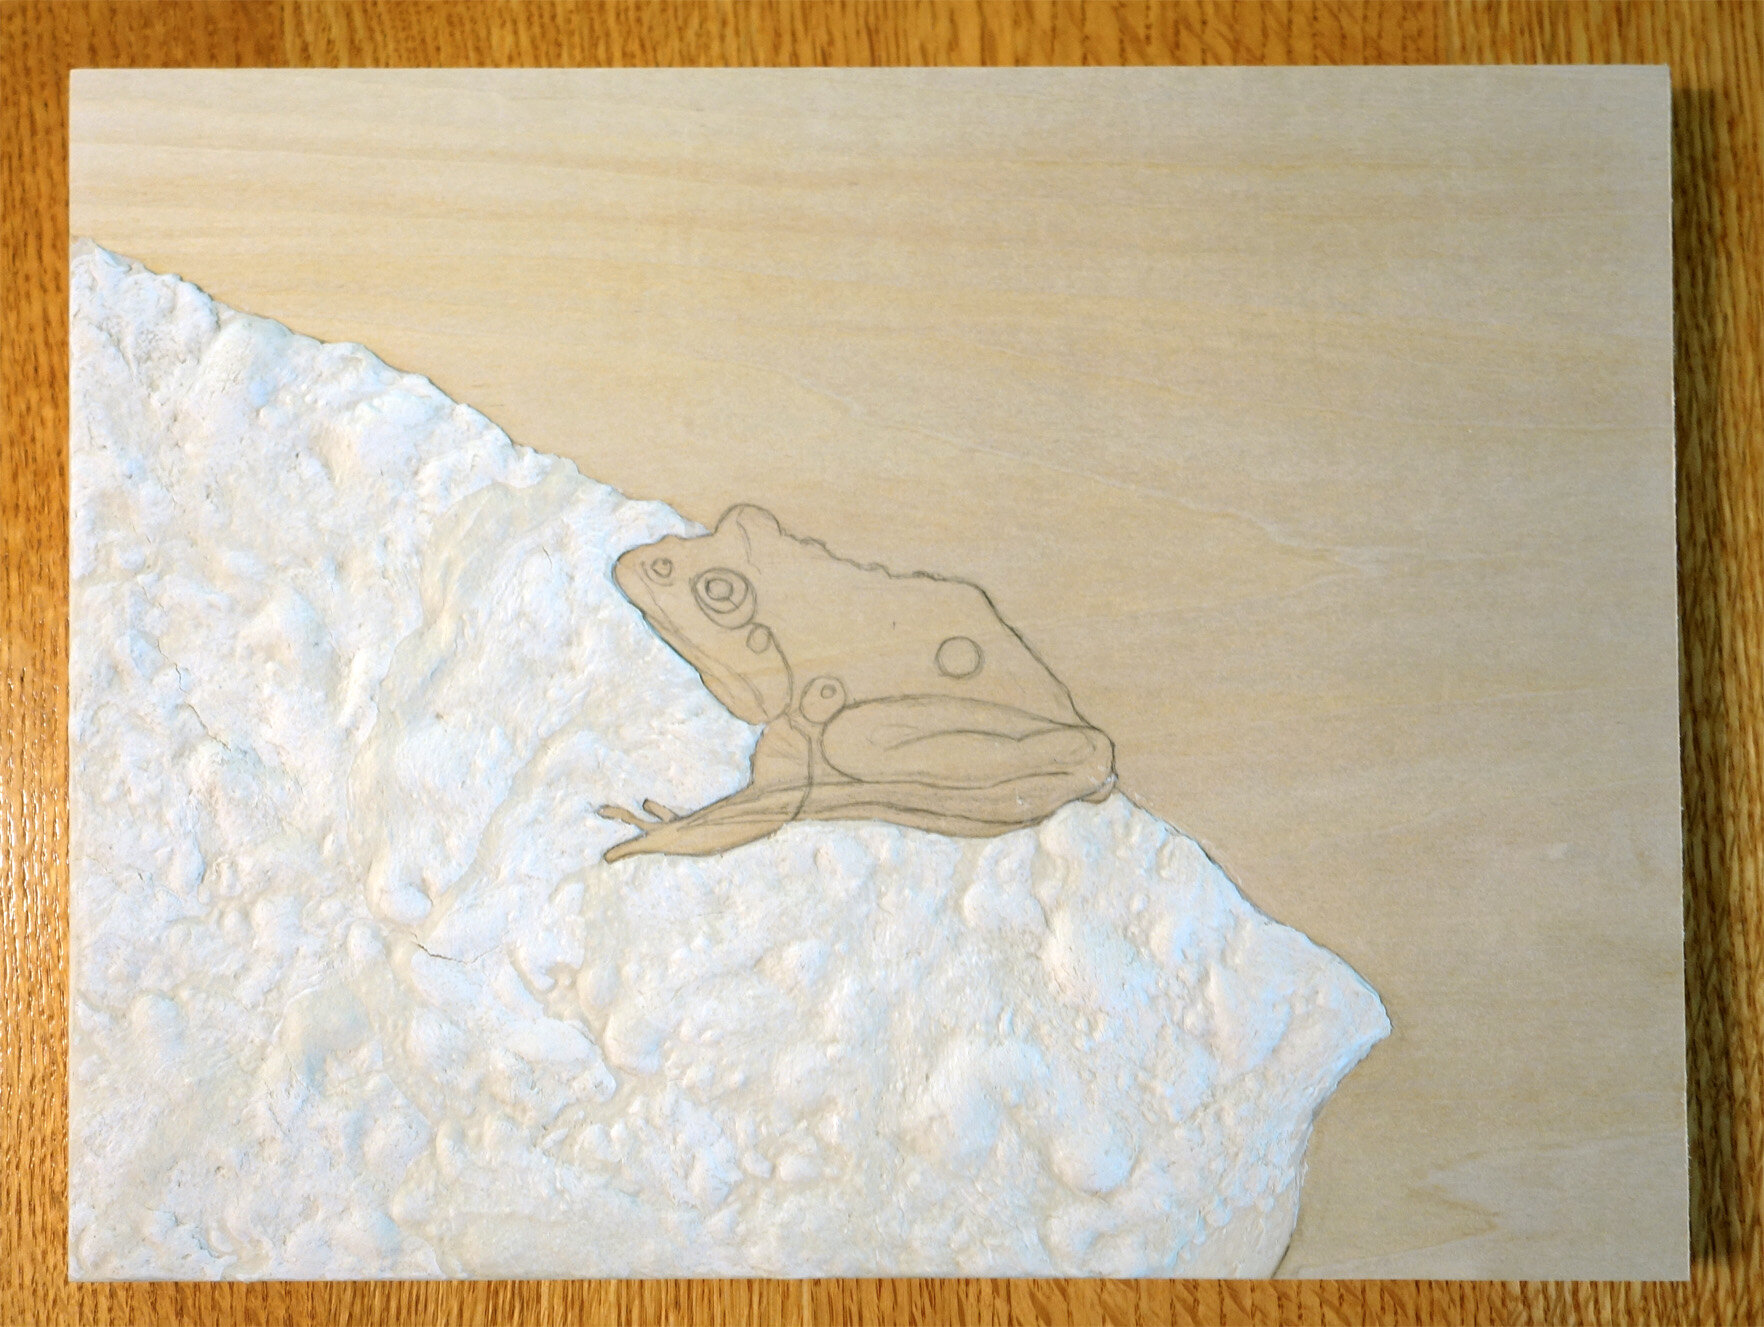
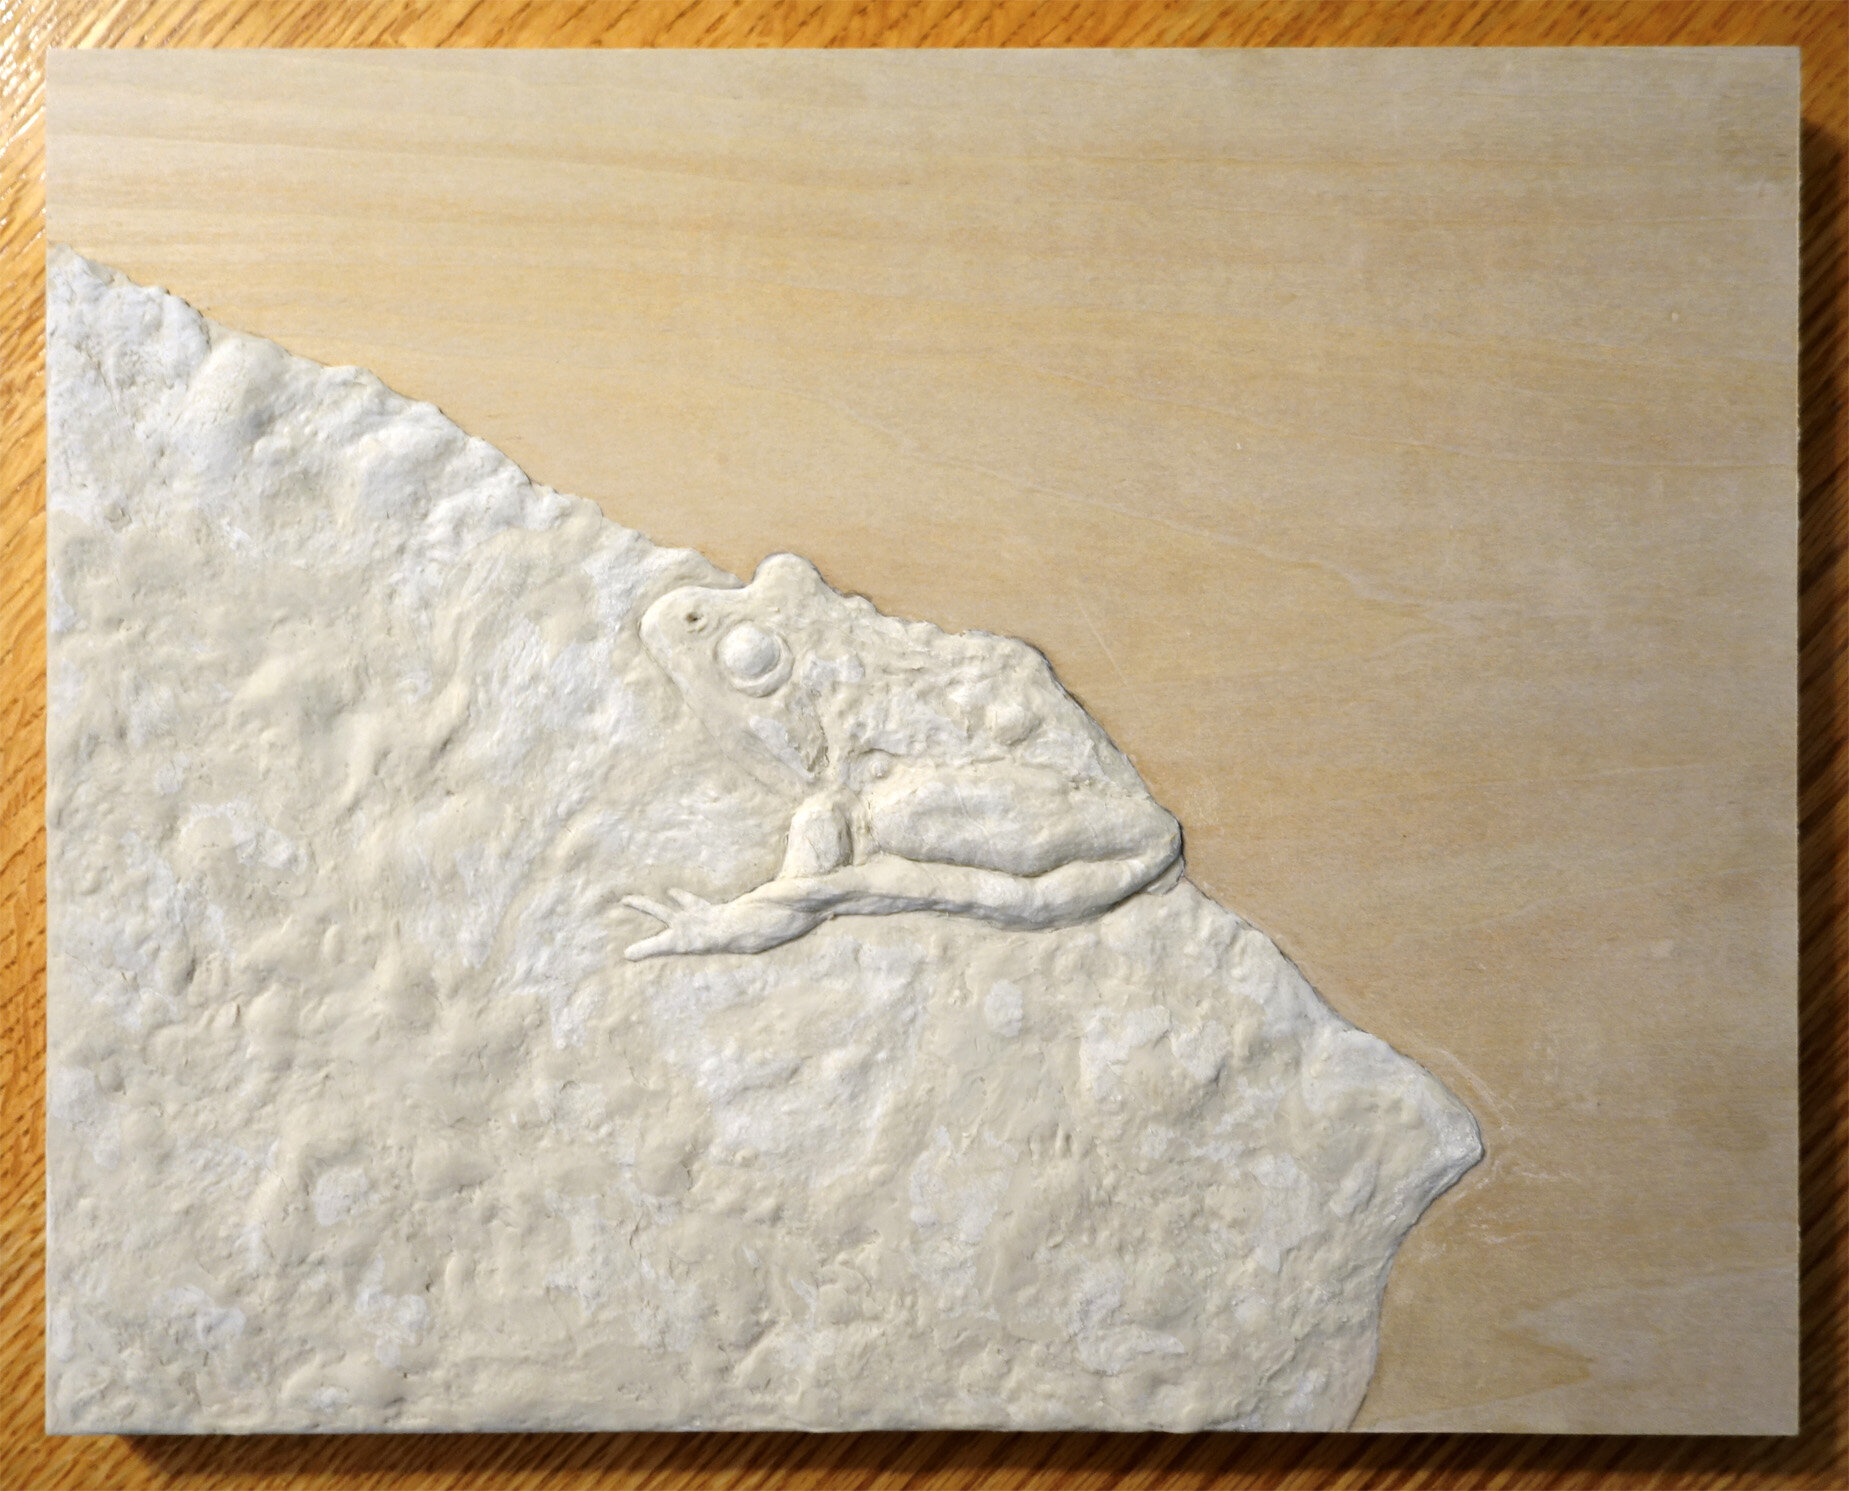
Whiterock Conservancy New Artwork: Surface
I just finished my second relief from my Whiterock Conservancy residency earlier this summer! This piece depicts an American bullfrog, Rana catesbeiana syn. Lithobates catesbeianus, floating on the surface of one of Whiterock’s turtle ponds.
Here are a couple of process pictures of the underlying QuickCure Clay relief. I began by sculpting the above-water portions of the bullfrog, and then added patches of algae as well.


After I finished the relief elements, I began to paint! I’m pretty pleased with the end result. I finished this piece with two coats of gloss varnish to contribute to a wet appearance.
This is Surface, 12x16x2”, QuickCure Clay relief and acrylic on basswood panel, 2021.
The Curious Case of the Antenna Fern
in Houseplants
I’ve been keeping houseplants for over fifteen years, and fairly early in that timespan I became a serious hobbyist. At this point, it’s not that common for me to find a species of plant for sale in a nursery I’ve never seen before. I wish it happened more often! However, recently I bought a fern that was completely new to me.
Some context: I keep what I would consider to be a small number of ferns; many ferns require a level of watering or humidity that can be hard for me to consistently supply. I was previously holding stable at four species of ferns which have proven pretty resilient - Nephrolepis exaltata 'Mini Russells' (a miniature Boston fern cultivar), Nephrolepis exaltata ‘Green Fantasy’ (another miniature Boston fern cultivar), Polypodium formosanum 'Cristatum' (ET Fern), and Davallia fejeensis (Rabbit's Foot Fern). However, due to my branching out into carnivorous plants, I’ve become more accustomed to daily watering. As such, I am willing to give more fern species a go and brought three new ferns into my collection this summer. Two of them I’ve either seen before even if I haven’t acquired them or at the very least have seen similar versions, and then there’s this third…
The tag called it the “Antenna Fern” and provided the scientific name Doryopteris cordata. When I purchased it, it had a soft groundcover of rounded, verdant, gently hairy leaves and I found it very attractive.
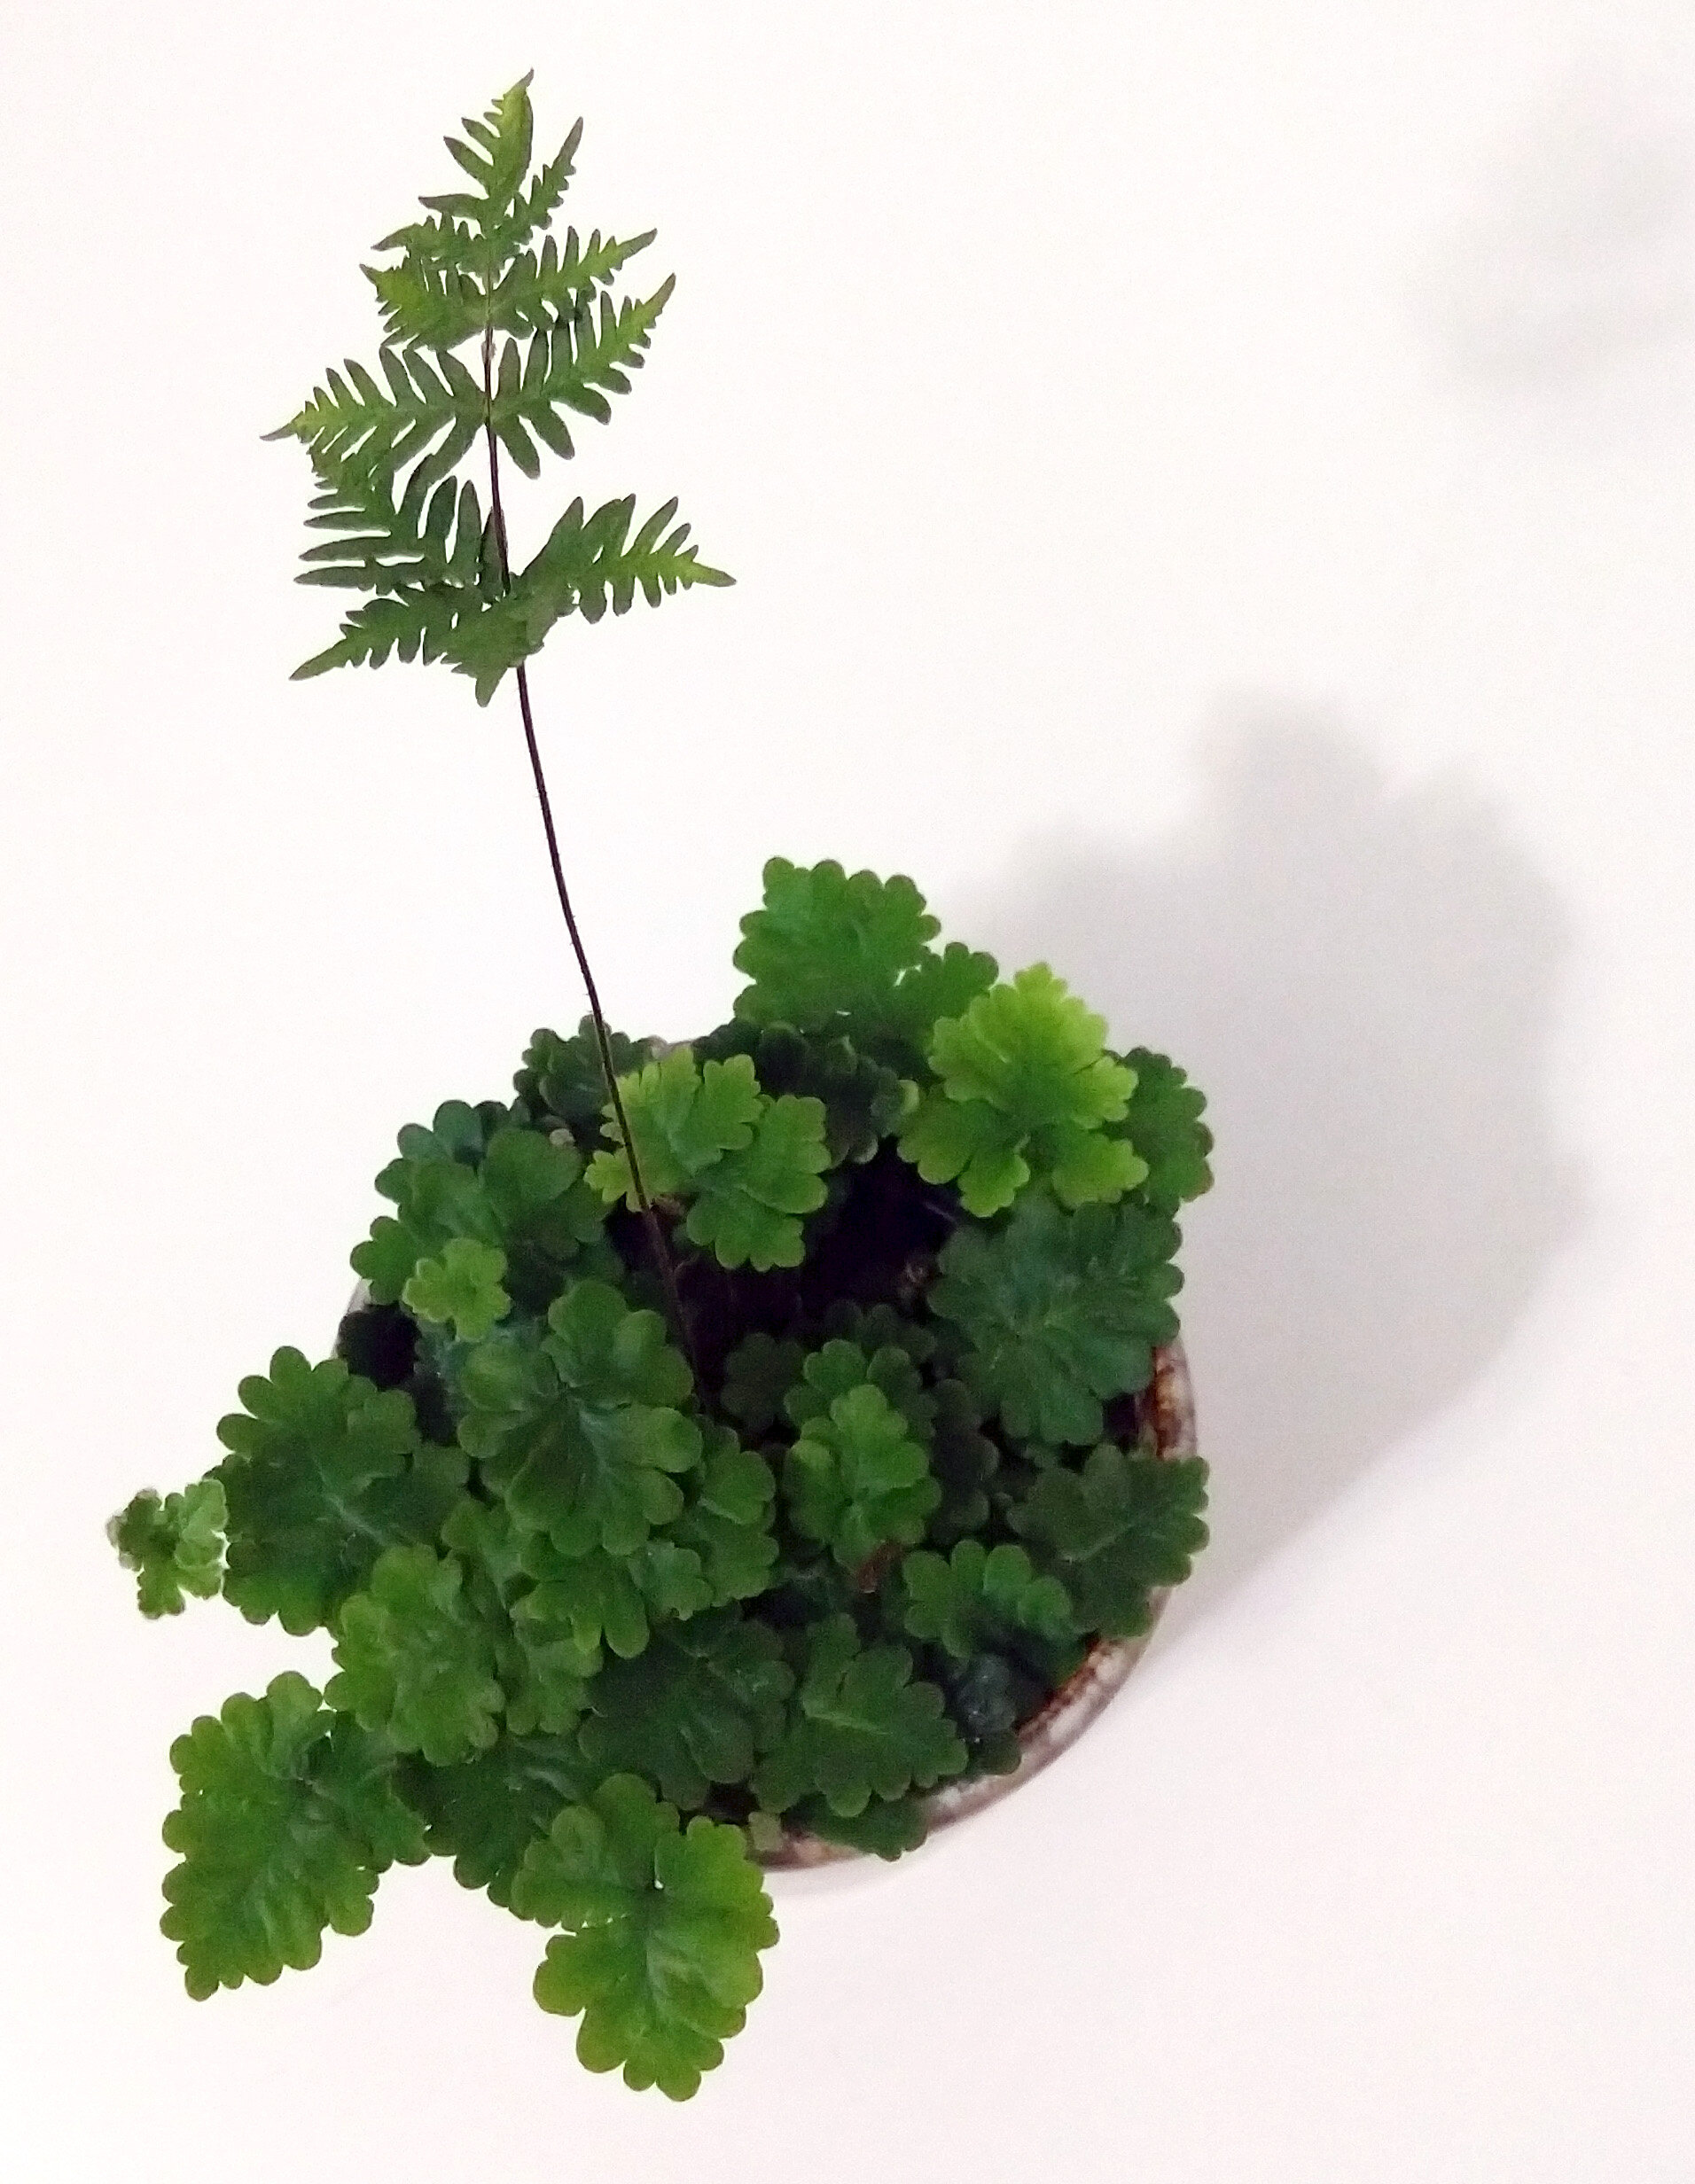
My Doryopteris pilosa var. gemmifera “Antenna Fern.”
A few weeks after it had come into my collection, it appeared to be growing a very errant new leaf. Instead of unfurling at ground level, it grew taller and taller until it loomed eight inches over the rest and after unfurling, it looked to be a completely different fern. I assumed a spore or very small plantlet from another fern species had gotten mixed up in my plant, and figured that was that.
As a couple more weeks passed, I grew even more curious as I assumed that if it was a second fern, another leaf or two would begin to appear in a central crown formation. This hadn’t yet happened.
As I was studying my main plant while trying to see how the interloper was doing, I decided I wanted to know more about the “Antenna Fern.”
Upon researching the fern, the provided scientific name of Doryopteris cordata does not actually exist. This is not that surprising; plant nurseries often mislabel their stock. The actual scientific name is Doryopteris pilosa var. gemmifera. But here’s the real shocker: I discovered in my research that the second fern is in fact the first fern; Doryopteris pilosa var. gemmifera is an extremely dimorphic fern, but apparently as many as one in five fern species exhibit some degree of leaf dimorphism (this also surprised me). In this case, the dimorphism results in a sterile groundcover and a fertile canopy that is better able to disperse spores into the wind. The colloquial name “Antenna Fern” is in fact a nod to the fertile fronds.
My research also confirmed that this is a rare plant in both cultivation and in the wild; however, if you’re interested in it there do appear to be some online vendors offering it up! Just a note of caution, though - from my own experience, this fern does need moisture at all times; I went on a three-day trip and upon my return it was desiccated and crisping, whilst all my other ferns were doing just fine. A good drink did refresh it, however, and aside from a couple crisp spots it’s fully bounced back as you can see in the photo above! I do wonder if this is my fern’s first ever antenna, or if the nursery also thought that the fertile fronds were hitchhikers and cut them off…
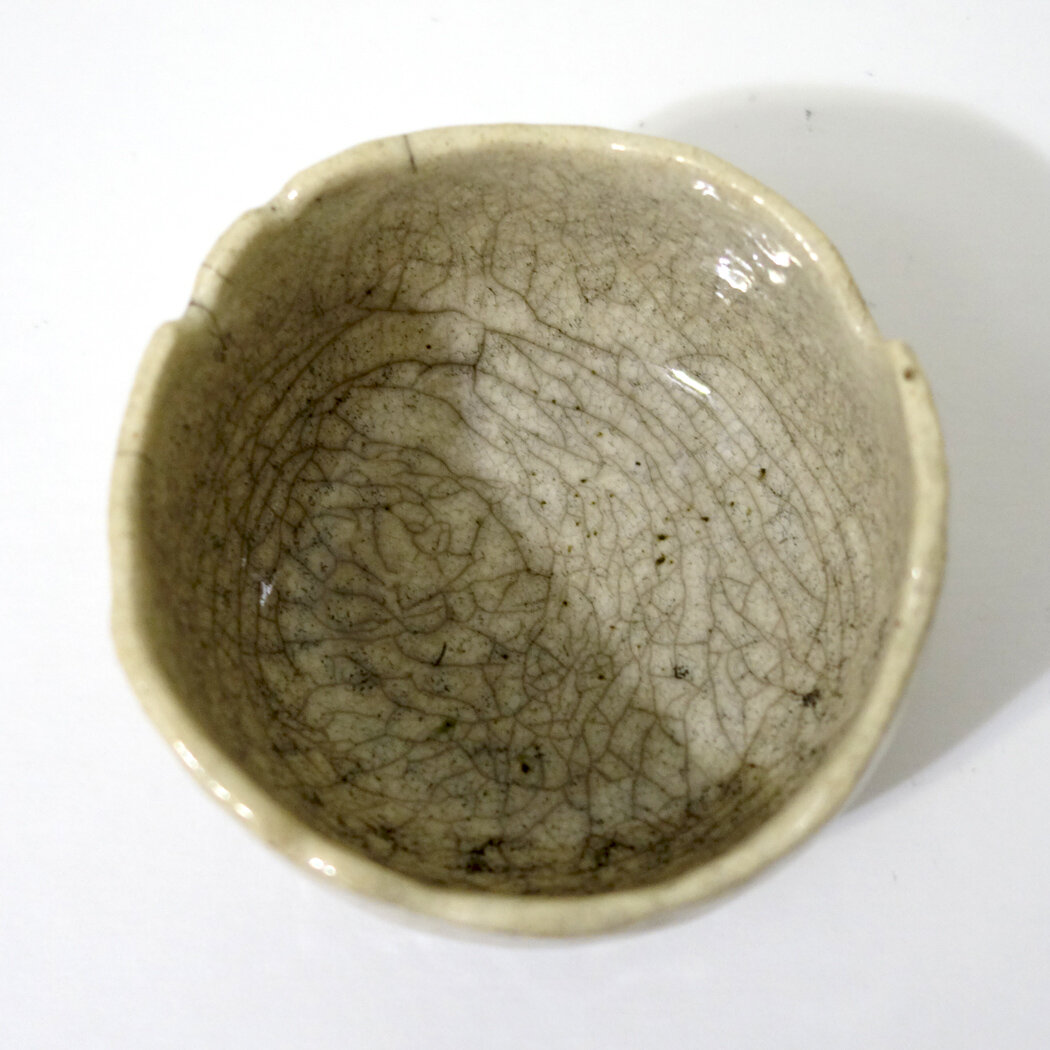
First Raku Workshop Pieces - White Crackle Edition
in New Artwork
I’m just going to call it how I see it; the white crackle pieces I got out of this first round of raku firing were by and large underwhelming. The instructions say to put three coats of the white crackle glaze on; I think my interpretation of what three coats should be was thinner than the intended result. Next time, I plan to do at least five coats. However, it is also the case that in order to deter cracking, we did not plunge these pieces into water upon removing them from the kiln. Though dunking into cold water does increase the chances the whole piece shatters, it will also increase the crackle effect in any survivors. Not doing so may have also limited the resulting crackle in these ceramics.
I did apply and rinse off India ink on all the below pieces in a post-process attempt to heighten the crackle’s contrast; this did have a very slight effect, but it didn’t do nearly as much as I’d hoped.
Below is the first piece; it’s a small dish, and honestly, the crackle is more impactful in these photos than it is in person. To me, it’s not that interesting of a piece, which is a shame as the costs of the process make it more expensive than I think its aesthetics merit.


The second piece has a similar aesthetic; it is perhaps a bit stronger, but still not as powerful in the crackle as I’d like. This one is a planter; raku is not watertight, so I plan to coat the interior with Thompson's WaterSeal to hopefully increase longevity before planting inside.


The third piece is much the same as the second, including it being a planter. The India ink soaked into the general glaze body more on this one, though, in a kind of pitting or freckling effect.
I had completed all of my white crackle glazing on these pieces before I fired any of them, which I now realize was a mistake; I should have glazed and fired one and then adjusted my process for the subsequent pieces. Admittedly, that is only somewhat possible as there are a limited number of firings per workshop, but it is a strategy that I plan to consider moving forward.


Finally, I present to you the only white crackle piece from this workshop that I consider to be successful! A combination of luck and possibly forgetting how many coats of glaze I applied and thus erring on the side of adding another contributed to this result. The brownish tinge near the top rim is an artifact of the smoke staining the surface; it is easily removable in the first 24 hours of the ceramic’s post-glazing life but then settles in. I somewhat thoughtlessly removed it from all the above pieces, but with this one I realized I could use it as a design element and didn’t remove it all. The strong black at the base is an artifact of the burning substrate (newspaper, in this case); it too could have been readily removed early on in the process but I again thought it added a dynamism to the piece. This one, too, is a planter, and will be receiving the Thompson’s WaterSeal on the interior.


I am still intrigued by the possibilities the crackle glazes (white and clear are the most standard options; turquoise is a rarer possibility as well) offer, but I will be more conservative moving forward with this glaze type due to this overall turnout on my first batch of attempts.
First Raku Workshop Pieces - Copper Glazes Edition
in New Artwork
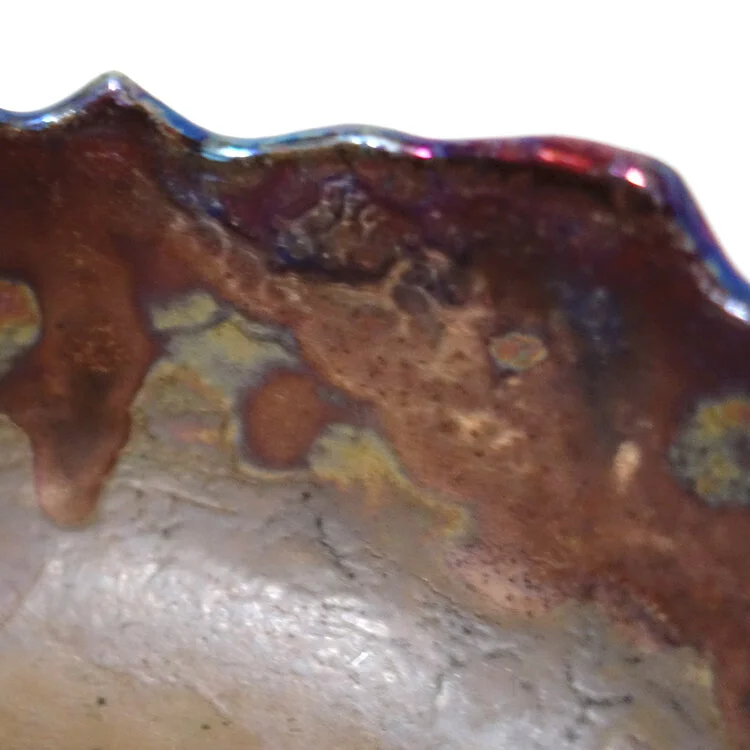
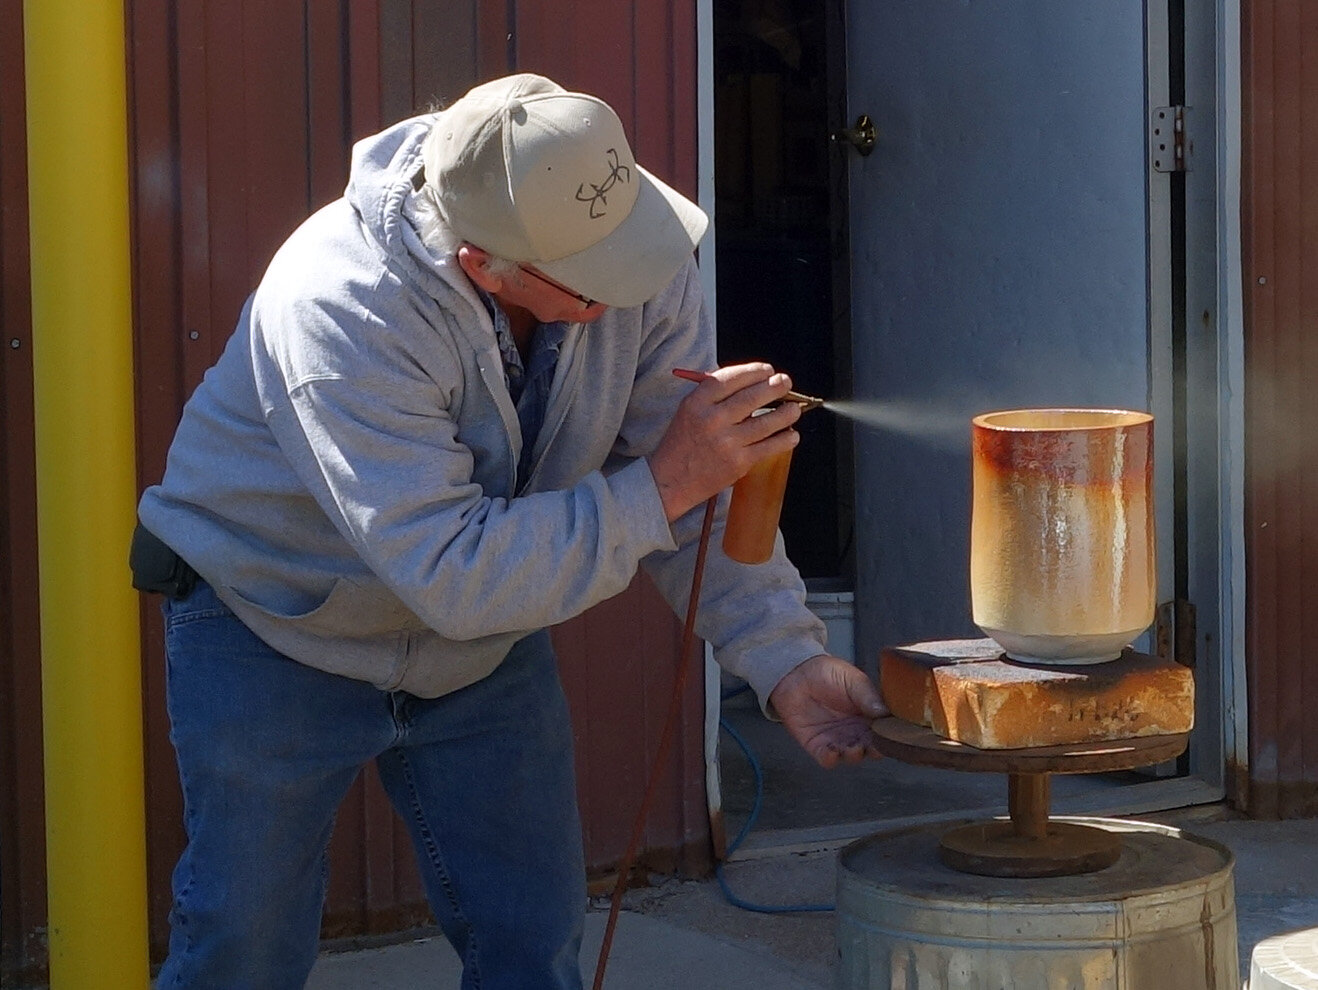
Here are my copper glaze pieces! These all turned out beautifully, but let me tell you - I learned that I cannot control what I’m going to get, at least not with all the variables that were at play at this raku workshop! The local temperature and humidity, the time in transferring from kiln to reduction, the organics used, the timing and duration of any burps (adding oxygen back into the reduction environment) - each and every factor influences the final color, shine, and character.
Amusingly enough, from having surveyed some sample pieces in advance of glazing, I determined I quite liked lithium carbonate as the interior glaze and used it on the inside of all four of my copper pieces. For the lips and exteriors, I tried out a few different options - some more lithium carbonate with a touch of Molly’s banding purple, emerald copper, golden rainbow, midnight luster… and a couple of the exteriors look almost identical despite or perhaps because of my experimentation, in concert with the rest of the environmental factors! (Because the exterior glazes didn’t align with my expectations of them, I don’t remember which specific bowls got which exterior glazes.)
In this first bowl, the lithium carbonate interior is matte and relatively dull, and it provides a stark contrast to the dark shiny rainbow lip and exterior of the bowl.


This second, smaller bowl - like every bowl here - has lithium carbonate on the inside, but this time it resulted in a satin, coppery base and a high gloss, pink-and-rainbow interior side. The exterior is also high gloss but contrasts the interior with silvers, golds, and aqua hues, accented by some sooty squiggles. This is perhaps the loudest bowl, and it gives me a unicorn cupcake vibe.


Here is the third bowl! In many ways it’s the most subtle of the four, but it is nevertheless quite rich. The lithium carbonate here developed a semi-gloss interior that has a lot of variation, rings, and finely-detailed contrast. The exterior reflects some of the same color palette of the interior, but it adds some turquoise and blue into the mix and has a higher gloss.


Finally, we come to my favorite piece from the whole day! This bowl is really nice. The lithium carbonate interior here has a high gloss and is very coppery with splashes of blue and purple and finely detailed contrast. It is complemented by a high gloss dark rainbow exterior that is very reminiscent of the first bowl and pretty reminiscent of the third bowl in this post.


Though much of the reason this last bowl is so powerful is its glazing, another consideration is that it is the largest of the pieces I brought. With that in mind, I plan to bring mostly large pieces to my next raku workshop.
Which copper glaze bowl is your favorite?
First Raku Workshop Pieces - Baked Potato Edition
in New Artwork
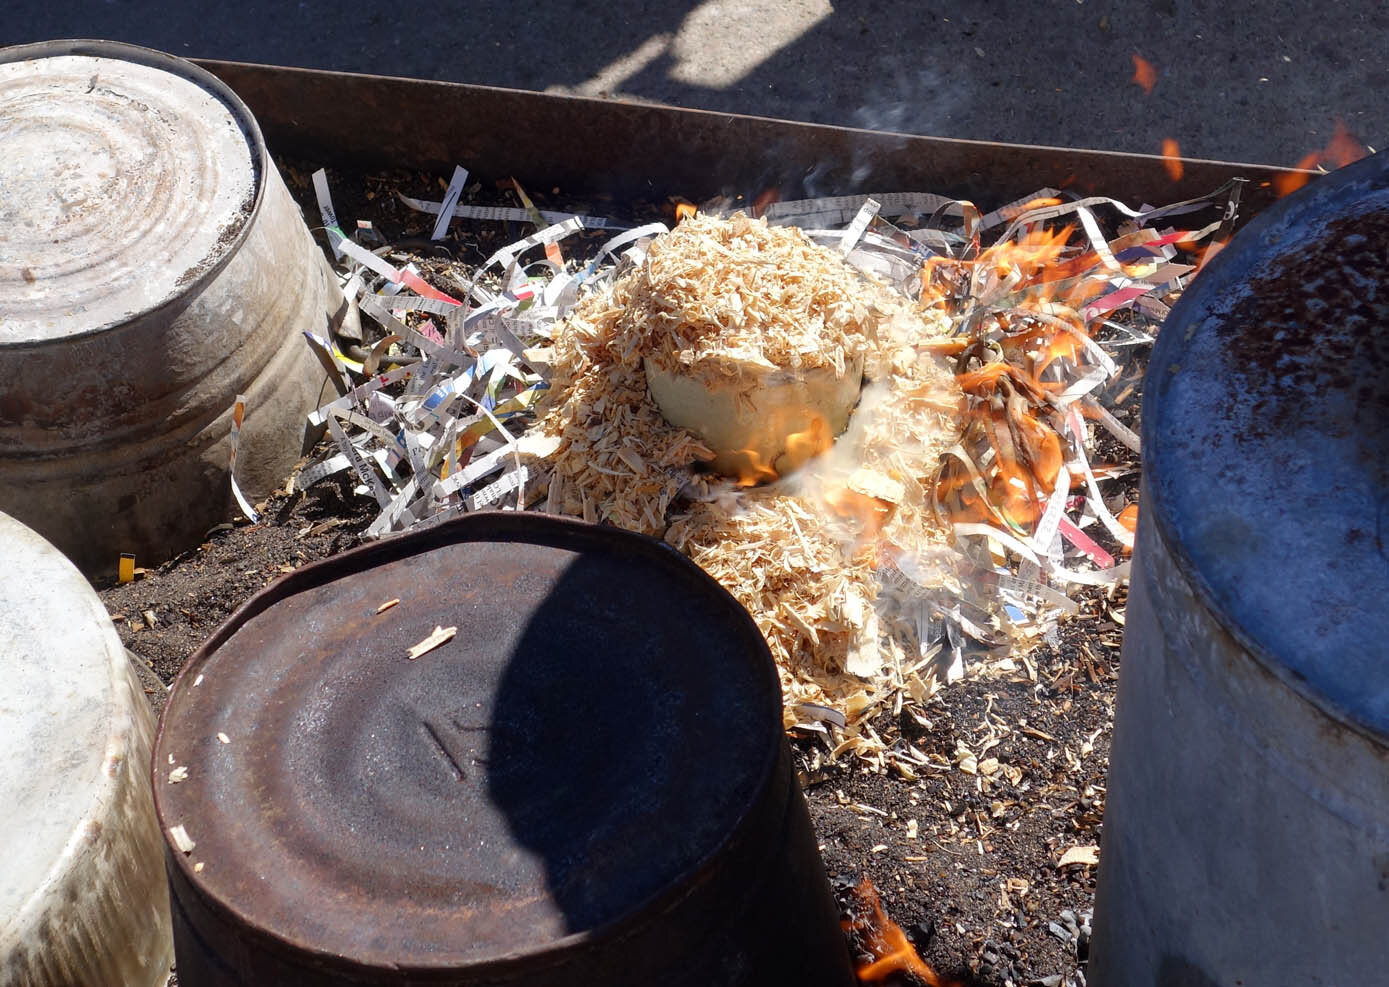
As I mentioned in my first raku post, the “baked potato” technique involves coating the bisqueware in ferric chloride, sprinkling it with sugar, salt, and/or horsehair, and then bundling it up in aluminum foil like a baked potato before firing it. The one example piece we were shown of this technique was interesting but not super compelling, so I just tried two “baked potatoes” out in the form of a couple cache pots.
Interestingly, the resultant pieces did not come out as advertised, but I do really like how they ended up. I was told the sugar and horsehair spots would turn black, but on my piece they are mostly white with some grays. This could be for a couple reasons: A) all the environmental variables at play - the local temperature and humidity outside, the ferric chloride purity and concentration, the thickness and tightness of aluminum foil, etc. B) at the time I understood I was to put one bundling of aluminum foil on, but afterwards I heard that perhaps the instructions called for two. Reason B is all the more interesting because some of my foil burned off in the kiln, exposing part of the pottery inside. The kilns did not have organics inside beyond what was in the “baked potatoes” and had vents providing air flow, so maybe the burning of the foil resulted in less carbon trapping than would otherwise have occurred?
Due to the general inconsistencies and vagaries of raku firing and the complicating factor of my still not being sure how many layers of aluminum foil is advisable, I’m very unclear on if I can replicate the appearance of my “baked potatoes” in the future.
Here is my first “baked potato” cache pot. As you can see, it kind of looks like red marble or agate. I had the choice of sealing these pots with a gloss or matte coat. I chose the matte, which I stand by.


And this is my second “baked potato,” which was fired in the same round as the first. I do really like the appearance of these, but I’m not as convinced that it’s best suited to cache pots though it certainly will look nice as such. I’d like to try a large bowl or two with this technique next time, as I think that could be even more gorgeous - though it’s all dependent on how the firing goes!


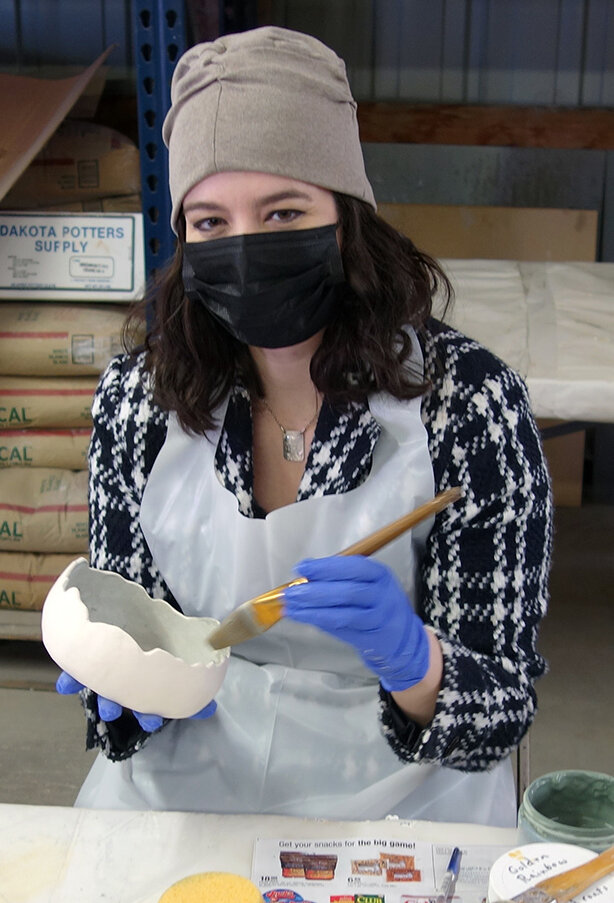
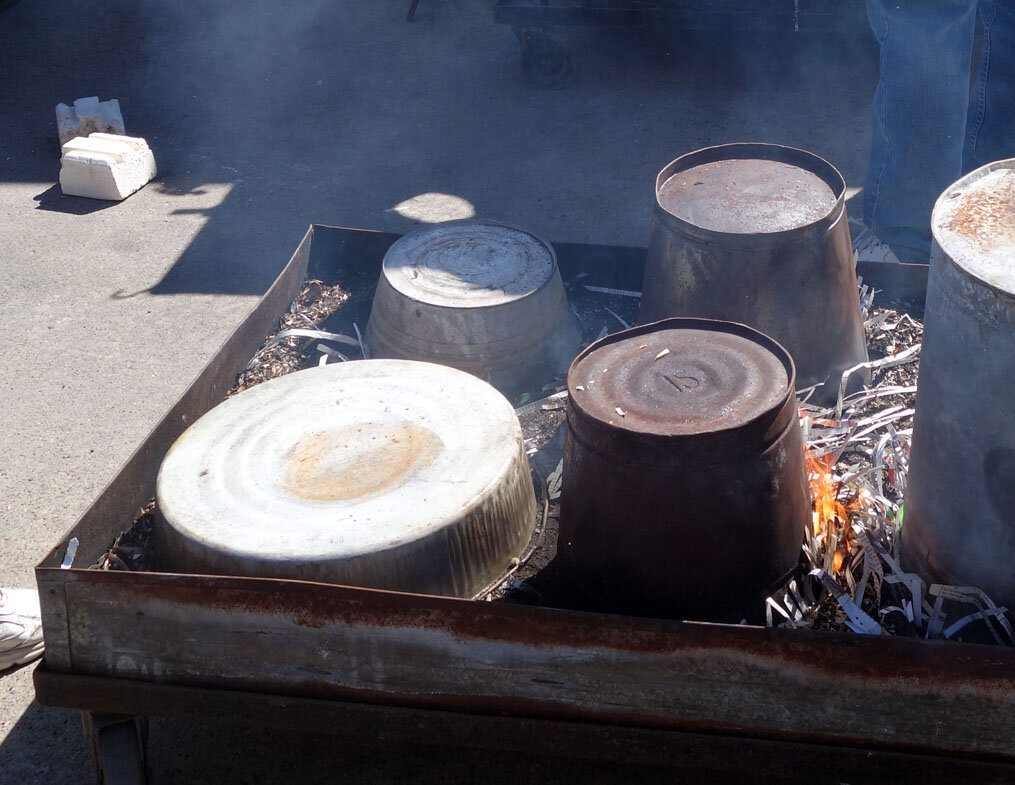
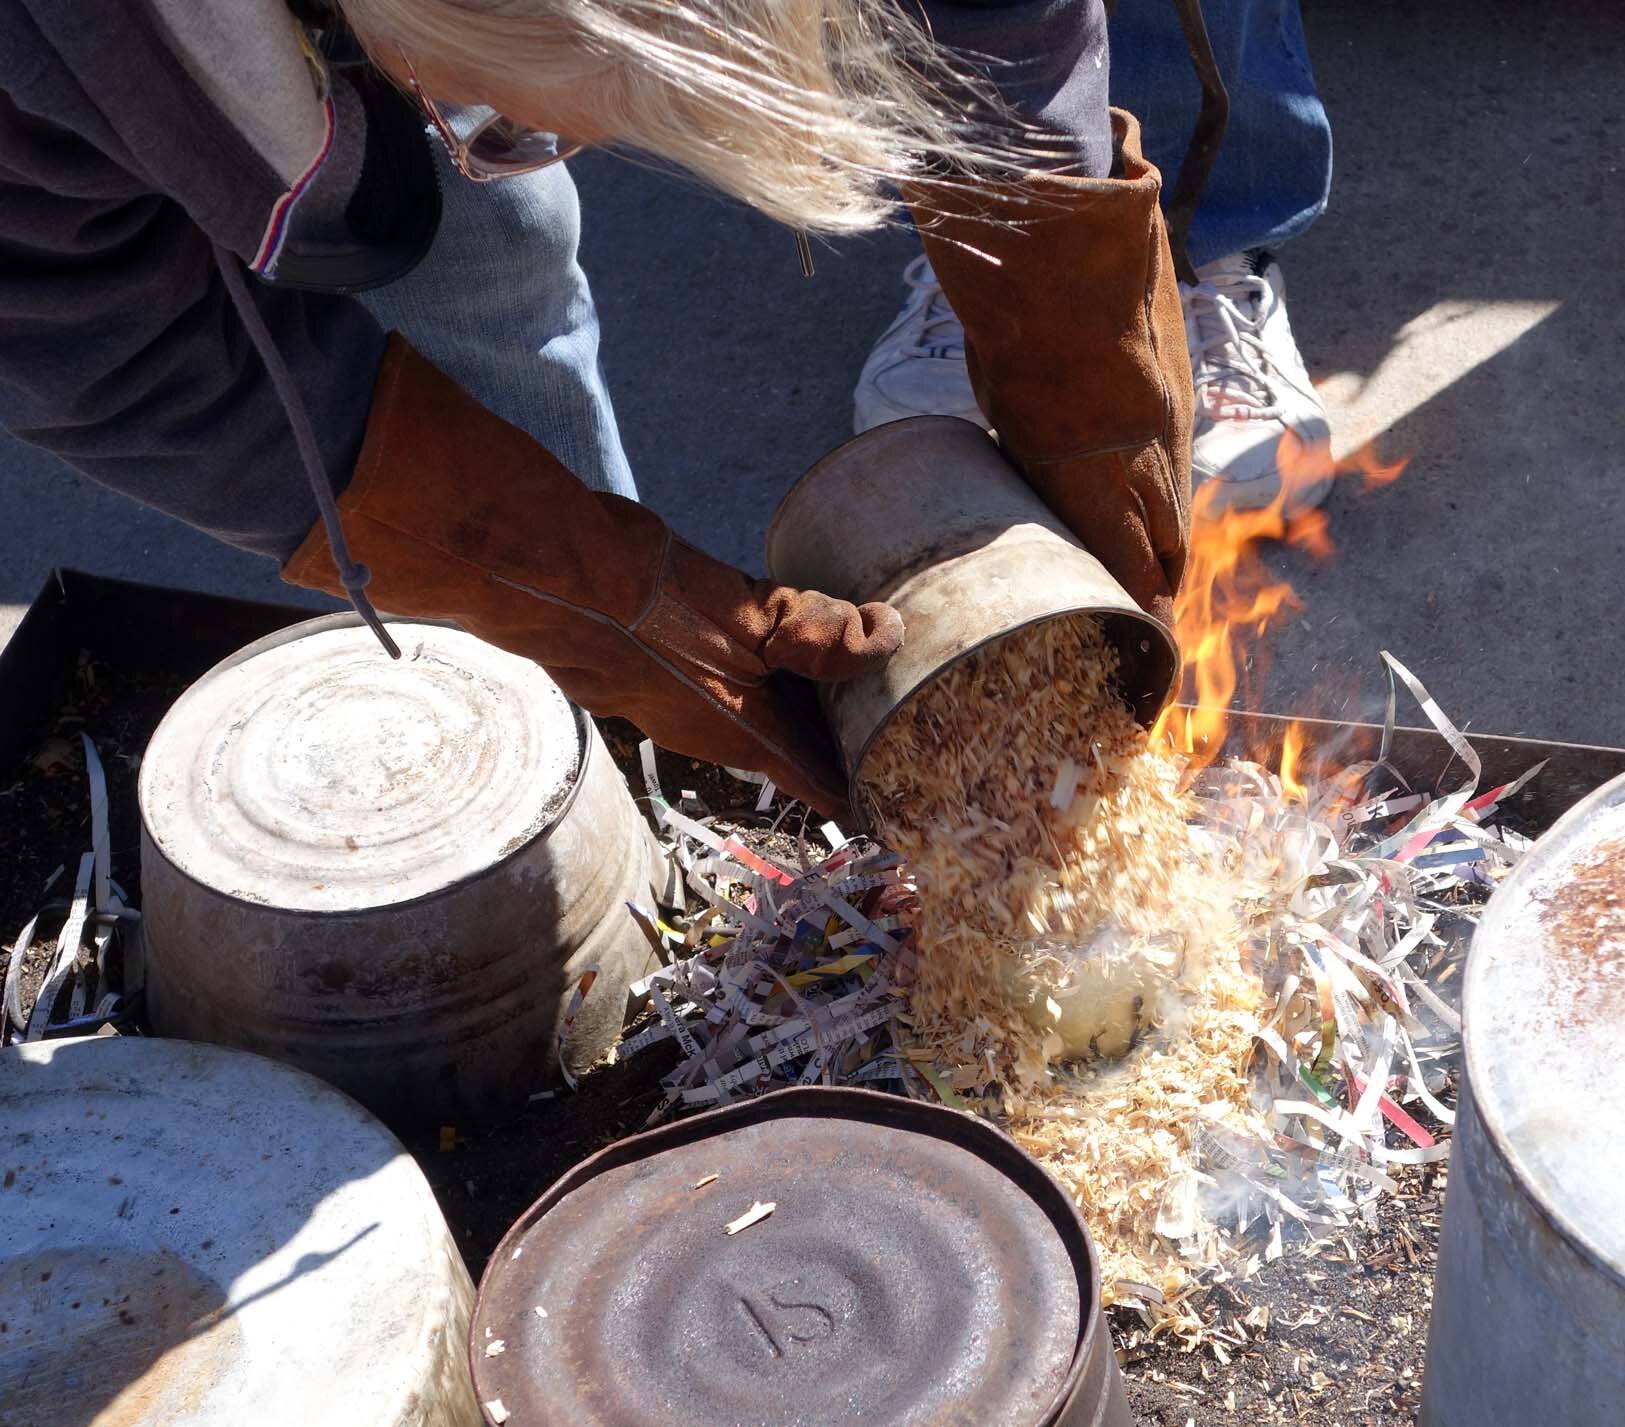
Cross Off Another Bucket List Item: I've Done Raku!
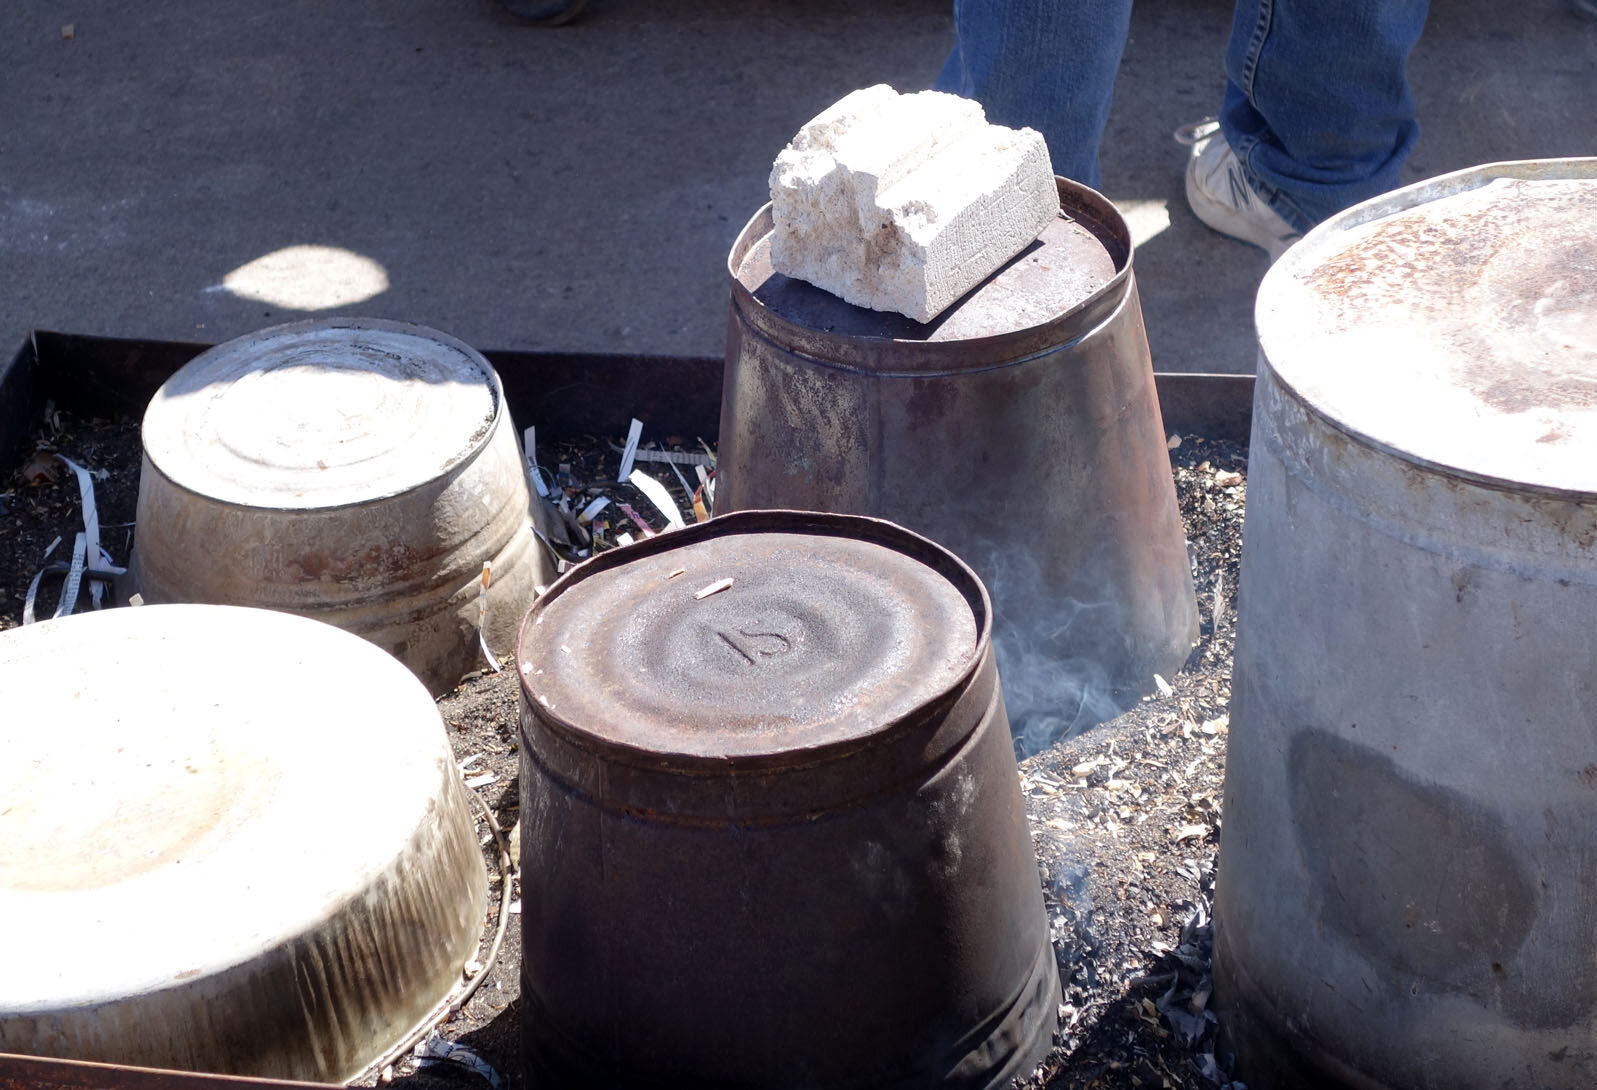
I’ve always wanted to do raku firing ever since I first saw a piece of raku pottery and learned of the technique as a child - but it’s never been an opportunity I could take advantage of until now! A few months ago I attended a Saturday raku workshop at Dakota Potters Supply in Sioux Falls, SD, joined by my ceramics faculty member Paul Adamson and graduating senior Anna Uehling. Raku, first practiced in Japan, is a low-firing technique that makes use of wide temperature swings, reduction, and carbon trapping to create some really ornate artwork. Due to the low-fire nature of the process, the pieces are mostly decorative; they are neither watertight nor food-safe.
Here is a slideshow of the day’s adventures. This post will be followed by a series of posts exploring each of the three different glazing techniques I tried! There were five different techniques available, and I was most interested this first go-round in three of them.
Crackle glazes (either clear or white), with the goal that carbon gets trapped in the crackles
The “baked potato” technique, wherein you coat the bisqueware in ferric chloride, sprinkle it with sugar, salt, and/or horsehair, and then bundle it up in aluminum foil like a baked potato before firing it
Copper glazes
Ferric chloride spray
Horsehair and/or feather application


Polyspermy in Plants
I’ve been making hybrid aloe and gastrolea seedlings from my own collection for about a year now, and in my curiosity I looked up whether plants can combine genetics from more than one father in the same seed, which is called polyspermy. This is different than seed pods on the same raceme containing different parentage (one flower being fertilized by one neighbor and another by a different one), which is a common phenomenon; the type of polyspermy in plants that I’m talking about means that one seed has three (or more) biological parents. The answer is apparently yes, but it’s such new research that there’s not yet clear information about which plants can and which cannot; proving it’s even possible only happened four years ago!
I think it’s pretty cool how much there still is to learn and research and document in the world!
Whiterock Conservancy New Artwork: Attuned
This is the first figurative piece I worked on at Whiterock Conservancy - a relief portrait of a small species of frog I found in abundance at the river shoreline. The Blanchard’s cricket frog, Acris blanchardi, is an endangered or threatened species in three states so far and is listed as a "Species of Greatest Conservation Need." It is considered a type of chorus frog, and is one of the smallest species of frogs in Iowa. Surprisingly (to me, at any rate) it is also considered a type of tree frog despite being semiaquatic and therefore not having the toe pads of their arboreal brethren.
As always, I began with a contour line drawing. My goal with this piece was a stylized, squashed relief reminiscent of antique bronze relief doors, so after finishing the drawing I began laying in the QuickCure Clay relief. Here are two process photos showing the beginning of that QCC work.
At this point, I got too involved in the actual creation to pause, so we’ll skip ahead to the finished work! This is Attuned, 14x11x1.35", QuickCure Clay relief and acrylic on basswood panel, 2021.


New Artwork: Whiterock Conservancy 8x8" Chromatograms
I and my friends gathered many natural materials while on my Whiterock Conservancy artist residency - plant, flower, fungus, bark, lichen, soil, water, rock, and mineral samples - which I then processed into a pigment solution and “printed” on filter paper through chromatography.
I’ve done a version of this before on my BROTA residency with the Buenos Aires Botanical Garden; that time, I used fairly standard scientific 4” rounds and only used one plant species per round for individual portraits that also captured differing seasons within the botanical garden. This time, I sized up to 8x8” squares, and additionally made a handful of larger 23x18” pieces; with these my chromatography features entire ecosystems. This post will display my new 8x8” pieces! The first photo is just a process pic, followed by 19 different chromatograms. (I donated three others to the conservancy, Liz Garst, and the groundskeeper Amanda who shared the tree frog with me.)
I’m really excited by this series and am interested to see how these pieces age in terms of pigmentation going fugitive; I have sealed them and hope they retain their coloration for many years to come, but their likely degradation over time certainly fits with themes in my broader bodies of work about ecological conservation and loss. My Buenos Aires pieces do appear to have lost a little saturation over the past two years, but they still display a good range of color. In that case, each round made use of only one plant species; in this case, since there are mineral and soil components as well, I have hopes that those sections will endure even longer than the plant pigmentation.