ceramic

Phoenix Athens Residency Artwork 8

The wooden spool end before the mosaic and concrete.

I’m always interested in manmade constructions altered by the environment and time, and when I kept finding broken fragments of marble paving stones, concrete pathing, ceramic tiles, and so forth, I started picking them up. After amassing quite a collection, I decided I’d make a mosaic that referenced some of the artifact displays I’d seen in Athenian museums, so I took the angle grinder with a diamond blade to them to cut them down to at or below my desired height.

I then put one unique piece per type into the second recycled wood round from the electrical spool - this one had the upraised interior wooden frame with a circular outside and a square inside. (To block the holes, I had already cut and glued down a piece of masonite to the back - see the image to the left.) Once I found the layout I wanted, I put a smoother white concrete (compared to the previous large-grogged grey type I used in Realms) in and around it. I thought I probably wanted to paint it, but by this point my show installation was the next day so we just installed it in that mid-way state.

Once installed, my show was up until my last day in Athens, so I then took it down and brought it back to the US. Then I began to test out different possible compositions in Photoshop, and I settled on painting a couple rings of color - the inner gold and the outer blue - around the central composition in a design that references the mati aka evil eye charms. The three cool-colored mosaic fragments in the center are intentionally reminiscent of an eye as well.

After I painted the two rings, they looked too new, so I weathered them a little and made the blue border bleed into the white band inside to soften that edge.

This is Pathways, found marble, concrete, and ceramic paver fragments with acrylic and concrete on recycled wood round, 17.5x17.5x.1.3, 2023.

Shelby Prindaville's Greek pathways mosaic relief.

My April 2022 Raku Ceramics

I just completed another raku workshop this past weekend, and as I was looking through my files I realized I’ve not yet published the raku pieces I made at my last one in April 2022. Clearly I should do that before sharing my latest workshop photos and products!

On my April 2022 raku workshop, I wanted to try to carbonize various plant fronds or leaves onto the surface of my pieces. This was a complete experiment, and it was mostly a failure. I tried a variety of ferns and tropicals out, and one after another, they burned away without leaving a trace. Here are some plates that I attempted to salvage after that didn’t work out. With the first, I pivoted to a sugar and horsehair application. With the second, I tried to use ferric chloride to stain the surface with plant leaves that weren’t carbonizing, but they just left those not-terribly-appealing ferric chloride splotches.

Once I realized those techniques were not working, I tried etching fern fronds onto a plate in a “baked potato” aluminum foil saggar firing; it kind of worked, but I think it’s underwhelming. Since none of those plant techniques were doing super well, I just put a litho carb copper glaze onto my final plate.

I also made a rounded crackle vessel and the glaze turned out really well, but the ceramic physically cracked due to thermal shock so it’s got that permanent asterisk associated with it.

I glazed this spherical vessel with copper glazes (Copper Sand is on the exterior and I think that’s Midnight Luster on the interior), and it came out looking like a little planet! This one’s a definite favorite.

And finally, the one plant piece that turned out beautifully and justified all the failures: this is another “baked potato” saggar firing, and the Muehlenbeckia axillaris vines I used carbonized perfectly into this vase’s surface.

I also lost a large platter-like vessel (it broke into quite a few pieces and was not salvageable) and had another plate fuse with a kiln brick and lose part of its bottom. I eventually recycled that broken platter-like piece in my rock tumbler!

Landscape Ceramics

I’ve been working on a series of landscape ceramics for some time now, and I plan to continue to add pieces! Here are some I completed in early 2022; these are all stoneware fired to Cone 6. The first three are vases, and then there’s a bowl, an egg-shaped vessel, and six small planters.

Second Raku Workshop - Crackle Edition

I only did one crackle piece (and this time, I went with the natural crackle as opposed to the white) this go-round, but it is my favorite of all of the pieces from either raku workshop. In fact, in a sense I think this might be my first professional piece of ceramic artwork. Or perhaps ceramic object.

What I mean by that is that so far, my ceramic studio practice has involved experimentation and learning, but my primary design purpose has been functional. The aesthetics matter, of course, but don’t take primacy over the form. I’ve been making pottery. That’s a completely valid ceramic arena!

However, in this piece, the function took a backseat to conceptual and aesthetic goals. I’m really pleased with how it turned out!

More Ceramics!

Here are some more of my ceramic pieces! The first two are of a lovely little bowl; it’s so varied and hard to photograph that unless I uploaded seven photos and a video I think you’ll miss out on some of its detail, but trust me when I say it’s really nice in person and is one of my best pieces thus far. All the rest are, as you can often expect of me, planters with drainage holes. I like all of these a lot and am particularly into the new white/blue/brown and deep brown/white glaze combinations.

The final image in the grid is wheel-thrown from an earlier cycle but has since been planted with an Episcia or “flame violet” cultivar! I am reminded by that planter that I should really make time to wheel throw again at some point, but then again I really like the personality and handcrafted appearance of my pinch pot practice…

New Ceramics!

My latest batch of ceramics has come out of the final firing! I started these pieces around three months ago, but ceramics take time and sequential processing. Though there’s still quite a bit of trial and error, I feel that I am honing my glazing skills! There are several glazing combinations from this go-round that I’m definitely going to be revisiting. There is also a new glaze color in this set - Green Tweed - that we didn’t have on hand before; I glazed it blind (meaning I had no samples of it to see how it’d turn out) so I didn’t use it on too many pieces, but it turns out I really like it both solo and in combination with other colors so I’ll be adding into a more regular rotation.

Above you see three new small dishes or bowls. The photography of ceramics is difficult because they are three-dimensional objects with variance - how many photos do I need to share to truly capture enough of each artwork? For these, I think one photo sufficiently captures each piece, though on the one with the hand-painted rings, there are rings on the exterior of the dish as well which I’m not sure is evident. Maybe I should have taken a side photo too?

However, for the small bowl above, I think at least two photos are needed to understand the glazing; another could provide even more coverage, but I believe only one would be insufficient.

All of the eight pieces immediately above are planters with drainage holes, as demonstrated by the final photo in the grid.

For many of the more complexly glazed pieces, I think my photographs - even multiple - don’t fully capture their totality. I should experiment to see if different photo setups can help, but also I think some artwork is always going to be best suited for in-person appreciation!

Finished Ceramics Are Finally Here!

Back in January, I began to try to learn about the discipline of ceramics for professional development as an administrator and artist (and maybe even further down the line it’ll be a course I feel capable of teaching, too)! Of course, the pandemic descended right after we had begun to kiln fire and we went remote mid-spring so then there was no more firing for a time which was a barrier to progress.

You may remember my blog post titled Pandemic Productivity which I wrote toward the end of March discussing this topic, and over the spring and summer I generated a number of pinch pot raw ware from home - and an end-of-summer bisque firing was done, so all of those pieces were ready for glazing in early August.

(If you’re unfamiliar with how to make ceramics, you take clay and shape it which when ready is called raw ware. That raw ware is then bisque fired in a kiln. Once bisqued, you typically glaze your pieces and fire them again at a higher temperature. The pieces that come out of that second firing are usually finished, though you can do additional treatments beyond that as well.)

My very limited previous ceramics glazing (I believe one finished cycle only?) had been with Cone 9 glazes, which our gas kiln is theoretically capable of… but the first set of pieces that came out were not only experimental in terms of learning how to glaze but also very underfired due to the gas kiln needing repairs. The underfiring negatively affected their watertightness and texture. We have since fixed the gas kiln, and I do have some pieces from January through March that had been prepared with Cone 9 glazes for my second glazing attempt and are presently still waiting for whenever we next fire the gas kiln.

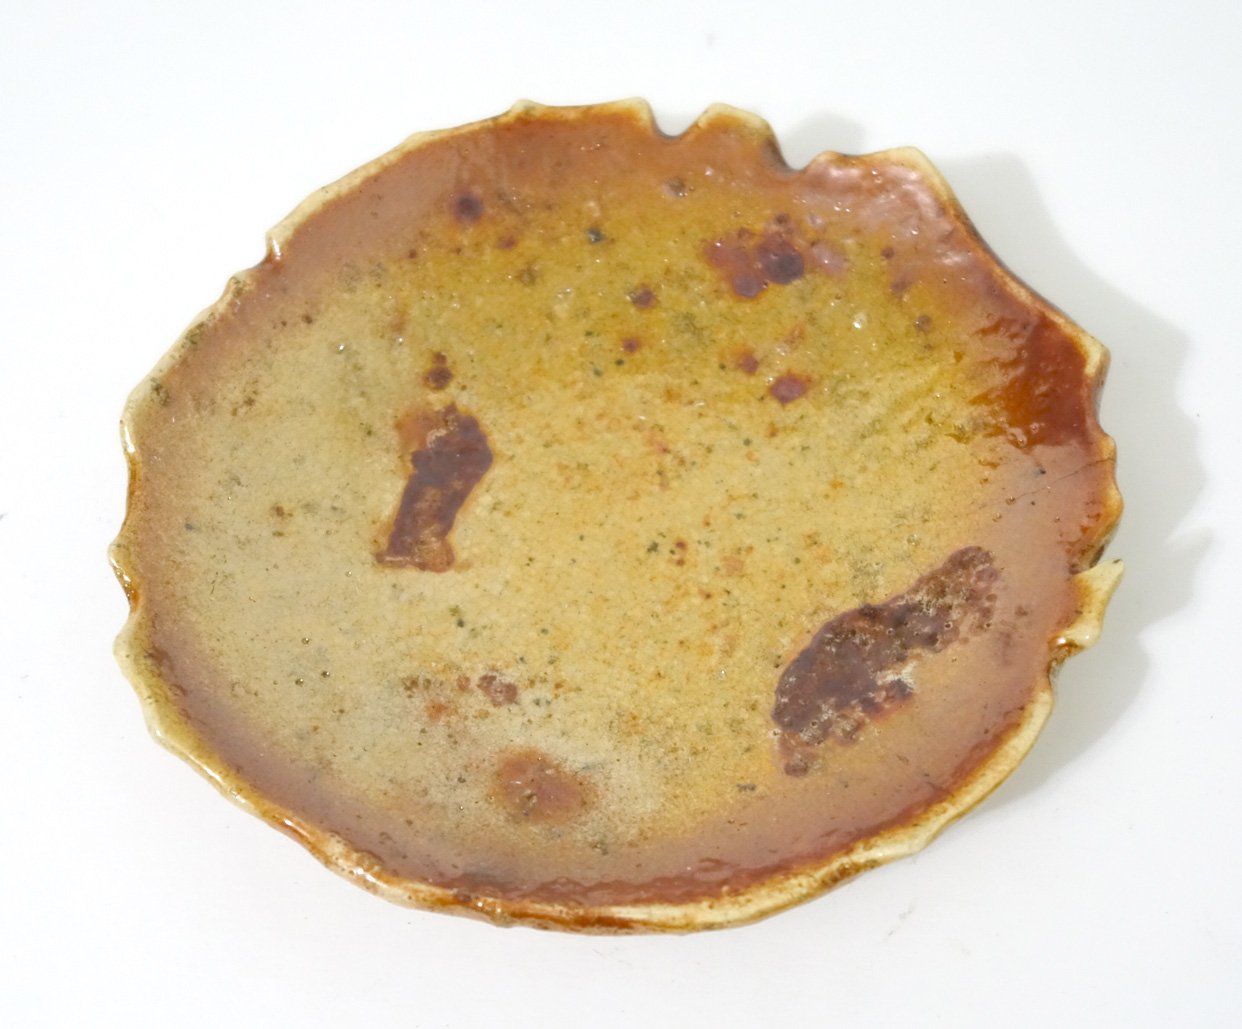
This fall we reopened Morningside College in person, and our ceramics course began again. It takes several weeks of creation before class bisque firing begins, and then once a decent stockpile of bisque pieces build up students begin glazing. Midway through this fall, I was able to rejoin the cycle by beginning to glaze my pandemic pinchware! The instructor teaching now prefers to fire at Cone 6 with our electric kilns. This meant any color mixing knowledge I had about our existing Cone 9 glazes - minimal anyway - was out the window, and I was starting from square one with the new Cone 6 glazes, many of which didn’t even have sample swatches yet. Again, there was a lot of experimentation and not a lot of control - but in only a few cycles I’m starting to develop some preferences! It’s also nice that these finished pieces have reached the proper temperature and their surfaces are, in contrast to the underfired pieces I’d done before, behaving as intended.

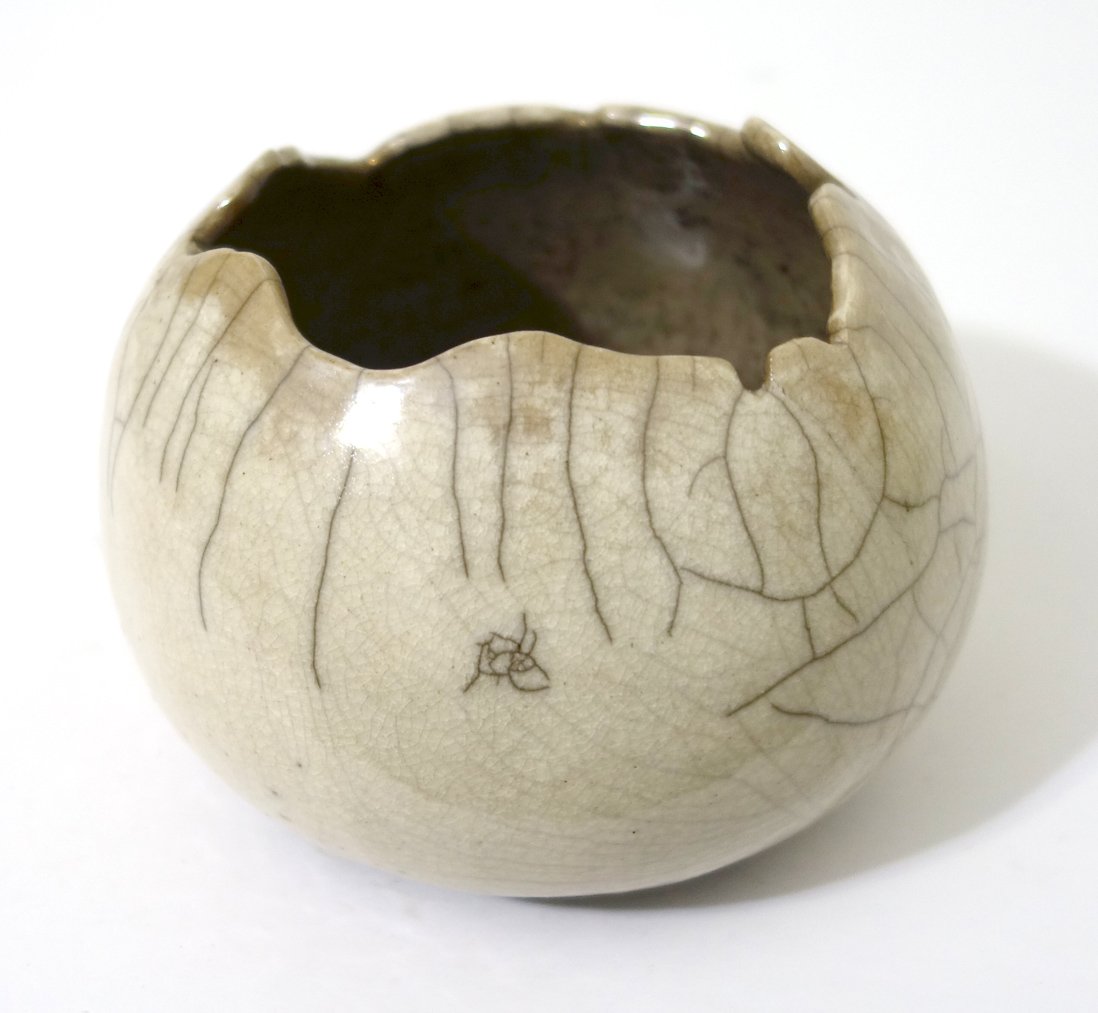
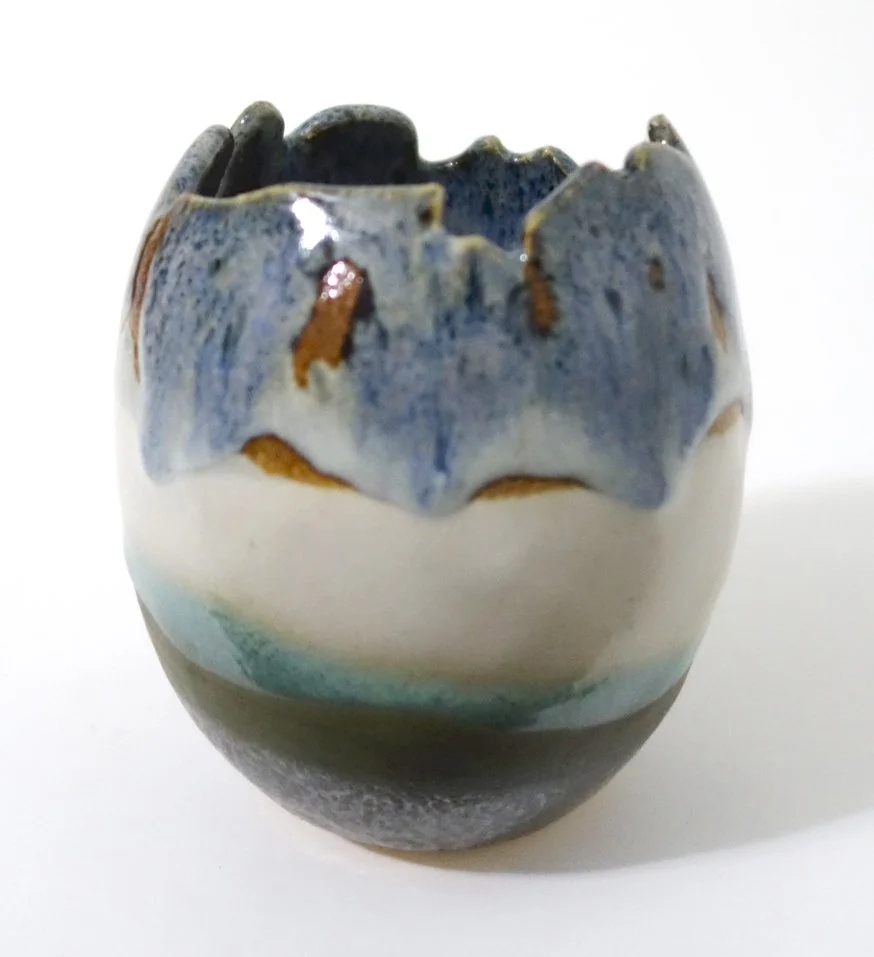
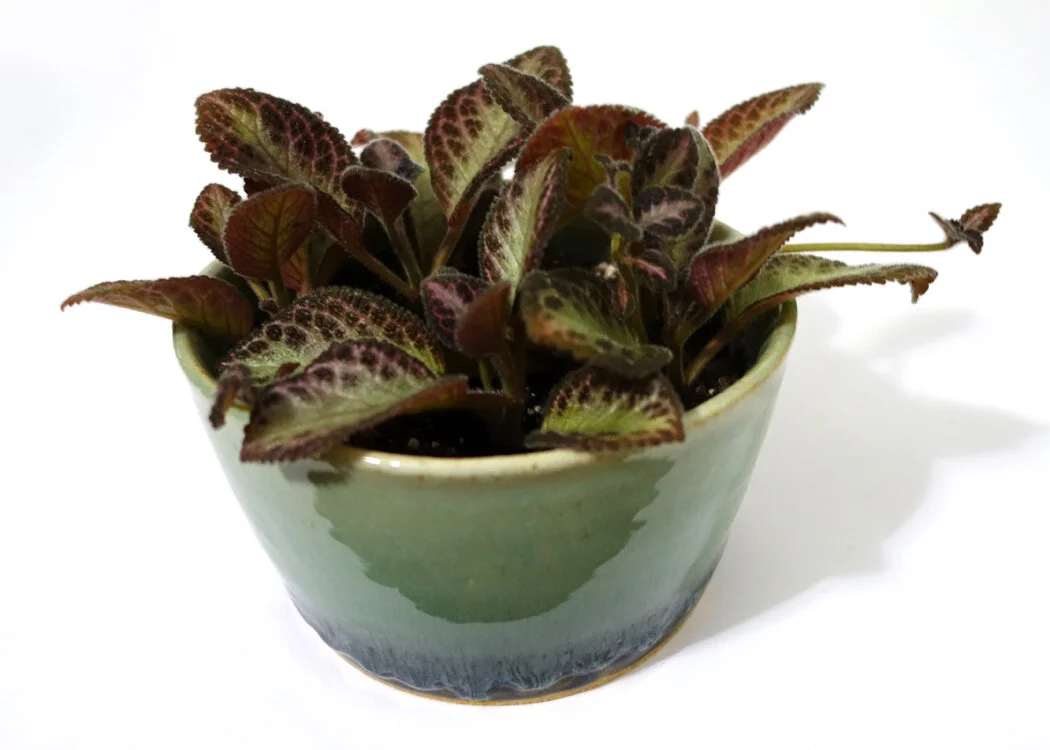
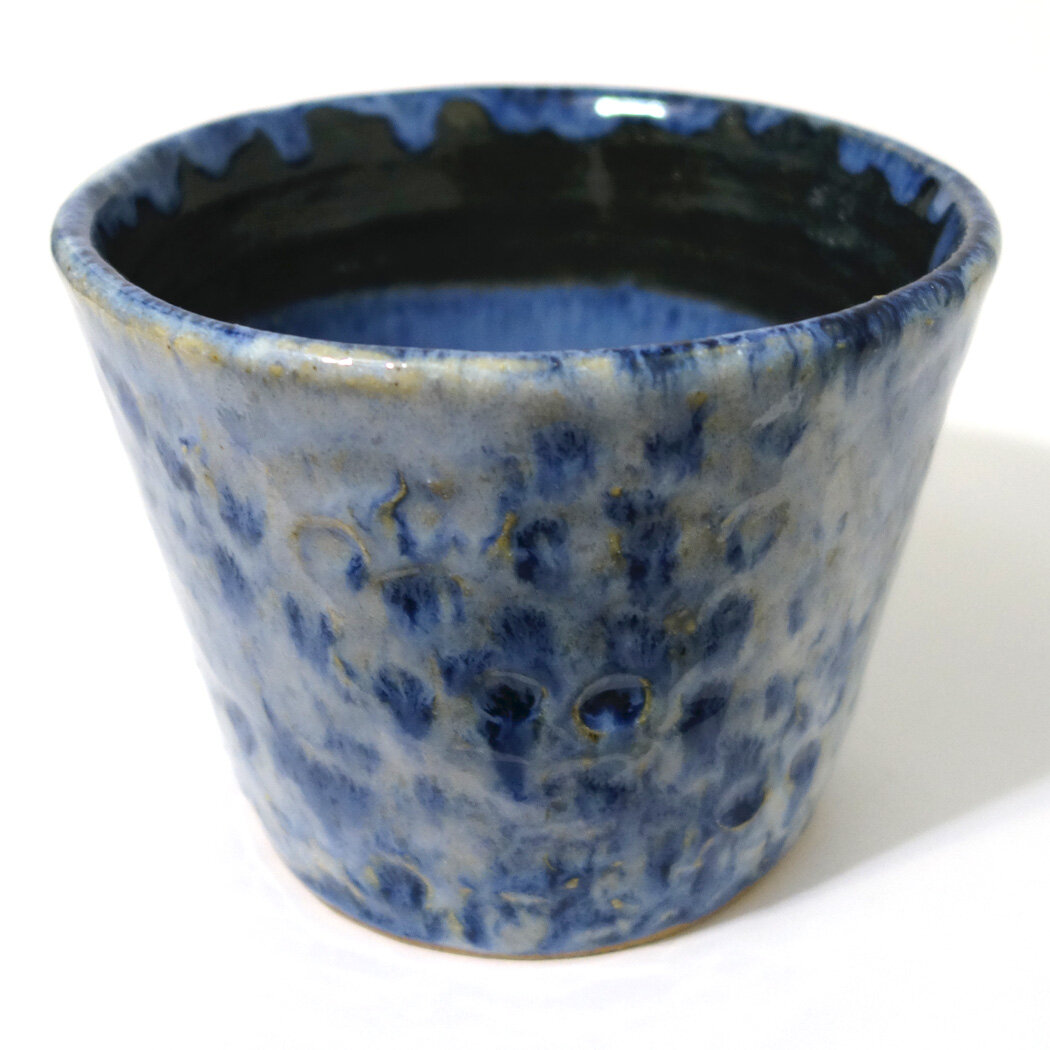
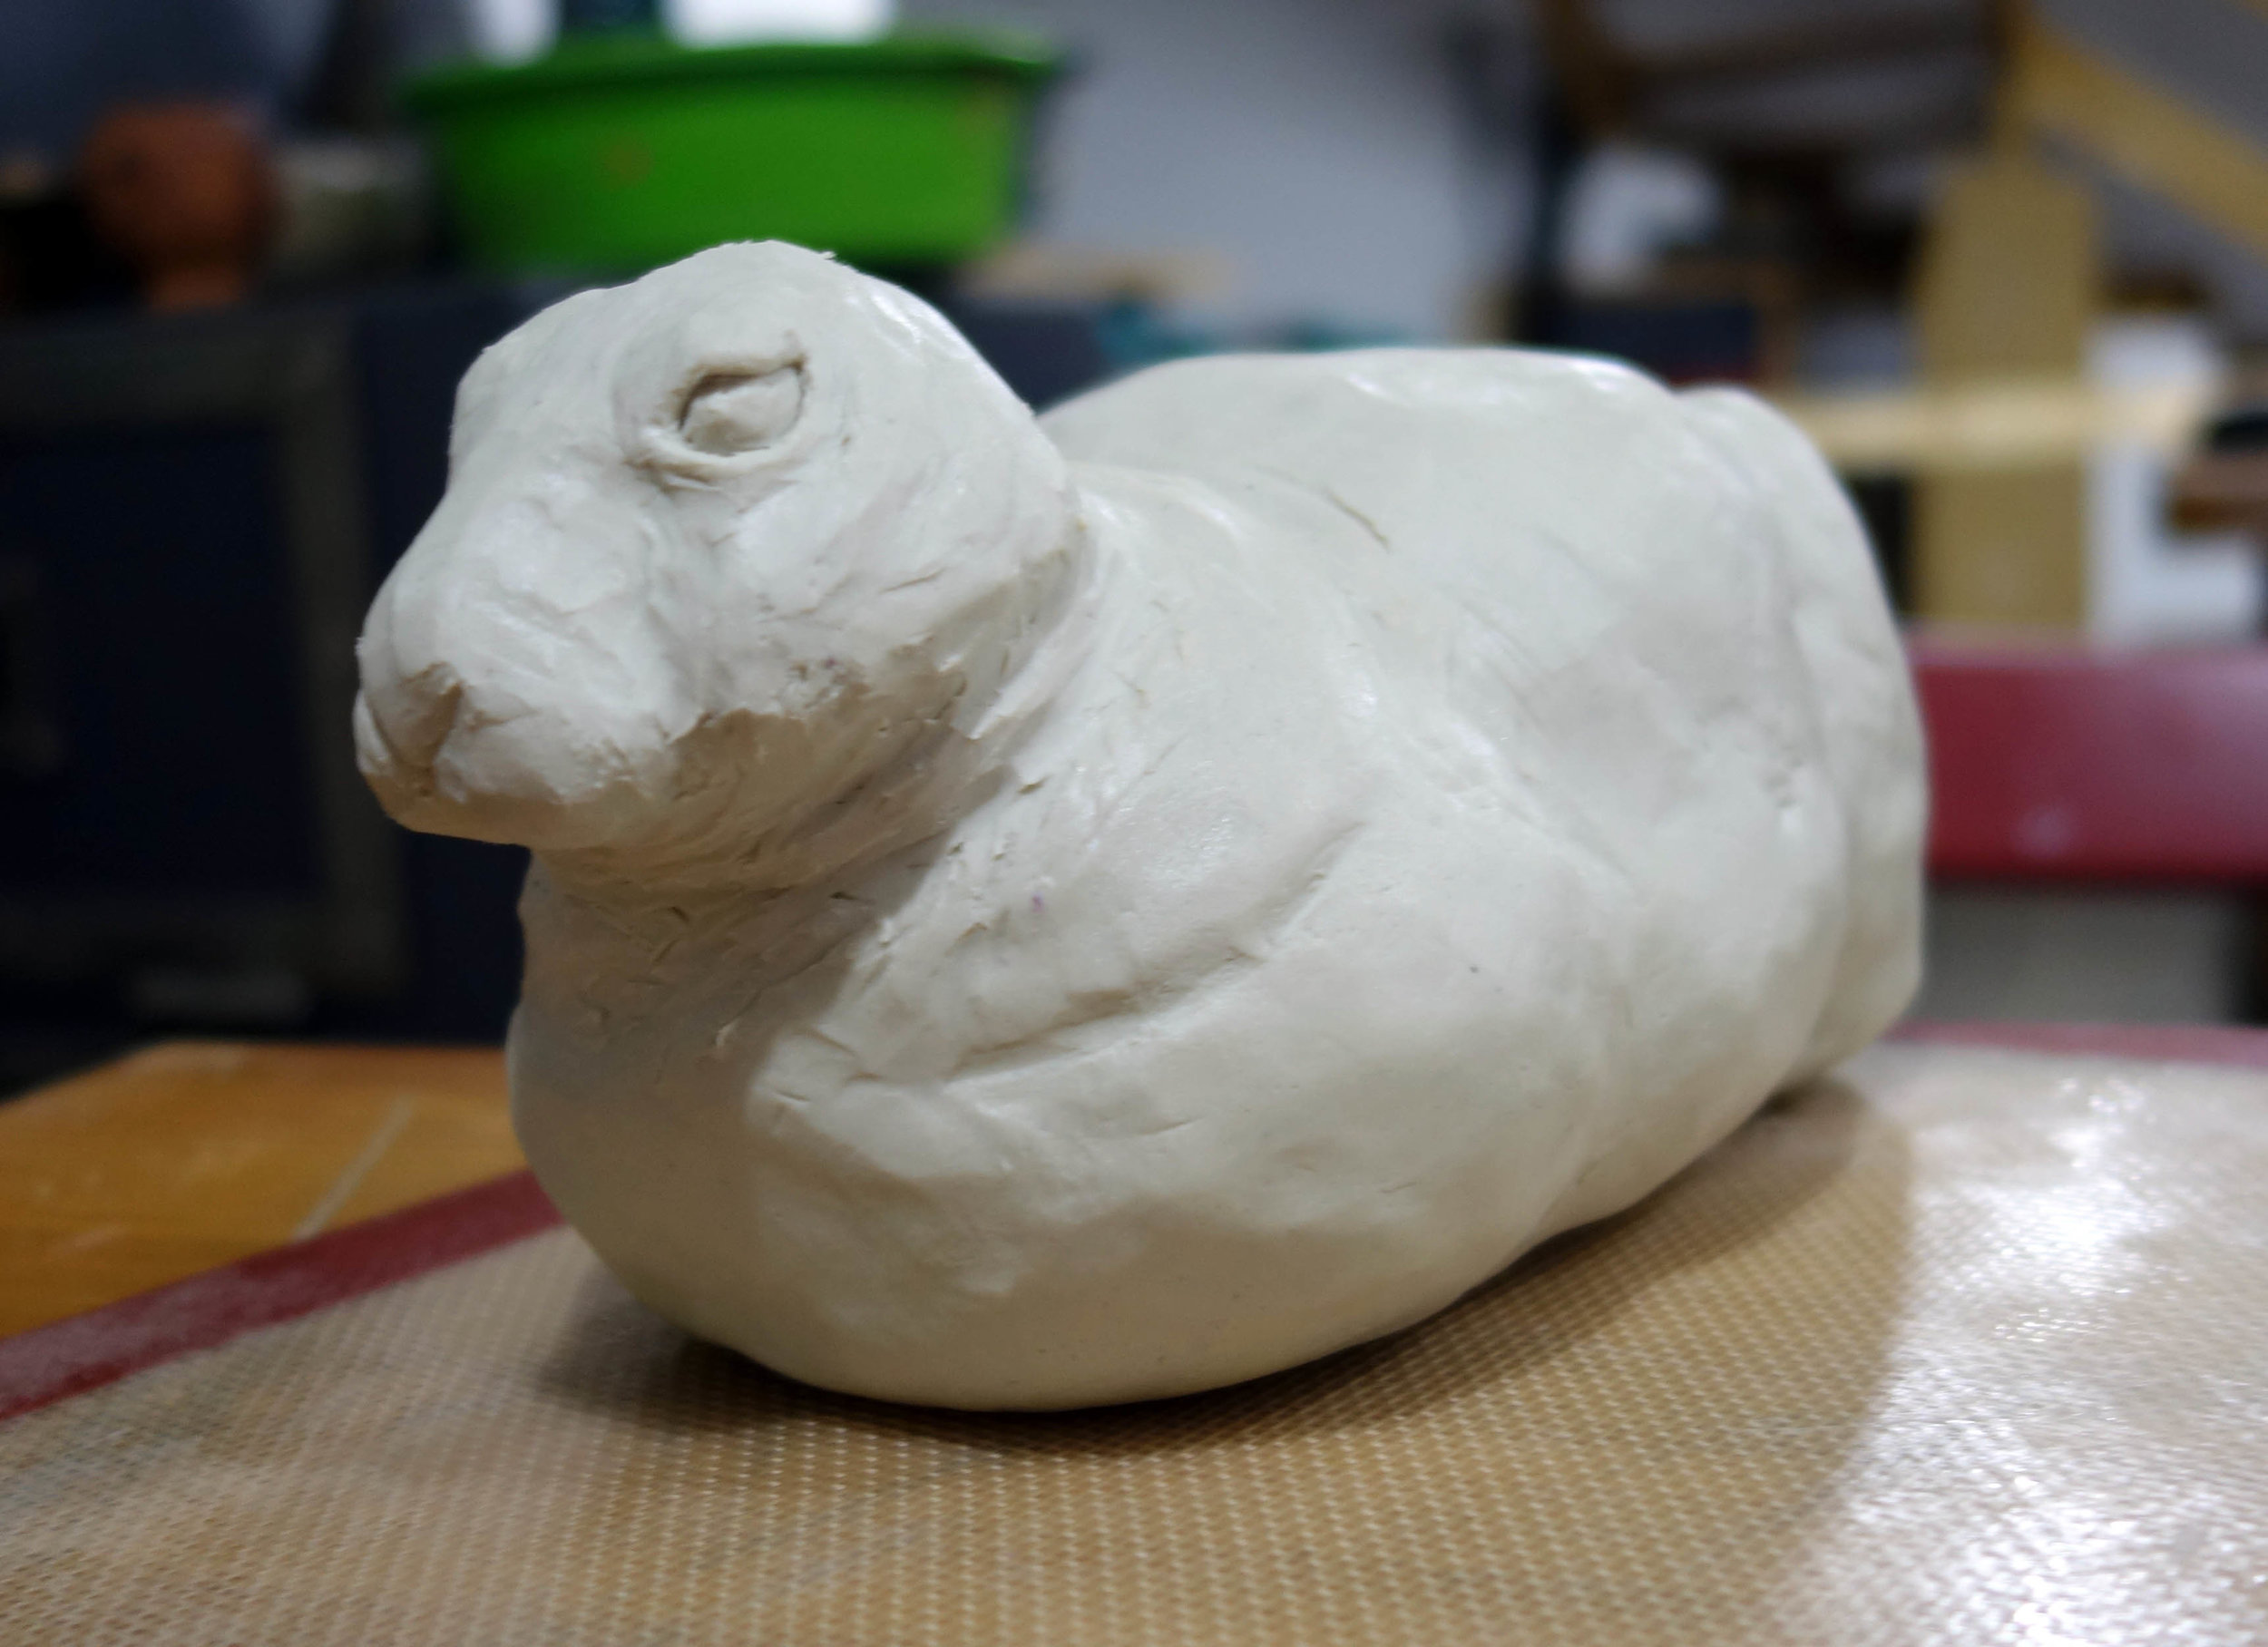
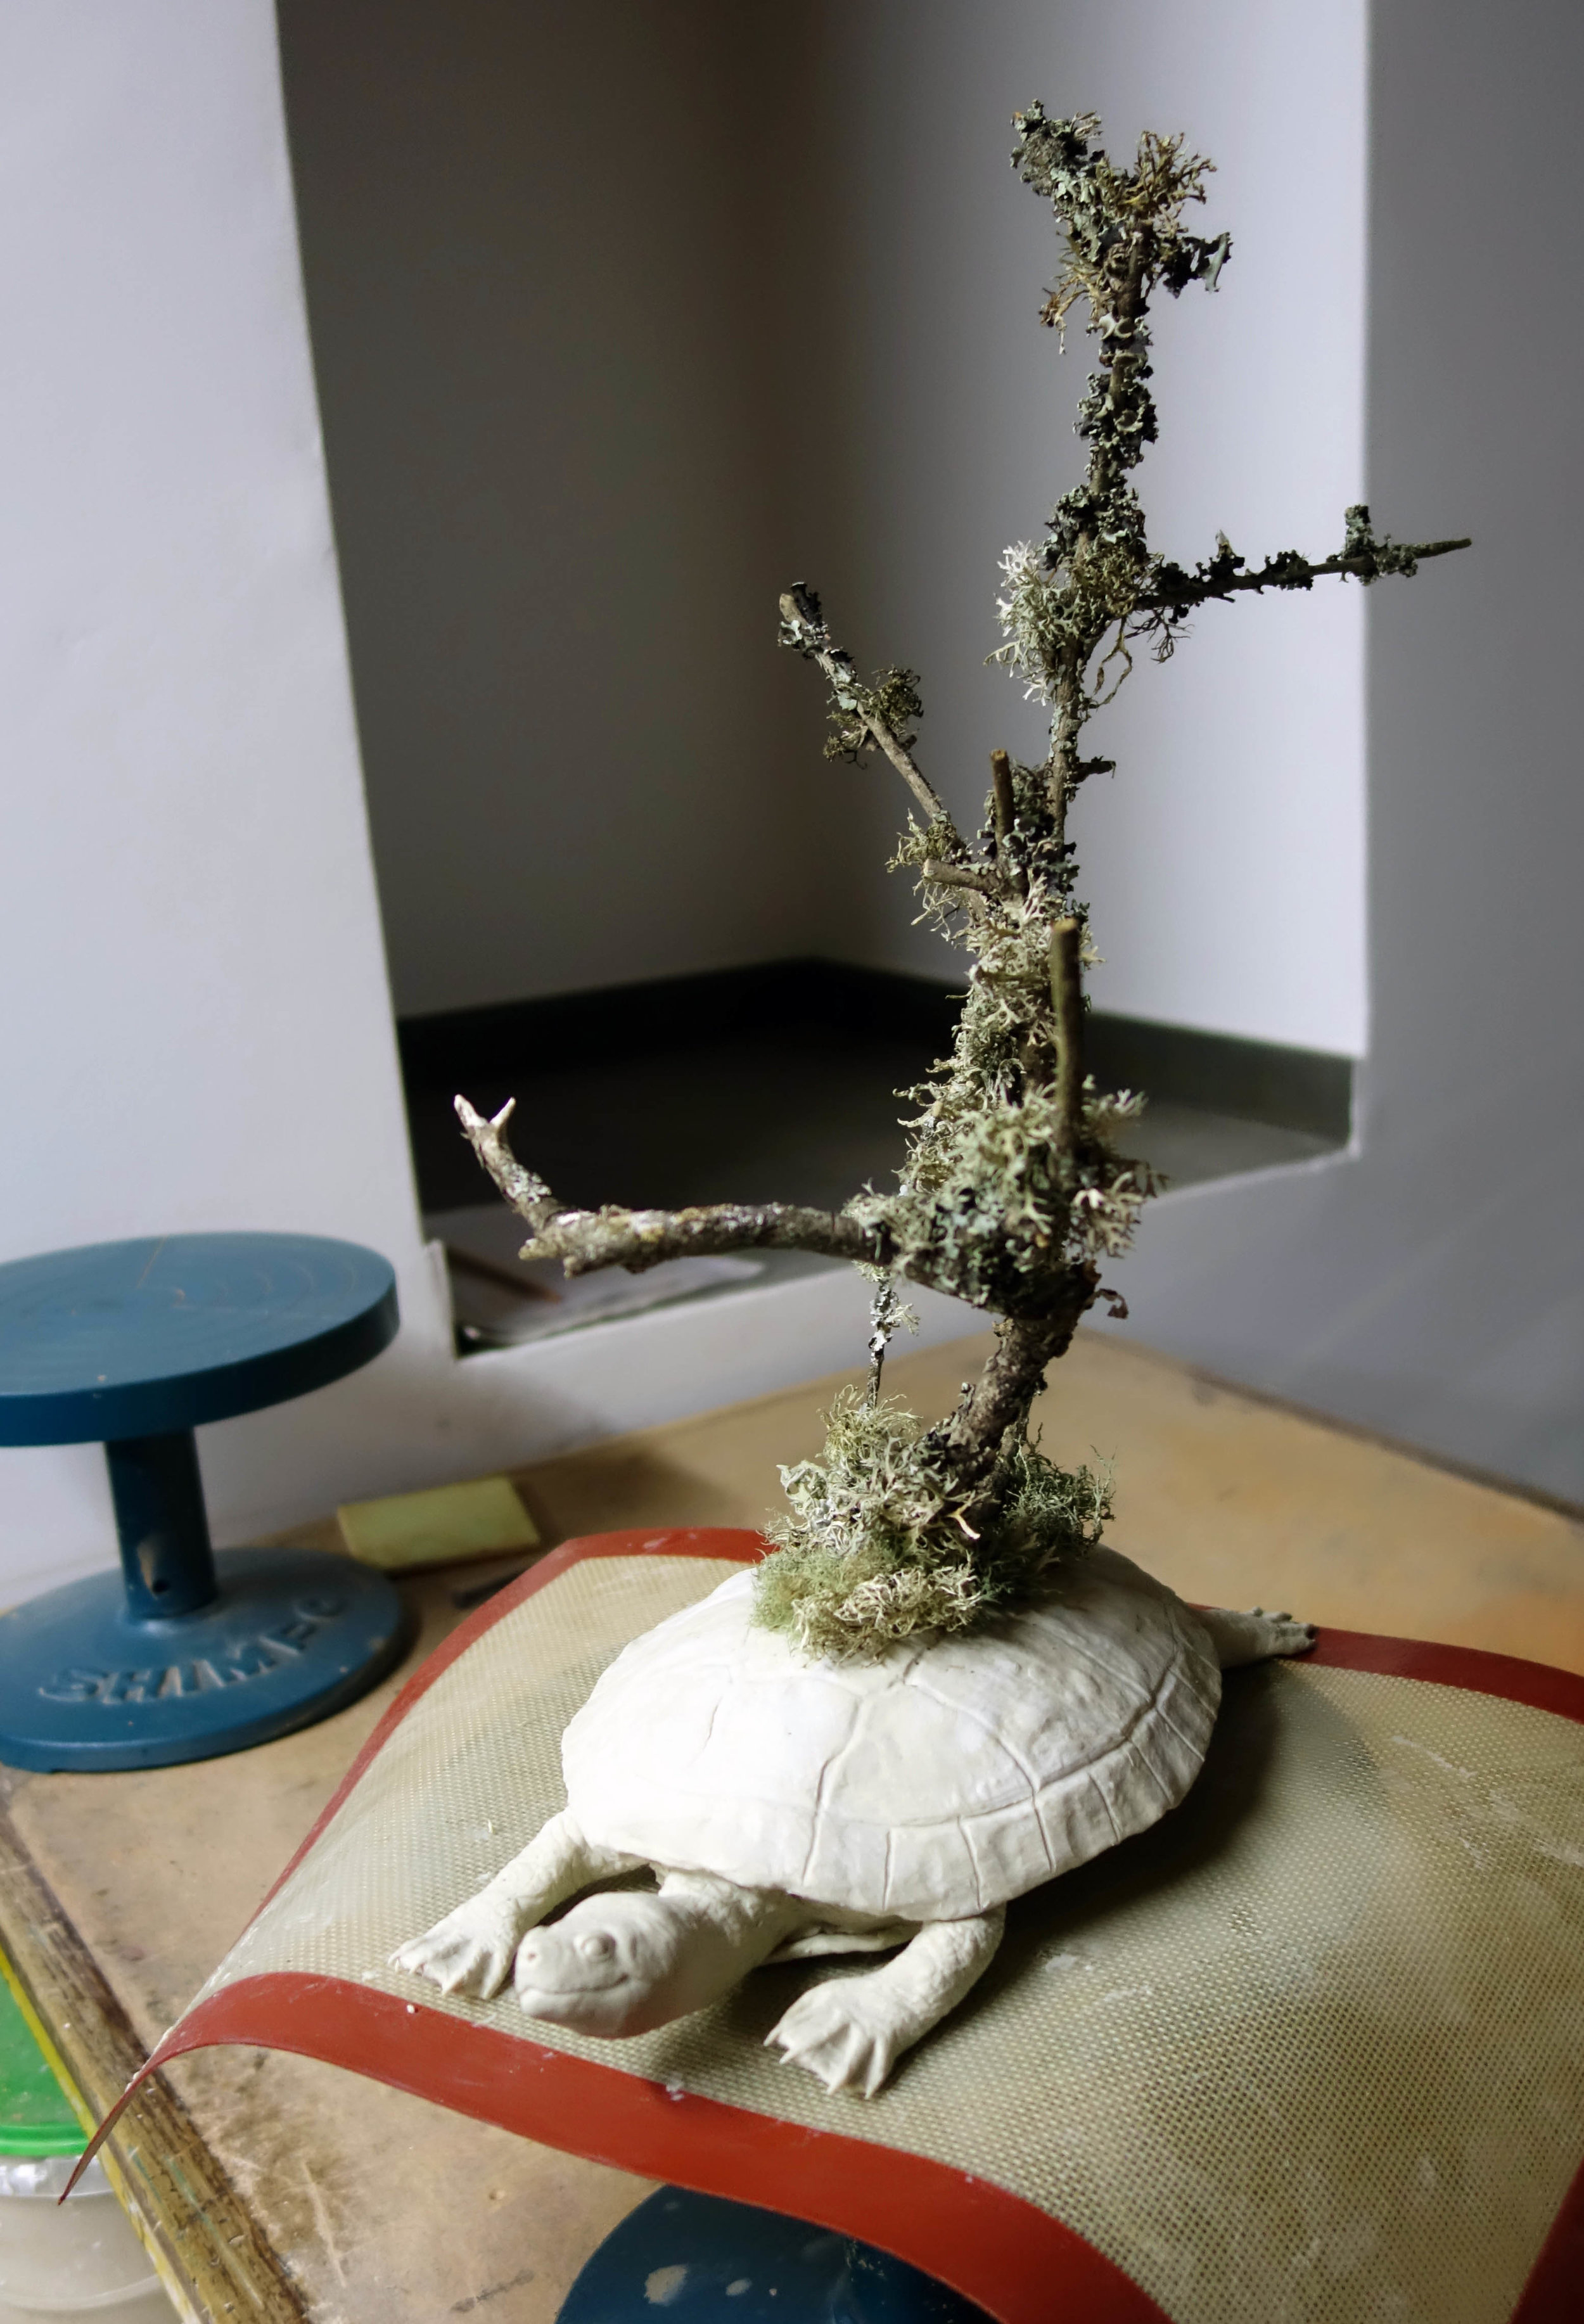
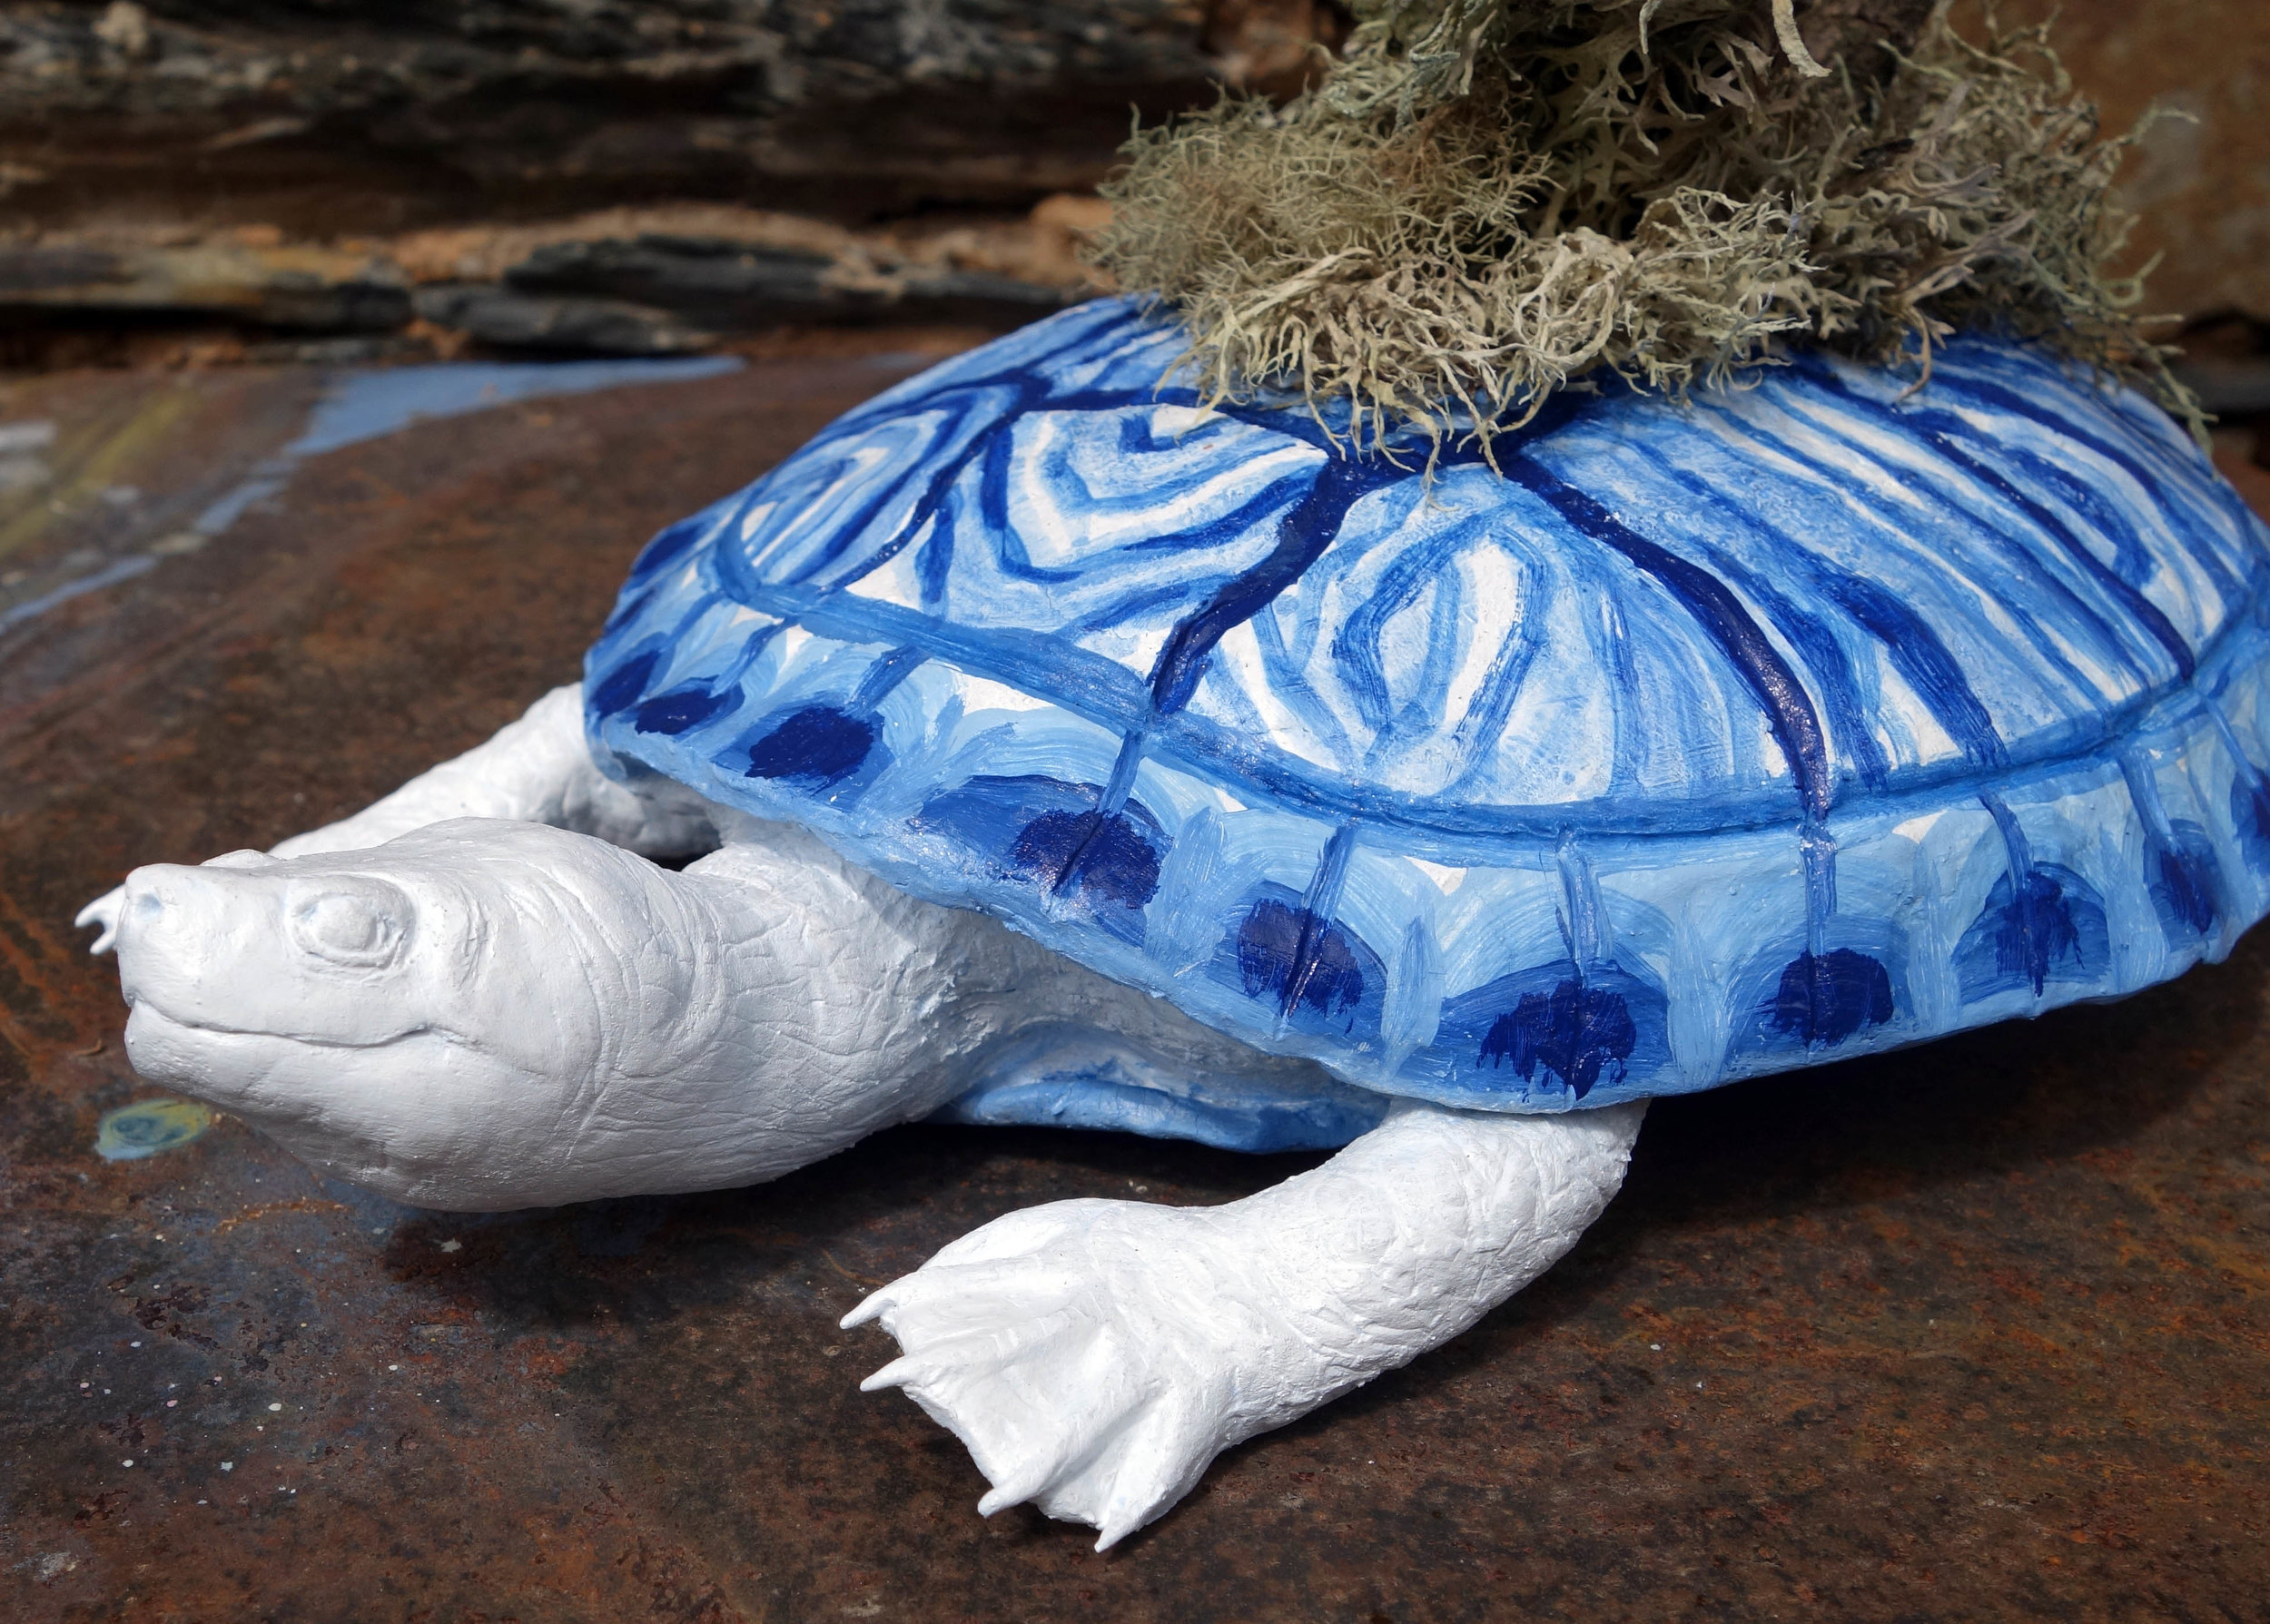
So, here are the first of my finished ceramics after almost a full year of work! All of these are planters with drainage holes, as the last three photos demonstrate. A couple are wheel thrown, and the rest are pinchware. They vary in size but most are relatively small - they’re all approximately 2-5” in diameter. Bigger pots are more time- and material-consuming to make and take up more room in the kiln so I’ve been sticking with smaller ones for now. I’ve made a few bowls (with no drainage holes) and vases, too, which I’ll share in a later post!

As you might imagine, making planters brings my interest in art and plants together nicely in that I can start to house my plants in my own pots! Transplanting during winter isn’t optimal so I’ve only done so where necessary, but here you can see a young Chlorophytum comosum - colloquially referred to as a spider plant - who desperately needed more space and has therefore been upgraded into a Shelby Prindaville planter with a top dressing to complement!

Cerdeira Village Residency Journal 5 - New Artwork!

When I was shopping at the market across from the Mosteiro dos Jerónimos, I saw a few azulejos tiles of rabbits, and I bought myself one of them - it reminded me a little of Albrecht Dürer's work.

After I finished the turtle sculpture, I decided I would do a rabbit and a bird as a partner piece to the turtle and nest mostly due to that market experience.  When I started looking at various images of rabbits in order to find one to sculpt, I decided that proportionally and structurally, a hare would be more interesting than a rabbit.  And given that I had been thinking about rabbits and hares due to this azulejos tile that reminded me of Dürer, I decided to base my sculpture off of Young Hare.

It was really quite fun sculpting a watercolor painting, as it were, and one that I highly admire.  I started off again with a styrofoam and wire base and then added QCC and began to form the body and head.  

I added the feet in three separate parts, and finally the claws and ears.  After every part was added, I detailed the fur and added some jackalope-esque branches in front of the ears.  This all took several days to come together, and obviously there were parts I had to construct myself in attempting to realize a three-dimensional animal out of a two-dimensional painting of it.

I had planned on sculpting a bird with the hare, but I liked the hare so much alone that I reconsidered.  As I was trying to decide what to do, I thought about how I would progress with the painting of the hare.  In the beginning I had thought about painting the rabbit in azulejos-inspired colors as well, but I realized when doing the turtle that the style that the shell and eggs looked quite good with it because they were fairly smooth, but when I tried to paint the turtle head and legs with various tints of blue, it got too busy and weird due to their pebbled surfaces (so I reverted them back to the clean white).  The fur of the rabbit is quite heavily textured, so I decided to paint it in a fairly realistic coloration through referencing Dürer's piece again but turning the colors just a little bit cooler in a nod to the azulejos theme and my own practice of using blue as a dominant color in my own work.

In deciding to paint it in naturalistic colors, though, I thought the two pieces wouldn't seem very related, so I figured I should do a bird - but a detachable bird, in case I ended up displaying the pieces separately as well or in case the bird didn't turn out so well.

I knew I wanted the bird to be in the azulejos color scheme, but I wasn't sure if I wanted to approximate an actual species/patterning like I did in the slider turtle shell design.  In the end, I decided the bird should be even more clearly a reference to the azulejos tiles; then there would be this strong representation in the bird and the eggs, a referential-but-also-naturalistic one in the turtle, and then an almost entirely naturalistic representation in the hare.

So here it is!  I also haven't accurately measured or titled it (though Young Hare will show up in the title somehow), but it is a mixed media ceramic sculpture including QCC, acrylic, and found branches.  Some of the photos below are of it in bright sunlight, so the cast shadows on the bird can be a little hard to parse, and all are against a brown/gray background which can make the branches difficult to differentiate too, but I will take photos of it in a white gallery space as well.

Cerdeira Village Residency Journal 3 - New Artwork!

When I woke up for my first morning in Cerdeira Village, I was still a little tired and quite sneezy - I thought I would escape from my Kansas allergies but there are apparently still plenty of plants I'm allergic to in Portugal!  I soon shook it off, though, and Julia and I made breakfast and started to get to know each other.  Next I went to set up my studio space; the atelier is downstairs and next door from the residency housing.  I took over two small pottery tables and a bigger workshop table and began working on my first piece.  

When I proposed my project for this very competitive residency, I took note of how ceramics-oriented the website was and my proposal was to make some fully 3D pieces out of QCC since of late I've been doing only relief work with QCC.  For my first sculpture, I decided I would create a slider turtle with branches growing atop its back supporting a nest.  I picked a turtle for a few reasons - 1) I'd sculpted two turtles a few years ago out of QCC but never felt I fully resolved their form and wanted to improve upon that work; 2) there is a multicultural myth that the world is supported on the back of a great turtle; 3) I hadn't seen very many animals in Portugal yet given that I'd only been there a couple days, but I had seen at least two different species of slider (red-eared and yellow-bellied) at the Estufa Fria in Lisbon.

I started the sculpture by carving a rough approximation of the shell out of styrofoam.  This was mostly to save on clay usage - I can only carry one bucket of it at a time due to the size and weight it occupies in my luggage, so I want to be smart in how I use it up - but also helps with the weight of the piece, which is important because I will have to ship my artworks back to the US and weight sharply increases the shipping costs.

Then I applied QCC in a relatively thin layer around the styrofoam and began to shape and detail it (hacking out bits of styrofoam as well if I needed to).  The shell took a lot longer than I thought it would to really shape properly; I did not finish it the first day.

I continued work the second and third days on the turtle.  After finally detailing the shell, I moved on to the head and feet.  I did them all separately so I could be very considered in my markmaking, and finally I assembled all the pieces and added a tail and other final detailing by the end of the third day.  I had planned to make the branches and nest out of the QCC as well, but I became enchanted by the local lichens that grow on the trees here and ended up pushing real branches into the turtle's back before curing the whole piece.

 Afterwards, I did add a nest and two eggs made out of QCC into the branches.

On the fourth and fifth days, I painted the turtle, nest, and eggs white.  I had got it into my head to reference the azulejos tiles so common to Portugal in the painting of the sculpture; the starting point was turning the natural light tan of the clay the bright white of the glazed tiles.  I had only brought one type of paint with me - my Golden OPEN Acrylics - which are great for normal painting needs but are really poor as a base coat due to their long dry time.  Here in Cerdeira Village, they seem to dry even slower - in fact, barely at all - and I ended up just going ahead and painting the turtle shell with an azulejos-inspired, painted-turtle-shell-based design on the sixth day here despite the shell still being faintly wet.  I also painted the eggs with a small decorative motif seen in the corners of some azulejos tiles.  The turtle and eggs took almost a week to dry, but aided by my eventual realization that I needed to put them outside in the sun to assist, they were handle-able by the time I needed to install them in their exhibition space the morning of June 2.

So here's the piece!  I haven't measured it yet, nor titled it (I've got some ideas mulling), but that will come.  It is a mixed media ceramic sculpture including 3P QuickCure Clay, acrylic, and found branches and lichens.

My New Mixed Media Relief of a Sloth

This is either finished or close to finished - I have a tendency to tweak works slightly for a number of days after the piece is "done."  

I'm naming it the closest English translation of the sloth's name: Pilgrim (Peregrina).

Pilgrim is 3P QuickCure Clay and acrylic on a 6x12" basswood panel.

Pilgrim.jpg

Exhibition Photos from La Maison Verte Residency at the Jardin Botanique de Marnay-sur-Seine

Here are a few images from the La Mason Verte June 2016 Artists in Residence Exhibition I had in the Jardin Botanique de Marnay-sur-Seine.  My exhibition was entitled Garden Lore.  The door, obviously, is permanently installed, and was about 20 feet away from the display area I used for the rest of my pieces.  Note how the garden staff tidied up the door's surrounding area for the exhibition and added a permanent sign with my details on it!  Two of the photos below (the ones with a bit of an apricot tint) were taken by photographer Abril M. Barruecos.

La Maison Verte - Artwork 6

I was bound and determined to finish a sixth piece in time for the exhibition in the Jardin Botanique de Marnay-sur-Seine, and I did it just in time!  This is 3P Quick Cure Clay and acrylic on an 8x8" birch panel.  I'm calling it Climber